Useful Sensors and Mechanisms for Mobile Robots Timothy Martin Eric M. Schwartz
advertisement
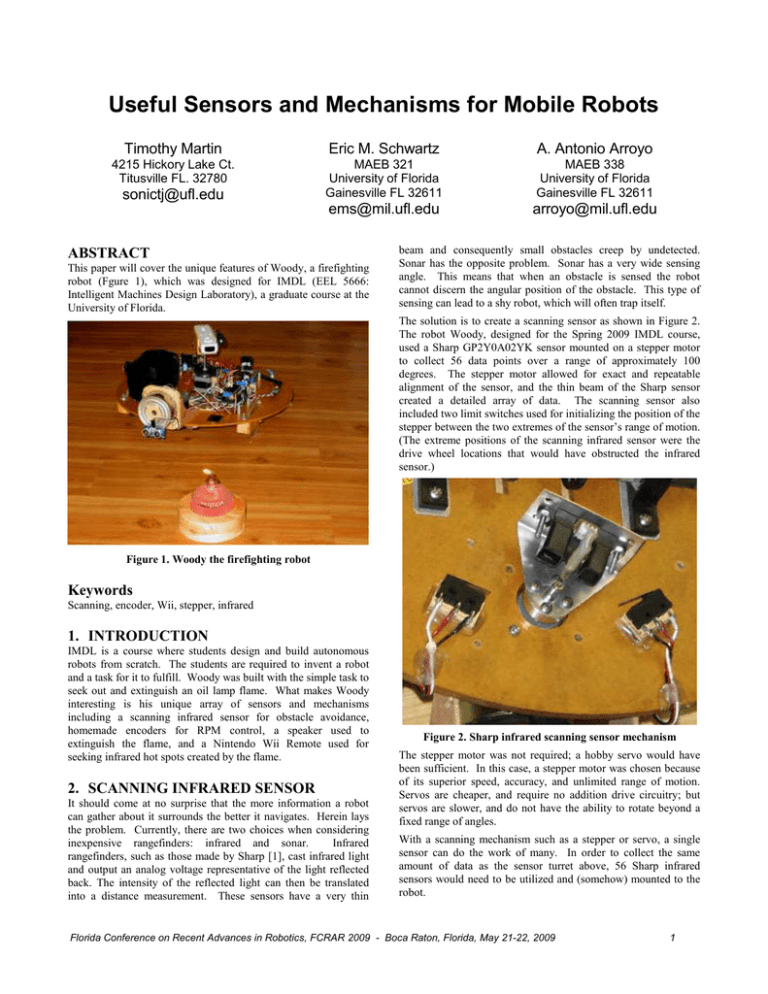
Useful Sensors and Mechanisms for Mobile Robots Timothy Martin Eric M. Schwartz A. Antonio Arroyo 4215 Hickory Lake Ct. Titusville FL. 32780 MAEB 321 University of Florida Gainesville FL 32611 MAEB 338 University of Florida Gainesville FL 32611 ems@mil.ufl.edu arroyo@mil.ufl.edu sonictj@ufl.edu ABSTRACT This paper will cover the unique features of Woody, a firefighting robot (Fgure 1), which was designed for IMDL (EEL 5666: Intelligent Machines Design Laboratory), a graduate course at the University of Florida. beam and consequently small obstacles creep by undetected. Sonar has the opposite problem. Sonar has a very wide sensing angle. This means that when an obstacle is sensed the robot cannot discern the angular position of the obstacle. This type of sensing can lead to a shy robot, which will often trap itself. The solution is to create a scanning sensor as shown in Figure 2. The robot Woody, designed for the Spring 2009 IMDL course, used a Sharp GP2Y0A02YK sensor mounted on a stepper motor to collect 56 data points over a range of approximately 100 degrees. The stepper motor allowed for exact and repeatable alignment of the sensor, and the thin beam of the Sharp sensor created a detailed array of data. The scanning sensor also included two limit switches used for initializing the position of the stepper between the two extremes of the sensor’s range of motion. (The extreme positions of the scanning infrared sensor were the drive wheel locations that would have obstructed the infrared sensor.) Figure 1. Woody the firefighting robot Keywords Scanning, encoder, Wii, stepper, infrared 1. INTRODUCTION IMDL is a course where students design and build autonomous robots from scratch. The students are required to invent a robot and a task for it to fulfill. Woody was built with the simple task to seek out and extinguish an oil lamp flame. What makes Woody interesting is his unique array of sensors and mechanisms including a scanning infrared sensor for obstacle avoidance, homemade encoders for RPM control, a speaker used to extinguish the flame, and a Nintendo Wii Remote used for seeking infrared hot spots created by the flame. 2. SCANNING INFRARED SENSOR It should come at no surprise that the more information a robot can gather about it surrounds the better it navigates. Herein lays the problem. Currently, there are two choices when considering inexpensive rangefinders: infrared and sonar. Infrared rangefinders, such as those made by Sharp [1], cast infrared light and output an analog voltage representative of the light reflected back. The intensity of the reflected light can then be translated into a distance measurement. These sensors have a very thin Figure 2. Sharp infrared scanning sensor mechanism The stepper motor was not required; a hobby servo would have been sufficient. In this case, a stepper motor was chosen because of its superior speed, accuracy, and unlimited range of motion. Servos are cheaper, and require no addition drive circuitry; but servos are slower, and do not have the ability to rotate beyond a fixed range of angles. With a scanning mechanism such as a stepper or servo, a single sensor can do the work of many. In order to collect the same amount of data as the sensor turret above, 56 Sharp infrared sensors would need to be utilized and (somehow) mounted to the robot. Florida Conference on Recent Advances in Robotics, FCRAR 2009 - Boca Raton, Florida, May 21-22, 2009 1 3. HOME MADE ROTARY ENCODERS rpm = max rpm (revolutions per minute) of the motor Another useful sensor that can be easily and cheaply made is a rotary encoder, as apposed to buying one for $30 or more. These sensors are excellent for monitoring the speed of motors, necessary for feedback for a PID controller. The IMDL robot implemented a PD controller for smooth and responsive movement of the robot. The PD controller also allowed the robot to maintain a rather straight path regardless of the terrain. gr = gear ratio cw = # of holes in the code wheels. The cost of each of the homemade encoders was $4; their performance was amazing. Each encoder consisted of photo interrupter (purchased from Sparkfun.com) and homemade codewheels affixed to the back shaft of the drive motors. Photo interrupters like the ones pictured in Figure 3 work like a switch that is toggled if an object (or a hole) passes between the arms of the device. In this case, holes were cut into the code wheels to generate a signal. The code wheels are pictured in Figure 4. The most important variables are rpm and the gear ratio because these are constants associated with the selected motor. The resolution dictates the precision of the speed (rpm) measurements. The sample period is the controller refresh rate. The number of code wheel holes required is therefore a function of the sample period and the resolution. It should also be noted that the 2 in the denominator is only valid when the interrupt driven by the encoder is change driven. If the interrupt was driven by a rising or falling edge, the denominator would not be multiplied by two. The motors on the IMDL robot had an speed of 150 rpm and a gear ratio of 80:1. The sample period selected for the controller was 50ms and the resolution was 200. The resulting number of code wheel holes was 10 (as shown in Figure 4). 3.1 PD controller The first step in creating the controller was to relate the PWM duty cycle to motor RPM. The microcontroller unit (MCU) was programmed to take this data then send it over its hardware USART. The USART was connected to a FTDI 232RL TTL to USB chip in order to send the data to Microsoft’s Hyper Terminal. Once there, the data was plotted in Microsoft’s Excel to generate an equation for PWM as a function of encoder ticks / 50ms (Figure 5). Right Motor Forward 300 Figure 3. Sparkfun photo interrupter [2] 250 PWM 200 150 100 50 0 0 20 40 60 80 100 120 140 160 180 200 Ticks / 50ms Figure 5. PWM VS. ticks / 50 ms Figure 4. Code wheels attached to the motors. There are some considerations when designing an encoder system. The following equation can be used to determine encoder and controller characteristics. sample _ period _ s res * 1 The next step was to build the PD controller and tune it with Hyper Terminal and Excel. This was achieved by running the motors for 10 seconds while taking data, and saving it to the internal flash of the MCU. After the 10 seconds, the data was sent to Hyper Terminal and graphed in Excel just as before. The end result after tuning was a controller with 0% overshoot, a 300 ms rise time, and a steady state error of less than 5% (Figure 6). , rpm * gr * 2 * cw 60 where sample_period = period the controller acquires data res = the maximum ticks read during the sample period Florida Conference on Recent Advances in Robotics, FCRAR 2009 - Boca Raton, Florida, May 21-22, 2009 2 Left Motor 60 Ticks / 50 ms 50 40 30 20 10 0 0 2 4 6 8 10 12 Time (s) Figure 6. PD controller output 4. A SPEAKER AS AN ACTUATOR The task for IMDL required a mechanism to extinguish a flame. The extinguisher had to be compact (to fit on the robot), simple (to minimize additional circuitry), and allow for an unlimited number of attempts to extinguish the flame. The first prototype was a rubber diaphragm attached to a rectangular box, with a hole (shown in Figure 7). The idea was to have a hobby servo pull back a hammer that would slam into the diaphragm. This would cause a sudden rush of air out of the box’s small hole. This gust of air would be used to extinguish the flame. This design proved too complicated mechanically and the design took up too much real estate on the robot platform. Figure 8. Focused speaker The second prototype was a focused speaker, shown in Figure 8. The principle was the same, but instead of a mechanical firing mechanism, the speaker just needed a voltage pulse. The speaker was fitted with a tin can to focus the air, and a hole for it to pass through. A 5W, 4Ω speaker was selected. A single Darlington transistor was used to drive the speaker from the MCU. During initial experiments, the speaker was fired as a single pulse, just like the mechanical diaphragm mentioned earlier; testing proved that that a blast of a constant frequency would be more effective. Further experiments showed that a lower frequency produced larger volumes of air, ample for blowing out an oil lamp. This was likely because a lower frequency allowed for a larger deflection of the speaker diaphragm. Another thought was to determine the resonant frequency of the tin can and to drive the speaker with a pulse at this rate. Unfortunately, there was not enough testing done to confirm that this hypothesis would improve the results. 5. NINTENDO WII REMOTE The Nintendo Wii Remote, shown in Figure 9, is filled with a variety of sensors. These sensors include a three-axis accelerometer, an infrared camera, and a handful of push buttons. Even better, the remote has come to be a hot ticket item for hackers because the device communicates over Bluetooth, and is relatively easy to interface with a personal computer (PC). The software used for this project was GlovePIE. GlovePIE is freeware software intended for gaming [3]. The program was originally intended for the P5 glove and has since come to support many other devices including the Nintendo Wii Remote. GlovePIE is a scripting program that enables the user to map the functions of input devices to functions of their PC, such as keyboard presses, and mouse movement. Figure 7. Mechanical extinguisher Florida Conference on Recent Advances in Robotics, FCRAR 2009 - Boca Raton, Florida, May 21-22, 2009 3 conditions, but more testing would be necessary to verify the cause of this problem. The communication to the remote was also a little shaky, but neither problems seemed to hinder Woody’s overall performance. The only real problem was the air conditioning system in the testing arena. If the flame was blown around Woody had trouble aiming accurately. Also the flame was occasionally judged to be out when it flickered in the wind. 8. FUTURE WORK Future research for the scanning sensor would be to put multiple infrared sensors on the same turret to increase the amount of data taken at once. This could serve to also slow down the data collection period to the datasheet specified time for the sensors. The encoders could be upgraded to quadrature so that direction could be sensed. The encoders would also benefit from shielding. The phototransistors tend to pick up infrared from sunlight. Figure 9. Nintendo Wii Remote [6] For this project, the robot made use of the Wii remote’s infrared camera to track the flame of the oil lamp and to transmit the flame’s position back to the robot. This was achieved by using a plug-in called PPJOY [4] (Parallel Port Joystick) to create a fake joystick that Windows recognizes as a hardware device. The joystick was mapped with the horizontal position of the Wii Remotes infrared center of mass calculation. Once the data was converted, another program called Processing was used to send the joystick data to the robot’s MCU over a separate Bluetooth connection. Processing [5] is used for its ability to send data over virtual com ports such as those created by a Bluetooth serial port. Turing the Wii Remote’s data into a joystick was simply a way of allowing both programs to communicate. Once the data was sent over the Bluetooth line to the MCU, the robot was able to center itself in front of the flame. 7. CONCLUSION The robot design, construction, and deployment was a huge success. The scanning infrared sensor worked very well. It was the only sensor on the front of Woody that prevented him from ramming into obstacles. This is especially impressive when considering that Woody has a 16-inch round frame. The only possible issue could be that the Sharp sensor was not allowed its response time, quoted by the data sheet [1], between data collections. The encoders worked brilliantly, as did the PD controller. The robots movements were extremely smooth and accurate. This was most noticeable when Woody drove toward the flame. There were no jerky movements as Woody closed in on his target while constantly aligning himself. The process was entirely graceful. The speaker functioned perfectly until the battery voltage began to diminish. After 10 or so fire extinguishing missions, Woody would often fail to extinguish the flame with his first attempt. The speaker currently only runs at half it rated wattage due to a math error when calculating what value resistors should be placed in series with the speaker. The circuitry was left alone because the system worked. The Wii remote could definitely use more research. C# may be able to replace the GlovePIE and Processing combo. This would simplify and possibly improve the performance of the sensor. 9. ACKNOWLEDGMENTS Thank you to Carl Kenner for his creation GlovePIE, and to Ben Fry and Casey Reas for Processing. Those two freeware programs made this project possible. 10. REFERENCES [1] “GP2Y0A02YK Optoelectronic Device,” http://document.sharpsma.com/files/GP2Y0A02YK-DATASHEET.PDF [cited 2009 Jan 09], 2006. [2] “Breakout Board for Photo Interrupter CNZ1120,” http://www.sparkfun.com/commerce/product_info.php? products_id=203 [cited 2009 April 02]. [3] Kenner, Carl “GlovePIE,” http://carl.kenner.googlepages.com/glovepie [cited 2009 February 15], 2009. [4] Westhuysen, Deon van der, “PPJOY” http://www.geocities.com/deonvdw/PPJoy.htm [cited 2009 February 15], 2009. [5] Fry, Ben and Reas, Casey “Processing,” http://processing.org/ [cited 2009 February 15], 2009. [6] “Wiimote,” http://www.etc.cmu.edu/projects/ wiixercise/images/wiimote.jpg [cited 2009 April 02], 2009. The Wii Remote also did its job, but it seemed to act a tad inconsistent. This may have been due to different lighting Florida Conference on Recent Advances in Robotics, FCRAR 2009 - Boca Raton, Florida, May 21-22, 2009 4
