Tissue Tracker Cheat Sheet
advertisement
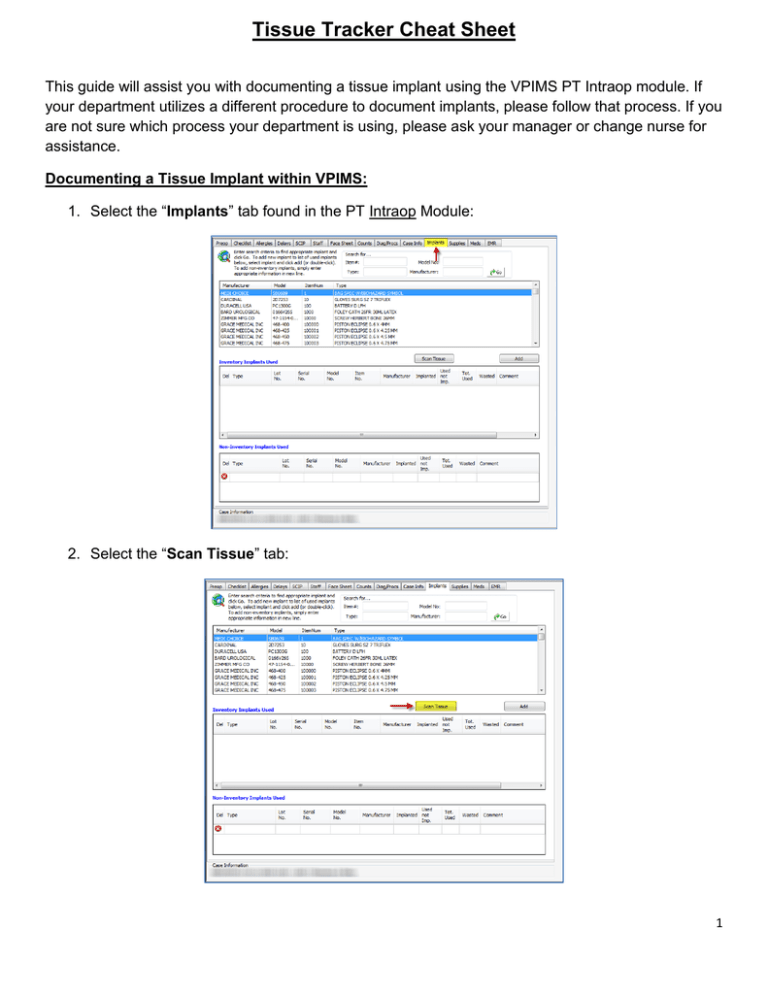
Tissue Tracker Cheat Sheet This guide will assist you with documenting a tissue implant using the VPIMS PT Intraop module. If your department utilizes a different procedure to document implants, please follow that process. If you are not sure which process your department is using, please ask your manager or change nurse for assistance. Documenting a Tissue Implant within VPIMS: 1. Select the “Implants” tab found in the PT Intraop Module: 2. Select the “Scan Tissue” tab: 1 Tissue Tracker Cheat Sheet 3. When the “Scan/Enter Tissue ID” box appears, scan or enter the Tissue ID using one of the methods listed below: 4. The “Tissue Scan Details” box should now appear. Compare the information in the blue portion of the box with both the Tissue Receipt and the package containing the tissue. If this information does not match, obtain a new tissue and inform the manager, team leader, or charge nurse about the discrepancy. 2 Tissue Tracker Cheat Sheet 5. After verifying the tissue information and expiration date, complete the grey potion of the “Tissue Scan Details” box as shown below: Verify the package integrity. Complete the “Out of Storage” date/time and the “Implant” date/time. These times cannot be the same. Verify the instructions were attached. Complete the “Package Temperature” using either Fahrenheit or Celsius. The application will automatically convert the temperature to Celsius when saved. 3 Tissue Tracker Cheat Sheet Using the scroll down boxes, enter the “Responsible Circulator” and “Responsible Physician”. The names will NOT appear if the circulator and surgeon have NOT been entered under the “Staff” tab in the PT Intraop module. Verify the product was prepared using the manufacturer’s guidelines. Select the “Use Implant Solution Data for Next Scan” checkbox if you are implanting multiple tissues and using the same solution. This will save some fields for the next scanned tissue. Using the scroll down boxes, enter the “Prepared by - Tech” and “Prepared by - Circulator”. The names will NOT appear if the tech and circulator have NOT been entered under the “Staff” tab in the PT Intraop module. Enter the implant solution name, lot number and expiration date. The expiration date cannot be the same or prior to the implant date. If the product did not require a solution, select “N/A”. Select “IMPLANTED” if the tissue was implanted. Select “USED BUT NOT IMPLANTED” for implants placed into the patient and removed. Select “Wasted” if the implant was dropped, malfunctioned, opened in error, and not used on the patient in any manner. If either “USED BUT NOT IMPLANTED” or “WASTED” are selected, the reason must be typed in here. Select “Save and Close” to save the tissue information and return to the PT Intraop “Implants” tab Select “Save and Scan Next” if entering another tissue. 4 Tissue Tracker Cheat Sheet 6. After the “Tissue Scan Details” box has closed, the tissue will appear under the “Inventory Implants Used” section in BLUE text. This is different from non-tissue implants which appear in BLACK. The icon will identify tissue implants and is used to return to the “Tissue Scan Details” box. Tissue implant in BLUE text Non-tissue implant in BLACK text The icon will return the user to the “Tissue Scan Details” box. Using this icon is the only way to change the tissue disposition between “Implanted”, “Used not Implanted”, and “Wasted”. 7. The implant is now documented. DO NOT enter the tissue implant again by manually typing in the Model Number or Item Number. This causes problems with documentation! 8. Remember: This process only documents the tissue implant on the intraoperative record. You must follow the POU process to CHARGE for the implant. 5 Tissue Tracker Cheat Sheet Summary: 1. Always document a tissue implant using the “Scan Tissue” box located in the PT Intraop module. Ask your manager if your department is using a different method. 2. The Tissue ID can be scanned using a scanner or manually entered with the keyboard. If you do not have a scanner, simply type in the Tissue ID. 3. Always check the expiration date on the tissue being implanted before opening the product. 4. Using the “Scan Tissue” box within the PT Intraop module will document the tissue was used, but does not charge for the product. You must use the POU application to charge for the tissue. 5. Once documented, the only way to change the tissue disposition is by selecting the When the “Tissue Scan Details” box appears, change the tissue disposition between “Implanted”, “Used not Implanted”, or “Wasted”. Select “Save and Close” to save the information. 6. Always charge for the tissue implant using the POU application icon. . 7. Do not document the tissue implant by typing in the model or item number. You must use the “Scan Tissue” box. 8. After documenting the tissue using the “Scan Tissue” Box, do not document the tissue a second time by typing in the model or item number. 6

