PORTFOLIO 6" and 7" Decorative Trims INSTALLATION INSTRUCTIONS
advertisement
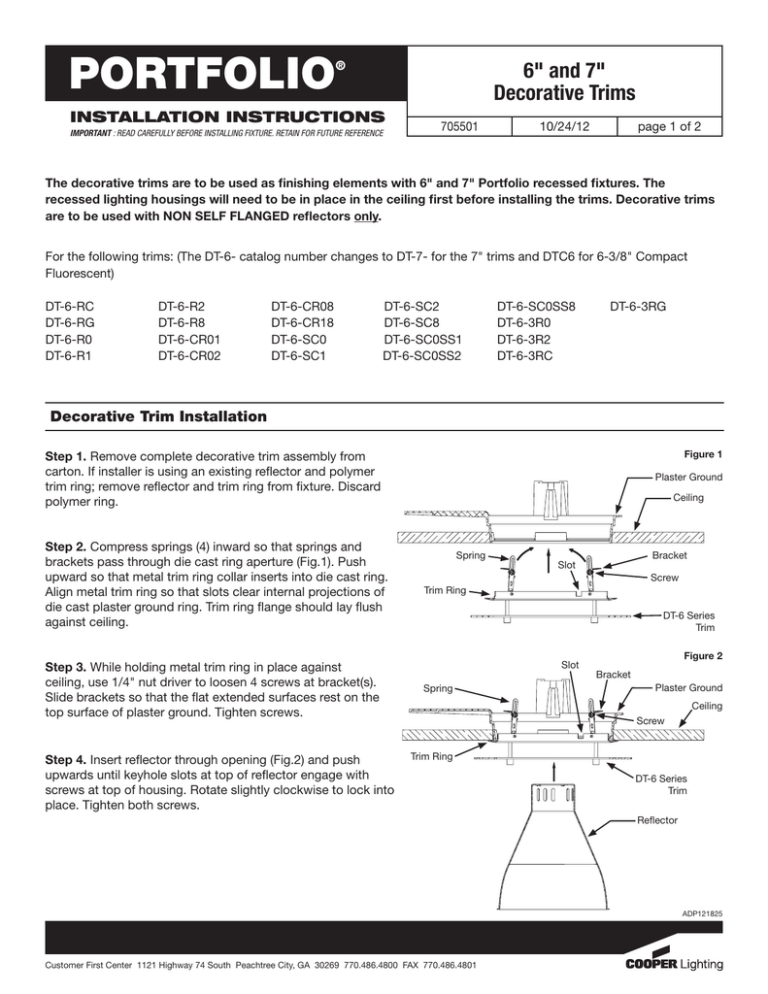
PORTFOLIO 6" and 7" Decorative Trims ® INSTALLATION INSTRUCTIONS IMPORTANT : READ CAREFULLY BEFORE INSTALLING FIXTURE. RETAIN FOR FUTURE REFERENCE 705501 10/24/12 page 1 of 2 The decorative trims are to be used as finishing elements with 6" and 7" Portfolio recessed fixtures. The recessed lighting housings will need to be in place in the ceiling first before installing the trims. Decorative trims are to be used with NON SELF FLANGED reflectors only. For the following trims: (The DT-6- catalog number changes to DT-7- for the 7" trims and DTC6 for 6-3/8" Compact Fluorescent) DT-6-RC DT-6-RG DT-6-R0 DT-6-R1 DT-6-R2 DT-6-R8 DT-6-CR01 DT-6-CR02 DT-6-CR08 DT-6-SC2 DT-6-SC0SS8DT-6-3RG DT-6-CR18DT-6-SC8 DT-6-3R0 DT-6-SC0 DT-6-SC0SS1DT-6-3R2 DT-6-SC1 DT-6-SC0SS2DT-6-3RC Decorative Trim Installation Figure 1 Step 1.Remove complete decorative trim assembly from carton. If installer is using an existing reflector and polymer trim ring; remove reflector and trim ring from fixture. Discard polymer ring. Step 2.Compress springs (4) inward so that springs and brackets pass through die cast ring aperture (Fig.1). Push upward so that metal trim ring collar inserts into die cast ring. Align metal trim ring so that slots clear internal projections of die cast plaster ground ring. Trim ring flange should lay flush against ceiling. Step 3.While holding metal trim ring in place against ceiling, use 1/4" nut driver to loosen 4 screws at bracket(s). Slide brackets so that the flat extended surfaces rest on the top surface of plaster ground. Tighten screws. Step 4.Insert reflector through opening (Fig.2) and push upwards until keyhole slots at top of reflector engage with screws at top of housing. Rotate slightly clockwise to lock into place. Tighten both screws. Plaster Ground Ceiling Spring Bracket Slot Screw Trim Ring DT-6 Series Trim Slot Spring Figure 2 Bracket Plaster Ground Ceiling Screw Trim Ring DT-6 Series Trim Reflector ADP121825 Customer First Center 1121 Highway 74 South Peachtree City, GA 30269 770.486.4800 FAX 770.486.4801 PORTFOLIO 6" and 7" Decorative Trims ® INSTALLATION INSTRUCTIONS IMPORTANT : READ CAREFULLY BEFORE INSTALLING FIXTURE. RETAIN FOR FUTURE REFERENCE 705501 10/24/12 page 2 of 2 For the following trims: DT-6-LF0 DT-6-R2F0 DT-6-CR02F0DT-6-SC1F0 DT-6-SC0SS1F0 DT-6-LF1 DT-6-R2F1 DT-6-CR08F0DT-6-SC2F0 DT-6-SC0SS2F0 DT-6-R0F0DT-6-R8F0DT-6-CR18F0 DT-6-SC2F1 DT-6-SC0SS8F0 DT-6-R0F1 DT-6-R8F1 DT-6-SC0F0DT-6-SC8F0DT-6-A0 DT-6-R1F0 DT-6-CR01F0 DT-6-SC0F1DT-6-SC8F1DT-6-L0 Follow STEP 1 Figure 3 Plaster Ground Step 2.While supporting the trim elements, remove the 4 knobs on the decorative trim. Carefully remove the acrylic and glass elements. (Fig.3) Follow STEPS 3 and 4 Bracket Spring Ceiling Screw Trim Ring Step 5.Insert glass and acrylic elements through the 4 posts extending down from the trim ring. Hold in place and tighten the 4 screws. Post Glass Element Knob ADP121825 Customer First Center 1121 Highway 74 South Peachtree City, GA 30269 770.486.4800 FAX 770.486.4801
