Trail Charger
Installation instructions and trouble shooting
Introduction
The following installation instructions and trouble shooting guide are meant for the Eaton Trail
Charger for trailer mounted lift gate applications (model #11020C11)
*
Installation instructions
1. The Trail Charger must be mounted inside the battery box or in a location free from
road spray and as close to the lift gate batteries as possible. The Trail Charger should
be oriented so the connector is horizontal with the indicator light easily visible. Eaton
warranty does not cover corrosion related issues.
2. The power wires should be routed following manufactures suggested installation
methods keeping all of the wiring protected.
3. Wire ties should be used to prevent wires from slacking. Keep slack to a minimum
between wires exiting the trailer wire channel and the Trail Charger mounting location.
4. Use rubber grommets wherever wires pass through holes cut into any type of material.
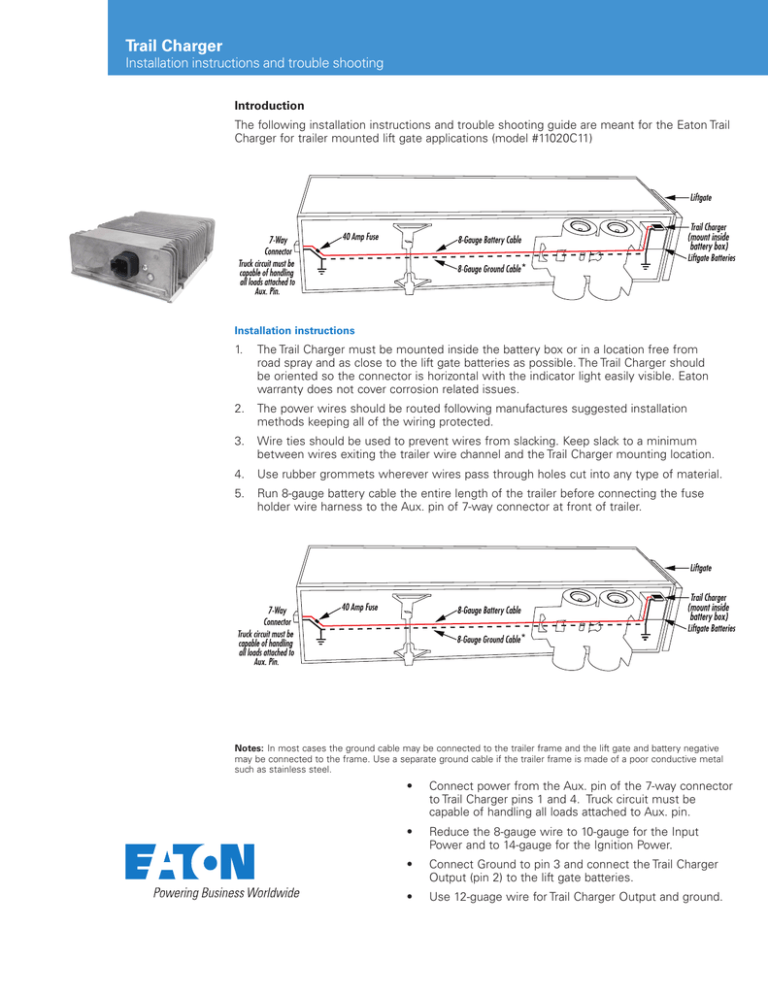
5. Run 8-gauge battery cable the entire length of the trailer before connecting the fuse
holder wire harness to the Aux. pin of 7-way connector at front of trailer.
*
NNotes: In most cases the ground cable may be connected to the trailer frame and the lift gate and battery negative
may be connected to the frame. Use a separate ground cable if the trailer frame is made of a poor conductive metal
such as stainless steel.
•
Connect power from the Aux. pin of the 7-way connector
to Trail Charger pins 1 and 4. Truck circuit must be
capable of handling all loads attached to Aux. pin.
•
Reduce the 8-gauge wire to 10-gauge for the Input
Power and to 14-gauge for the Ignition Power.
•
Connect Ground to pin 3 and connect the Trail Charger
Output (pin 2) to the lift gate batteries.
•
Use 12-guage wire for Trail Charger Output and ground.
Trouble shooting
The initial check should be to connect the trailer to a tractor or other
power supply and check to see if the power indicator light is on.
NNote: 7-way trailer connector must be plugged in and newer model tractors
require the key switch to be in the run position to provide power to the Aux.
pin. If the Aux. pin is not controlled with switched power, the tractor batteries
may discharge into the lift gate batteries, resulting in a no-start condition.
12V
If the power indicator is not on, unplug the 4-way connector and
check the inputs and outputs.
Pins #1 (input power) and #4 (ignition) - Both should read battery
voltage (with reference to ground) coming from the 7-way connector.
#1 #2
NNote: In this installation pins #1 and #4 have been paralleled in the wiring
harness.
lift gate
battery voltage
#4 #3
12V
Pin 1
Pin 2
Pin 3
Pin 4
Input power
Output
Ground
Ignition
Input connection
If power is not present at pin 1 and pin 4 of the Trail Charger input
connector be sure to check for power at the 7-way junction box
located at the front of the trailer. Check the fuses located inside the
junction box. If power is not present at the 7-way junction box check
the connector cord and the 7-way connector of the trailer.
Pins #2 (output) and #3 (ground) - You should be able to put your red
meter lead in #2 and your black meter lead in #3 and read the same
voltage as the lift gate batteries.
Output connection
If the voltage between pins #2 and #3 is not the same as the
voltage of the lift gate batteries, check the connection between the
Trail Charger and the batteries.
If power is present at the connector, plug connector back into Trail
Charger. The voltage at the lift gate batteries should begin to rise
(unless the batteries are shorted). The green LED should illuminate.
If it does not, the Trail Charger may be defective. Contact technical
support at Eaton at 800-845-6269 ext. 103 for assistance.
Fuse holder
Eaton
Controls and Power Conversion Division
10955 SW Avery Street
Tualatin, OR 97062
United States
Cooperbussmann.com/CPCD
Eaton.com
© 2014 Eaton
All Rights Reserved
Printed in USA
Publication No. SP180137C
March 2014
Eaton is a registered trademark.
All other trademarks are property
of their respective owners.


