Voltage Regulators
Service Information
Testing a Motor Capacitor on a Voltage Regulator
Procedure Instructions
S225-60-12
Contents
Product Information . . . . . . . . . . . . . . . . . . . . . . . . . . . 1
Safety Information �������������������������������������������������������� 2
Procedure Instructions . . . . . . . . . . . . . . . . . . . . . . . . . 3
Product Information
Introduction
Service Information S225-60-12 provides instruction for
testing a motor capacitor on a voltage regulator.
Refer to S225-11-1, CL-6 Series Control Installation,
Operation, and Maintenance Instructions and S225-1030, VR-32 Voltage Regulator with Quik-Drive Tap-Changer
Installation, Operation and Maintenance Instructions for
detailed service information on Cooper Power Systems
voltage regulators and controls.
!
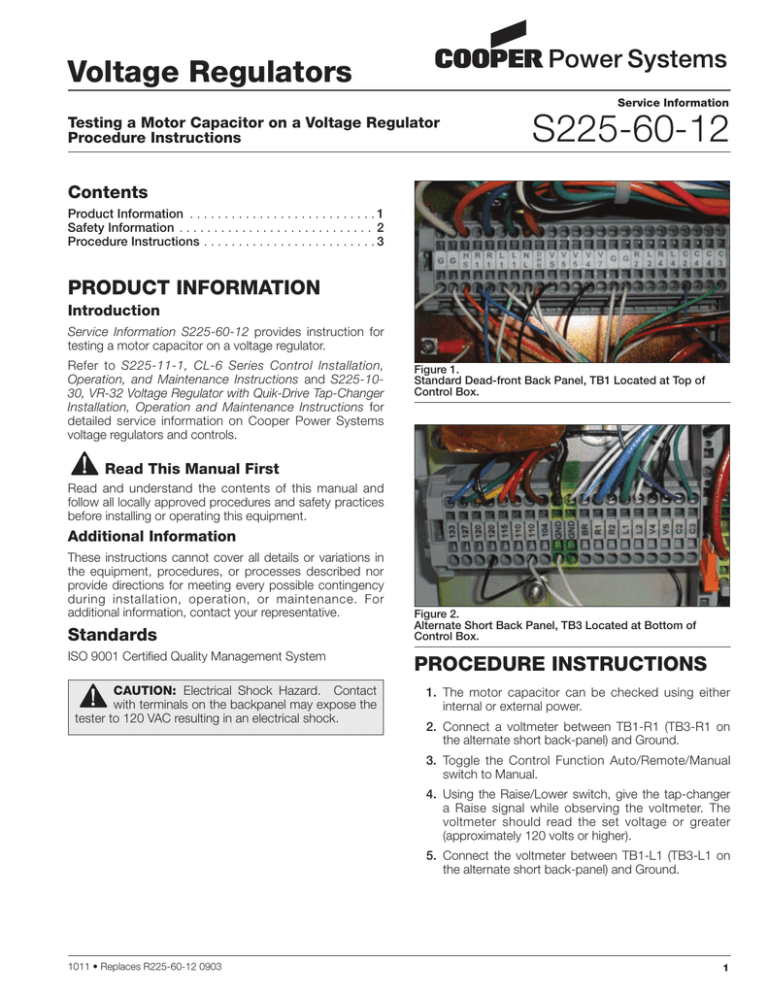
Figure 1.
Standard Dead-front Back Panel, TB1 Located at Top of
Control Box.
Read This Manual First
Read and understand the contents of this manual and
follow all locally approved procedures and safety practices
before installing or operating this equipment.
Additional Information
These instructions cannot cover all details or variations in
the equipment, procedures, or processes described nor
provide directions for meeting every possible contingency
during installation, operation, or maintenance. For
additional information, contact your representative.
Standards
ISO 9001 Certified Quality Management System
Caution: Electrical Shock Hazard. Contact
with terminals on the backpanel may expose the
tester to 120 VAC resulting in an electrical shock.
!
Figure 2.
Alternate Short Back Panel, TB3 Located at Bottom of
Control Box.
procedure instructions
1. The motor capacitor can be checked using either
internal or external power.
2. Connect a voltmeter between TB1-R1 (TB3-R1 on
the alternate short back-panel) and Ground.
3. Toggle the Control Function Auto/Remote/Manual
switch to Manual.
4. Using the Raise/Lower switch, give the tap-changer
a Raise signal while observing the voltmeter. The
voltmeter should read the set voltage or greater
(approximately 120 volts or higher).
5. Connect the voltmeter between TB1-L1 (TB3-L1 on
the alternate short back-panel) and Ground.
1011 • Replaces R225-60-12 0903
1
Testing a Motor Capacitor on a Voltage Regulator Procedure Instructions
!
SAFETY
FOR LIFE
SAFETY FOR LIFE
!
SAFETY
FOR LIFE
Cooper Power Systems products meet or exceed all applicable industry standards relating to product safety. We actively
promote safe practices in the use and maintenance of our products through our service literature, instructional training
programs, and the continuous efforts of all Cooper Power Systems employees involved in product design, manufacture,
marketing and service.
We strongly urge that you always follow all locally approved safety procedures and safety instructions when working
around high-voltage lines and equipment and support our “Safety For Life” mission.
SAFETY Information
The instructions in this manual are not intended as a
sub­s titute for proper training or adequate experience
in the safe operation of the equipment described.
Only competent technicians, who are familiar with this
equipment should install, operate and service it.
A competent technician has these qualifications:
nIs thoroughly familiar with these instructions.
nIs trained in industry-accepted high- and low-voltage
safe operating practices and procedures.
nIs trained and authorized to energize, de-energize, clear,
and ground power distribution equipment.
nIs trained in the care and use of protective equipment
such as flash clothing, safety glasses, face shield, hard
hat, rubber gloves, clampstick, hotstick, etc.
Following is important safety information. For safe
installation and operation of this equipment, be sure to
read and understand all cautions and warnings.
Hazard Statement Definitions
This manual may contain four types of hazard
statements:
!
DANGER:
Indicates a hazardous situation which, if not
avoided, will result in death or serious injury.
!
WARNING:
Indicates a hazardous situation which, if not
avoided, could result In death or serious injury.
!
CAUTION:
Indicates a hazardous situation which, if not
avoided, could result in minor or moderate injury.
Caution: Indicates a hazardous situation which,
if not avoided, could result in equipment damage
only.
2
Safety Instructions
Following are general caution and warning statements that
apply to this equipment. Additional statements, related to
specific tasks and procedures, are located throughout the
manual.
!
DANGER:
Hazardous voltage. Contact with high voltage will
cause death or severe personal injury. Follow all
locally approved safety procedures when working
around high- and low-voltage lines and equipment.
!
WARNING:
Before installing, operating, maintaining, or testing
this equipment, carefully read and understand
the contents of this manual. Improper operation,
handling or maintenance can result in death, severe
personal injury, and equipment damage.
!
WARNING:
This equipment is not intended to protect human
life. Follow all locally approved procedures and
safety practices when installing or operating this
equipment. Failure to comply may result in death,
severe personal injury and equipment damage.
!
WARNING:
Power distribution and transmission equipment
must be properly selected for the intended
application. It must be installed and serviced
by competent personnel who have been trained
and understand proper safety procedures. These
instructions are written for such personnel and
are not a substitute for adequate training and
experience in safety procedures. Failure to properly
select, install or maintain power distribution and
transmission equipment can result in death, severe
personal injury, and equipment damage.
!
S225-60-12
SAFETY
FOR LIFE
6. Using the Raise/Lower switch, give the tap-changer
a Raise signal while observing the voltmeter. The
voltmeter should read the set voltage plus the
capacitive voltage and should be between 160
and 190 volts. If the voltmeter reads zero volts or
millivolts, the capacitor has failed open.
7. To recheck the results, connect the voltmeter
between TB1-L1 (TB3-L1 on the alternate short
back-panel) and Ground.
8. With the Auto/Remote/Manual switch on Manual,
give the tap-changer a Lower command using the
Raise/Lower switch while observing the voltmeter.
The voltmeter should read the set voltage or greater
(approximately 120 volts or higher).
Figure 3.
Legacy Back Panel, TB1 Located at Top of Control Box.
9. Connect the voltmeter between TB1-R1 (TB3-R1 on
the alternate short back-panel) and Ground.
10. Using the Raise/Lower switch, give the tap-changer
a Lower signal while observing the voltmeter. The
voltmeter should read the set voltage plus the
capacitive voltage and should be between 160
and 190 volts. If the voltmeter reads zero volts or
millivolts, the capacitor has failed open.
Note: If a voltage is present between R1 and Ground or
L1 and Ground that is more than millivolts without
giving a raise or lower signal, either the capacitor
or motor has failed shorted or there is some other
type of short or wiring problem. If a cause cannot
be found in the control panel or back panel, an
outage is required to remove the voltage regulator
from service.
Figure 4.
Control Panel Switches.
Contact your Cooper Power Systems representative to
request further assistance.
3
Testing a Motor Capacitor on a Voltage Regulator Procedure Instructions
!
SAFETY
FOR LIFE
© 2011 Cooper Industries. All Rights Reserved.
Cooper Power Systems is a valuable trademark of Cooper Industries in
the U.S. and other countries. You are not permitted to use the Cooper
Trademarks without the prior written permission of Cooper Industries.
One | www.cooperpower.com | Online
S225612 Rev. 0 (Replaces R225612 Rev. 0)
2300 Badger Drive
Waukesha, WI 53188 USA

