Chapter 6. Meeting 6, Controlling Gain and Processing Signals
6.1. Announcements
Mix Graph 3 due Wednesday
•
•
Audio materials for first Processing Report (due 7 March) will be released on Wednesday
6.2. Review Quiz 1
•
?
6.3. Amplitudes in Nature
•
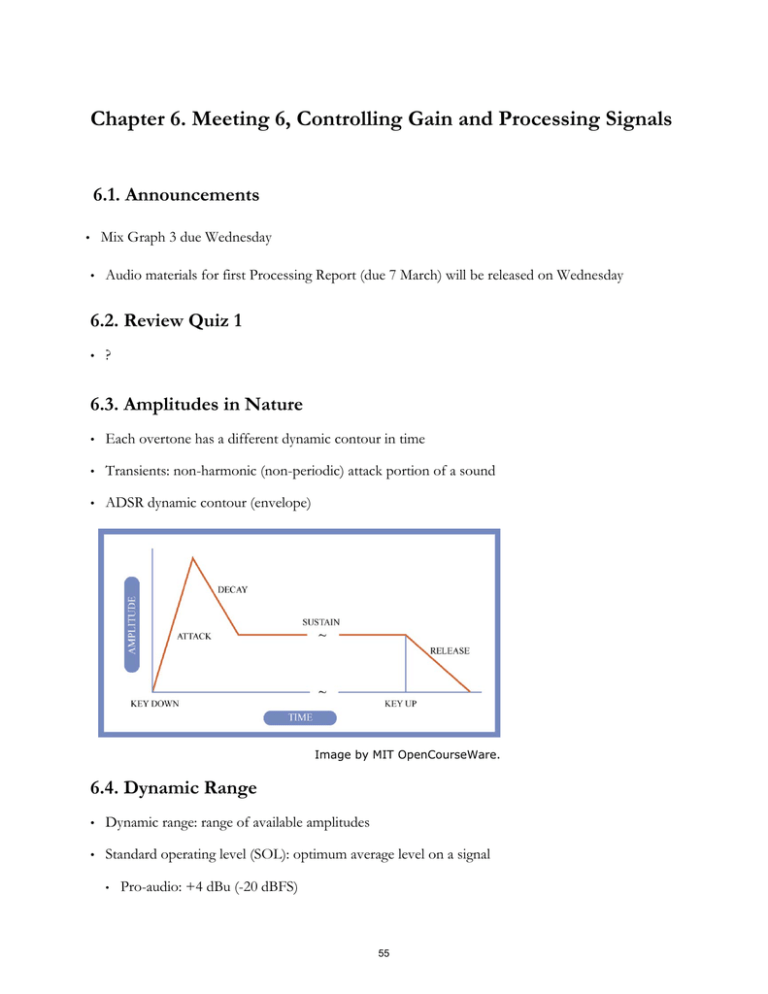
Each overtone has a different dynamic contour in time
•
Transients: non-harmonic (non-periodic) attack portion of a sound
•
ADSR dynamic contour (envelope)
Image by MIT OpenCourseWare.
6.4. Dynamic Range
•
Dynamic range: range of available amplitudes
•
Standard operating level (SOL): optimum average level on a signal
•
Pro-audio: +4 dBu (-20 dBFS)
55
•
•
•
Commercial audio: -10 dBV (-7.8 dBu)
The maximum: peaking, clipping, saturation, overload, distortion, maximum output level (MOL)
•
As a sine wave is clipped, it becomes a square wave
•
Clipping adds harmonics
•
Example: processorsDistortion.pd
The minimum: noise floor
Distortion
Headroom
Signal-to-Noise
(S/N) Ratio
Dynamic Range
0 VU
Noise
Operating levels of an electronic sound system or device. We want to work
above the noise floor and below the point of distortion.
Image by MIT OpenCourseWare.
•
Signal to noise ratio
•
Peak to average ratio
56
Graph removed due to copyright restrictions.
Illustration of peak level vs. average level in a sound wave.
See Fig. 11.4 in Thompson, D. M. Understanding Audio.
Hal Leonard Corp., 2005.
•
Headroom: space between SOL and clipping (20 dB is standard)
6.5. Amplitude Meters
•
A simple measure of signals power
•
Potentially misleading
•
Many varieties
•
Considerations when evaluating amplitude meters
•
Peak or average?
•
Units in dB or something else?
•
Negative and/or positive values?
•
Where is 0 dB and what does it mean?
•
What is negative infinity?
6.6. dB Meters
•
dBu Meters: negative infinity to +24 dBu (sometimes 20 dBu)
•
dBFS Meters: negative infinity to 0 dBFS
57
•
dB SPL Meters: 0 to 120 dB SPL
•
Comparisons
•
+4 dBu = -20 dBFS (sometimes -16 to -18 dBFS)
•
-10dBV is equivalent to -7.8 dBu
6.7. VU and RMS Meters
•
Root Mean Square (RMS): an average
•
Mathematical average
+
Amplitude (volts)
Peak Level
rms Level
Time (ms)
_
The relationship between peak and rms levels, for a typically complex sound signal.
Image by MIT OpenCourseWare.
•
Average the square of a number (or a window) of samples, then take the square root
•
RMS of a square wave is greater than that of a sine wave
58
Square Wave
Sine Wave
Peak (1.0)
Peak, rms and
average all 1.0
rms (0.707)
Average (0.637)
For a square wave, the peak, rms, and average level are equal.
For a sine wave, the rms and average levels are lower.
Image by MIT OpenCourseWare.
•
Volume Units (VU): an average
Meter images © source unknown. All rights reserved. This content is excluded from our
Creative Commons license. For more information, see http://ocw.mit.edu/fairuse.
•
•
0 VU is equal to +4 dBu or 1.228 V RMS for a sine wave
•
0 VU is equal to -20 dBFS (sometimes -18 to -16 dBFS)
•
Change in 1 VU may be 1 dB change
•
Integrates 300 msec of change
•
Peak may be as much as 15 dB (8 to 20 dB) higher than VU reading
Peak Program Meter (PPM)
59
Meter images © source unknown. All rights reserved. This content is excluded from our
Creative Commons license. For more information, see http://ocw.mit.edu/fairuse.
•
Scale from 1 to 7; each segment is 4 dB change
•
Faster attack time than VU meters (10 ms)
•
PPM 6 = 100% reading, +4 dBu = 0 VU
•
Adjusts after 10-12 ms
6.8. Meter Examples
60
Meter images © source unknown. All rights reserved. This content is excluded from our
Creative Commons license. For more information, see http://ocw.mit.edu/fairuse.
61
Meter images © source unknown. All rights reserved. This content is excluded from our
Creative Commons license. For more information, see http://ocw.mit.edu/fairuse.
62
Meter images © source unknown. All rights reserved. This content is excluded from our
Creative Commons license. For more information, see http://ocw.mit.edu/fairuse.
63
Meter images © source unknown. All rights reserved. This content is excluded from our
Creative Commons license. For more information, see http://ocw.mit.edu/fairuse.
64
•
Meter images © source unknown. All rights reserved. This content is excluded from our
Creative Commons license. For more information, see http://ocw.mit.edu/fairuse.
65
Meter images © source unknown. All rights reserved. This content is excluded from our
Creative Commons license. For more information, see http://ocw.mit.edu/fairuse.
66
Meter images © source unknown. All rights reserved. This content is excluded from our
Creative Commons license. For more information, see http://ocw.mit.edu/fairuse.
67
Meter images © source unknown. All rights reserved. This content is excluded from our
Creative Commons license. For more information, see http://ocw.mit.edu/fairuse.
6.9. Changing Amplitudes
•
Pre-amp (trim): amplifier with a wide range of gain (0 to 60 dB) designed for bringing very quite
signals up to SOL
•
Power amp: amplifier for a taking a signal from SOL to a high-powered signal necessary to drive
speakers
•
Pad (attenuator): reduces gain by a fixed amount with a switch (-6 dB, -20 dB)
•
Fader: scales a signal at SOL: unity (no change), boost +10 dB, attenuate to -infinity dB
•
Direct Box: convert from -10 dBV to +4 dBu
6.10. Gain Staging
•
Every signal goes through numerous amplifiers from source to destination
•
Each amplifier is a gain stage
•
Each amplifier (and any process in between) adds noise (has its own noise floor)
•
Each gain stage, if above unity, can amplify the last gain stage’s noise floor
•
Optimal gain staging: first gain stage does all amplification; all subsequent gain stages are at unity
•
Optimal gain staging: as much as possible as early as possible
6.11. Gain Staging: Example
•
Inserting a device with a poor signal to noise ratio can degrade the entire signal path
68
© Hal Leonard Corporation. All rights reserved. This content is excluded from our
Creative Commons license. For more information, see http://ocw.mit.edu/fairuse.
Source: Thompson, D. M. Understanding Audio. 2005
6.12. Level Setting: Principles
•
The essential first step when working with an input
•
Mantra: as much as possible as early as possible
•
Optimizes signal to noise ratio with ideal gain-staging
69
6.13. Level Setting: Procedure
•
Reset, clear, and zero all controls (set trim at minimum)
•
Connect or select input
•
Set meters (if necessary) to display only the trim gain stage and skip other gain stages
•
On some mixers, this may mean engaging SOLO
•
On some mixers, this may mean engaging Pre-fader listen (PFL) SOLO
•
Must get typical material from the source (musician, device, et cetera)
•
Raise the trim slowly
•
Find amplitude peaks and estimate average peaks with meters
•
Continue to raise the trim until average peaks are at +4 dBu (-20 dBFS, 0 VU)
6.14. Level Setting: Example
•
Tascam HD-P2 portable recorder
© TASCAM. All rights reserved. This content is excluded from our Creative
Commons license. For more information, see http://ocw.mit.edu/fairuse.
6.15. Level Setting: Example
•
Avalon AD 2022 preamp
70
© Avalon Industries, Inc. All rights reserved. This content is excluded from our Creative
Commons license. For more information, see http://ocw.mit.edu/fairuse .
6.16. Level Setting: Example
•
Mackie 1604 VLZ3
71
© LOUD Technologies, Inc. All rights reserved. This content is excluded from our
Creative Commons license. For more information, see http://ocw.mit.edu/fairuse.
72
6.17. Automation: Fader Levels
•
Automating fader levels in a DAW
•
Live: under Mixer, select Track Volume
Double click to add / remove points
Can view view on waveform or in separate lane
Courtesy of Ableton AG. Used with permission.
6.18. Panning Amplifiers: Linear
•
Take a signal, split into two signals, and inversely vary amplitudes
•
A fader that as one turns up, the other turns down
•
A bad approach (1 is left, 0.5 is middle, 0 is right)
L == (1 - x)
R == x
73
6.19. Panning Amplifiers: Non-Linear
•
Must reduce amplitude in center to reduce increase in loudness
•
Reduction between 3 dB and 4.5 dB
Graph of Panpot Output
1.0
Left Output
Right Output
Relative Output
-3 to -4.5 dB
Left
-90o
Center
Right
o
+90
o
0
Image by MIT OpenCourseWare.
6.20. Automation: Stereo Panning
•
Automating pan position in a DAW
74
•
Live: under Mixer, select Track Panning
Double click to add / remove points
Can view view on waveform or in separate lane
Courtesy of Ableton AG. Used with permission.
75
MIT OpenCourseWare
http://ocw.mit.edu
21M.380 Music and Technology: Recording Techniques and Audio Production
Spring 2012
For information about citing these materials or our Terms of Use, visit: http://ocw.mit.edu/terms.


