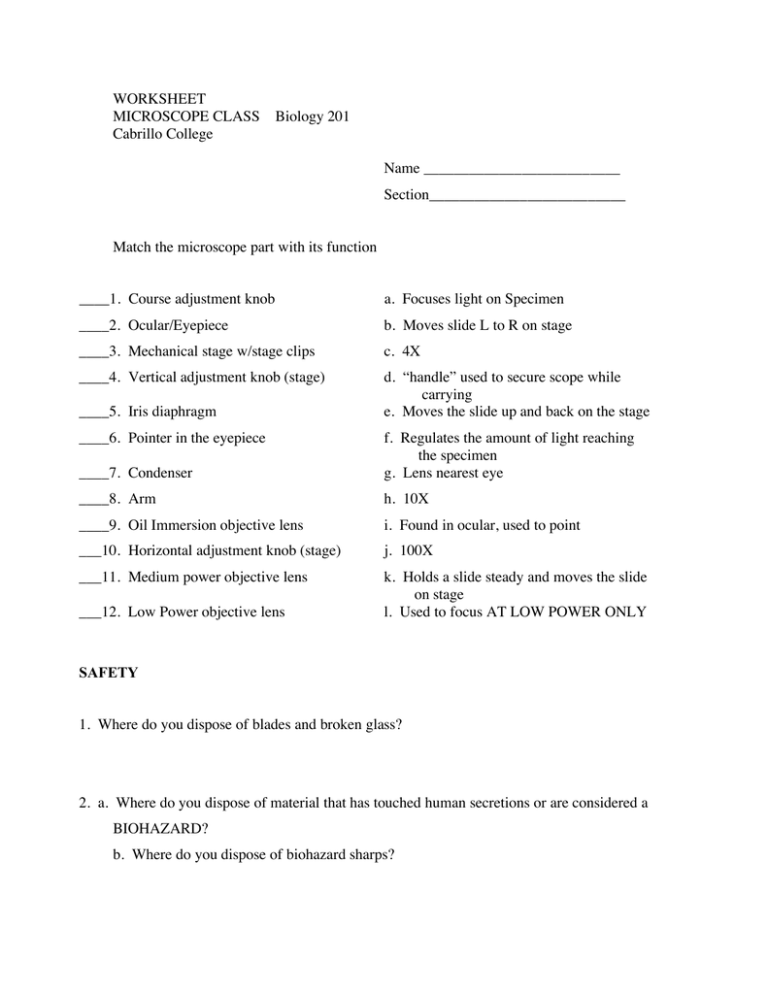
WORKSHEET MICROSCOPE CLASS Biology 201 Cabrillo College
advertisement

WORKSHEET MICROSCOPE CLASS Cabrillo College Biology 201 Name __________________________ Section__________________________ Match the microscope part with its function ____1. Course adjustment knob a. Focuses light on Specimen ____2. Ocular/Eyepiece b. Moves slide L to R on stage ____3. Mechanical stage w/stage clips c. 4X ____4. Vertical adjustment knob (stage) d. “handle” used to secure scope while carrying e. Moves the slide up and back on the stage ____5. Iris diaphragm ____6. Pointer in the eyepiece ____7. Condenser f. Regulates the amount of light reaching the specimen g. Lens nearest eye ____8. Arm h. 10X ____9. Oil Immersion objective lens i. Found in ocular, used to point ___10. Horizontal adjustment knob (stage) j. 100X ___11. Medium power objective lens k. Holds a slide steady and moves the slide on stage l. Used to focus AT LOW POWER ONLY ___12. Low Power objective lens SAFETY 1. Where do you dispose of blades and broken glass? 2. a. Where do you dispose of material that has touched human secretions or are considered a BIOHAZARD? b. Where do you dispose of biohazard sharps? 3. In case of fire, a flame burning that is under 1 meter2 in area prompts what response? 4. When should you use the safety shower? 5. Should you wait for an instructor to use the First Aid kit? 6. Why is it important that all food and drink be left outside the lab? 7. What is appropriate dress for the lab? OBSERVING PREPARED SLIDES LETTER ‘e’ 1. The image of the letter e is inverted somehow. What does it look like? 2. Does it matter that all images under the scope are inverted? Explain. 3. What does parfocal mean? MEASURING 4. Your interpupillary distance (distance between your pupils) for the compounds scope is____________________. 5. Your diopter adjustment sets the ring at ______________________. (Settings are in the following range: -2, -1, 0, 1, 2 COLORED THREADS 6. What is meant by depth of field? 7. Color of uppermost thread________________, middle thread_____________, lower thread_________________. (Not all slides are the same) 8. What are two ways to adjust light? 9. Which of the two ways above is most helpful for focusing on the threads? WET MOUNT 10. Draw the wet mount of Elodea cells at 40X and at 100X. Draw at least 5 cells. Include chloroplasts, cell membranes and cell walls. 11. Draw one cell that illustrates what happens when NaCl is added to the leaf. Include chloroplasts, the cell membrane and the cell wall. 12. What light adjustment allows for better viewing of the Elodea specimen? CHEEK CELLS (This is a biohazard!) 13. Draw cheek cells at 40X and 100X. Draw at least 5 cells. HUMAN BLOOD SMEAR 15. Draw some red blood cells (10 at least) and two white blood cells as seen with the oil immersion objective lens. 16. What light adjustment allows for better viewing of the blood cells? 17. What must be done to the oil immersion objective when you have finished observing the slide? 18. What must be done to the slide before returning it to the tray? 19. There are three kinds of paper commonly used in our Biology labs. Indicate the function of each. a. Lens paper _________________________________________ b. Kim wipes _________________________________________ c. Bibulous paper ______________________________________ 20. At what magnification may you use the gross focus? (This question worth 5,000 points) LAB CLEAN UP 1. What does the colored number taped onto your microscope indicate? 2. Scopes returned to their shelves should have the arm facing in or out? (Circle the correct answer) 3. What should tables be cleaned with? When should this be done? 4. Indicate the proper way to return your scope to the shelf. a. The stage should be ___________________________________. b. The _________________ objective lens should be in place. c. The cord should _____________________________________. d. The light should be __________________________________. e. The dimmer should be ________________________________. 5. Push your chair in. Wash and disinfect your desktop. Pack your trash. We hope you have fun in your Biology class! Parts of the Microscope Name: Biology Quick Reference Guide to Correct Microscope Usage 1). When carrying the microscope, put one hand on the arm/body tube and one hand under the base of the microscope. Pretend it is a baby and keep it close to your body. 2). Proper steps for all viewing: a. Lower the mechanical stage. b. Turn on the light and turn the voltage up. c. Rotate the nosepiece to the 4X objective, if it is not already in position. d. Center the slide on the stage. e. Raise the stage to the highest point. f. Focus by lowering the stage down, not up. g. Increase the magnification. h. Focus with the fine focus adjustment knob only. 3). Always clean the slides before and after use. 4). Only use lens paper on the microscope lenses. 5). Proper steps for putting away the microscopes: a. Rotate the nosepiece to the 4X objective, but not by going through the oil immersion lens. b. Lower the stage completely. c. Turn down the light source using the voltage control dial. d. Turn the light source off. e. Remove the slide. f. Clean the slide g. Clean off oil immersion lens with lens paper. h. Place the microscope into the cabinet with the eyepieces facing AWAY from you and in the correct numbered spot. 6). When in doubt, always ask your instructor how to use the microscope, especially when using the oil immersion lens.

