Setting Up Your DocuSign Signature Option 1: Via the Signing Process
advertisement

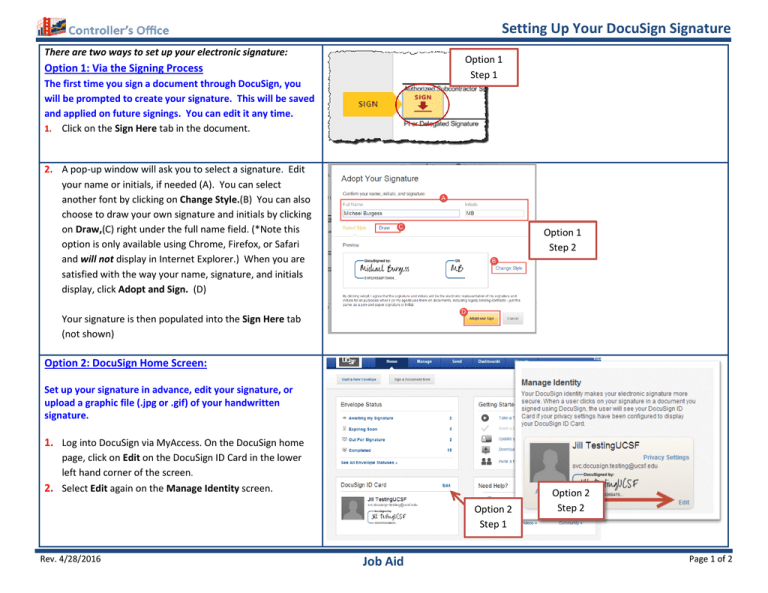
Setting Up Your DocuSign Signature There are two ways to set up your electronic signature: Option 1 Step 1 Option 1: Via the Signing Process The first time you sign a document through DocuSign, you will be prompted to create your signature. This will be saved and applied on future signings. You can edit it any time. 1. Click on the Sign Here tab in the document. 2. A pop-up window will ask you to select a signature. Edit your name or initials, if needed (A). You can select another font by clicking on Change Style.(B) You can also choose to draw your own signature and initials by clicking on Draw,(C) right under the full name field. (*Note this option is only available using Chrome, Firefox, or Safari and will not display in Internet Explorer.) When you are satisfied with the way your name, signature, and initials display, click Adopt and Sign. (D) Option 1 Step 2 Your signature is then populated into the Sign Here tab (not shown) Option 2: DocuSign Home Screen: Set up your signature in advance, edit your signature, or upload a graphic file (.jpg or .gif) of your handwritten signature. 1. Log into DocuSign via MyAccess. On the DocuSign home page, click on Edit on the DocuSign ID Card in the lower left hand corner of the screen. 2. Select Edit again on the Manage Identity screen. Option 2 Step 1 Rev. 4/28/2016 Job Aid Option 2 Step 2 Page 1 of 2 Setting Up Your DocuSign Signature 3. Select Edit on the Manage Signatures screen, for the signature that you wish to edit. Step 3 4. You can change the font or upload a file. To upload a graphic file of your handwritten signature, select upload. You can upload a .gif, .jpg, or other graphic file; note that you will also need to upload an image of your initials. Step 4 More information available on the Controller’s Office website: http://controller.ucsf.edu/buying_paying/ © Regents of the University of California (Do not modify or reproduce without permission) Rev. 4/28/2016 Job Aid Page 2 of 2

