JOURNAL HEWLETT- PAC K ARD
advertisement
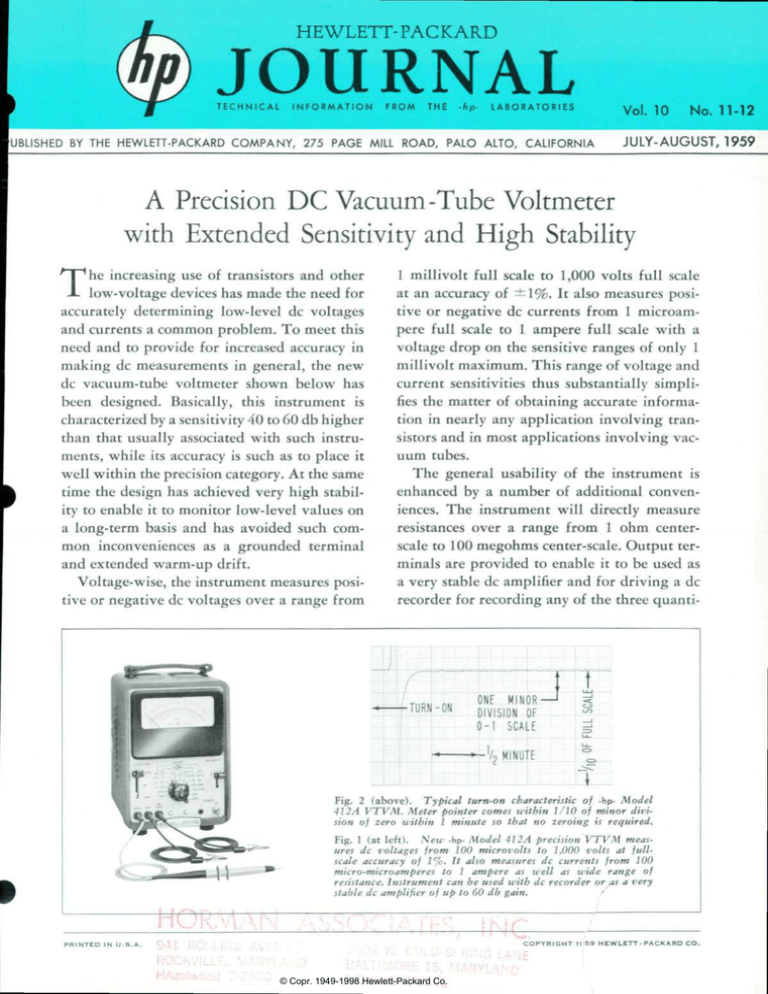
HEWLETT- PAC K ARD JOURNAL T E C H N I C A L I N F O R M A T I O N F R O M T H E - h p - L A B O R A T O R I E S Vol.10 No. 11-12 UBLISHED BY THE HEWLETT-PACKARD COMPANY, 275 PAGE MILL ROAD, PALO ALTO, CALIFORNIA JULY- AUGUST, 1959 A Precision DC Vacuum -Tube Voltmeter with Extended Sensitivity and High Stability The increasing use of transistors and other low- voltage devices has made the need for accurately determining low-level dc voltages and currents a common problem. To meet this need and to provide for increased accuracy in making dc measurements in general, the new dc vacuum-tube voltmeter shown below has been designed. Basically, this instrument is characterized by a sensitivity 40 to 60 db higher than that usually associated with such instru ments, while its accuracy is such as to place it well within the precision category. At the same time the design has achieved very high stabil ity to enable it to monitor low-level values on a long-term basis and has avoided such com mon inconveniences as a grounded terminal and extended warm-up drift. Voltage-wise, the instrument measures posi tive or negative dc voltages over a range from 1 millivolt full scale to 1,000 volts full scale at an accuracy of ±1%. It also measures posi tive or negative dc currents from 1 microam pere full scale to 1 ampere full scale with a voltage drop on the sensitive ranges of only 1 millivolt maximum. This range of voltage and current sensitivities thus substantially simpli fies the matter of obtaining accurate informa tion in nearly any application involving tran sistors and in most applications involving vac uum tubes. The general usability of the instrument is enhanced by a number of additional conven iences. The instrument will directly measure resistances over a range from 1 ohm centerscale to 100 megohms center-scale. Output ter minals are provided to enable it to be used as a very stable dc amplifier and for driving a dc recorder for recording any of the three quanti- TURN -ON ONE MINOR DIVISION OF 0-1 SCALE •\ MINUTE Fig. 2 (above). Typical turn-on characteristic of -hp- Model 412A VTVM. Meter pointer comes within 1/10 of minor divi sion of zero within 1 minute so that no zeroing is required. Fig. 1 (at left). New -hp- Model 412 A precision VTVM meas ures dc voltages from 100 microvolts to 1,000 volts at fullscale accuracy of 1%. It also measures dc currents from 100 micro-microamperes to 1 ampere as well as wide range of resistance. Instrument can be used with dc recorder or as a very stable dc amplifier of up to 60 db gain. P R I N T E D I N C O P Y R I G H T U . S . A . © Copr. 1949-1998 Hewlett-Packard Co. 1 ! 5 9 H E W L E T T - P A C K A R D C O . Fig. voltmeter period of record of Fig. 2 showing stability of new voltmeter for hour period following initial turnon. One meter vertical division on record equals only one minor division on meter face, i.e., 1/50 of full scale. ties of voltage, current, or resistance that the instrument measures. In con trast to most vacuum-tube instru ments, the input terminals are isolated de-wise from the chassis, a feature al most essential in making accurate lowlevel voltage measurements where dif ferences in ground potentials are other wise often a complicating factor. Other conveniences include a high discrimination against power-fre quency voltages and currents in the measured circuit, a mirror scale for accuracy in reading, a shout warm-up time, a penholder style voltage probe, and a special electrical arrangement of the test leads to assist in achieving ac curacy in measurements. STABILITY CONSIDERATIONS To achieve a truly convenient instru ment with a full-scale sensitivity of 1 millivolt and a factual accuracy of 1 % of full scale over a range of operating conditions imposes strict design re quirements as regards stability. The instrument's input circuit, for example, must not introduce instabilities larger than a fraction of 1% of 1 millivolt, i.e., not larger than a fraction of 10 microvolts, a value well within the range of potentials commonly produced by thermoelectric effects. Similarly, the amplifier portion of the instrument as well as the indicating circuitry includ ing the indicating meter itself all taken together must be stable within the re maining fraction of 1% over a range of operating conditions. In practice, it has been found necessary to refine the design of all three circuit sections to a considerable degree to meet such strict requirements. Further, if the required stability is achieved and the instrument's drift is maintained within 1% over the usual range of operating conditions, then the meter pointer will shift less than 1% of full scale over these conditions. With this fact in mind, the designer may ask whether the zero-set control traditional for dc instruments is ihen required. In the case of the Model 41 2 A, a high degree of stability has been achieved, and it has been deemed unnecessary to include a zero-set control on the in strument. The lack of need for this control is a convenience for all users but is an especial convenience where data are being taken by non-technical personnel, since accidental zeroing misadjustments are precluded. The decision to omit the zero control is based on stability typified by the data in Figs. 2 to 4. Fig. 2, for example, illus trates how rapidly the meter pointer comes to zero after turn-on for a "cold" instrument at room tempera ture. Note that the vertical scale is enormously expanded with one major division on the chart equal to but one minor division (2% of full scale) on the instrument's meter face. Well with in a minute after turn-on, the meter pointer is within 1/10 of a minor divi sion of zero. POST-WARMUP STABILITY As implied by such a rapid and monotonic pull-in of the meter pointer as indicated in Fig. 2 following the tran sients associated with initial turn-on, the zero drift thereafter is negligibly small. This is illustrated in Fig. 3 which is a continuation of the record in Fig. 2 except for a change in the time scale of the recorder. Fig. 3 thus shows a record of the zero drift and noise for approximately an hour following in strument turn-on. During this hour period, the meter pointer drift is con fined to an amount from 1/10 of a minor division on one side of zero to less than 1/10 of a minor division on the opposite side. By the end of the period recorded in Fig. 3, thermal equilibrium has oc curred within the instrument cabinet and further changes in zero position of the meter pointer are insignificant. | I28V-»" t I 115V 128V Fig. 4. Typical stability of new volt meter with large changes in line voltage. Vertical sensitivity is same as in previous recordings. LINE VOLTAGE STABILITY A large amount of feedback has been used in the instrument to assist in achieving the stabilities indicated above and to stabilize against the effects of normal changes in the Gm of the ampli fier tubes. As a result, 10% changes in line voltage have essentially no effect on the meter indication. This is demon strated in Fig. 4 which shows the effect on the zero position of the meter point er of large changes in line voltage when OUTPUT Fig. and de circuit arrangement of new voltmeter. Modulator and de modulator use photoconductive elements to obtain stable chopping without mechanical contacts. © Copr. 1949-1998 Hewlett-Packard Co. -TEST CLIP -TEST CLIP Fig. voltmeter. Meter size reproduction of meter face used on new voltmeter. Meter movement itself has very large torque-to-weight ratio to virtually eliminate functional effects. the instrument is set to its most sensi tive voltage range. Very large line changes such as from 115 to 128 volts or from 128 to 102 volts may produce a short transient deflection of the pointer, but otherwise the pointer re mains within 1/10 of a minor division of zero for these large changes. CIRCUITRY The general arrangement of the in strument's circuit is shown in Fig. 5. The design approach used to achieve stable amplification has been to use an ac-coupled amplifier together with a modulator and synchronous demodu lator composed of photoconductive elements. In this type of modulator and demodulator, an interrupted light beam falling on photoconductive elements provides a stable method of chopping and restoring the dc signal to obtain the advantages of chopping without the disadvantages of mechanical con tacts. * This method also readily permits the chopping to be done at a frequency other than power-line frequency so that pick-up effects are minimized. At the amplifier output the demodulator commutates the amplified chopped signal to a direct current whose level is proportional to the input signal. This level is then indicated by the meter and applied to the output terminal for ex ternal use. The basic stability achieved by this design approach is enhanced by a dc feedback path extending from the out put terminal to the modulator at the front of the system. A large amount of •This modulator/demodulator circuit is an adaptation of that developed for the -hpultra-sensitive dc Micro Volt-Ammeter which has a full-scale sensitivity of ±10 microvolts; see John M. Cage, "An Increased-Sensitivity Micro Volt-Ammeter using a Photoconductive Chopper," Hewlett-Packard Journal, Vol. 9, No. 7, March, 1958. feedback is used — 50 db — which is thus effective with equal force to all parts of the signal path except the input atten uator. The selective amplifier and filter are arranged to discriminate against power frequency components in the measured circuit as well as against possible com ponents at the amplifier operating fre quency (50 cps). The combination gives a discrimination against power frequencies such that a power frequen cy component 40 db above the full scale value (up to 1500 volts peak) causes not more than \% effect on the meter reading. About the same discrimination is achieved against components at the amplifier operating frequency. INDICATING METER To obtain an indicating meter having a performance suited to making it a component of a measuring instrument with a 1% overall tolerance, a move ment having a sensitivity of 1 milliampere has been selected to obtain the ruggedness and permanence that a movement with that time-proved value of sensitivity is known to possess. In addition, the movement design has been refined by the manufacturer to obtain what is considered to be one of the high est torque-to-weight ratios presently employed in a movement of this class. Because of this high ratio, frictional effects in the movement are vanishingly small, and the movement accuracy is typically within subjective variations in reading the mirror-backed face — about 0.2%. Movement accuracy is maintained over the normal range of operating temperatures by tempera ture-compensated circuitry. From a usability standpoint, an ef fort has been made to achieve sim plicity and ease of readability of the © Copr. 1949-1998 Hewlett-Packard Co. Fig. 7. Current for resistance measure ments is applied independently of meas uring leads to assist in accurately measur ing small resistances. meter face. The meter itself is large — 5 % " wide — and uses only three scales. The upper pair of scales has a length of approximately 5" and is used for reading both voltage and current. A single lower scale is then used for re sistance readings. The resistance scale is provided with red-colored numerals to permit easy identification of the scale. INPUT SYSTEM Besides the fact that the new volt meter is isolated for dc to permit offground measurements and to avoid the dc ground-loop problem common in sensitive measurements, the instrument has several other input features worthy of comment. The input impedance for voltage measurements has been made unusually high — 200 megohms on the upper 8 ranges. On the remaining 5 lower ranges the impedance decreases but is still as high as 10 megohms on the most sensitive range. Input capacity is isolated from the circuit under meas urement by a 1 -megohm resistance in the voltage probe. The probe itself is the -np- penholder style (Fig. 1) which has been favorably received in other -hp- instruments. On current measurements the input circuit becomes an Ayrton system corn- Fig. 8. Typical response at voltmeter's output terminals to a voltage or current step at input. Sweep time is 0.2 second/ division. Fig. 9. Rack mount ver sion of new precision voltmeter has been de signed with overall height of only 5J inches. posed of l/2 % -tolerance resistances. This resistance tolerance combines with the instrument's voltage-measuring tolerance to give a conservative 1% accuracy rating on current measure ments. As a current-measuring device, the instrument has a maximum resist ance on the 1 microampere scale of only 1,000 ohms. This decreases rapidly with decreasing sensitivity, becoming only 0.1 ohm on the upper ranges. RESISTANCE MEASUREMENTS For resistance measurements the in strument's most sensitive range has a center-scale value of 1 ohm, while measurements can be made readily to at least 0.02 ohm, the resistance of about 2 feet of #20 copper wire. To make the unit capable of measuring such low values, which are comparable to the resistance of a set of test leads, a modified Kelvin connection, as indi cated in Fig. 7, has been used for the instrument leads in resistance measure ments. The voltage from the internal regulated dc supply is applied through separate conductors in the test leads di rectly to the test clips at the end of the leads. The IR drop in the resistance to be measured is thus monitored directly and instrument lead resistance is re moved as a factor in the measurement. As mentioned previously, the voltage sensitivity of the instrument extends into the thermal emf region. To keep such voltages from seriously affecting resistance measurements when metals having a significant thermal emf coef ficient with respect to copper are en countered, the minimum applied opencircuit voltage has been held to 10 mil livolts. Maximum short circuit current on resistance measurements is 10 milliamperes, while maximum open-circuit voltage does not exceed 1 volt. DC AMPLIFIER USAGE To enable the instrument to drive a dc recorder foi recording any of its measurements orvto enable it to serve as a general-purpose, high-stability dc amplifier, output terminals are pro vided at the chassis rear. As an amplifier the instrument provides a maximum output of 1 volt across 1000 or more ohms for full-scale inputs. Thus, for input voltage levels below 1 millivolt or input current levels below 1 micro ampere, the instrument provides 60 db of amplification. This amplification has the stability and low-noise charac teristics indicated in Figs. 2 to 4, these records having been made by driving a dc recorder from the instrument's output terminals. The response the instrument pro SPECIFICATIONS -hp- MODEL 41 2A DC VACUUM TUBE VOLTMETER VOLTMETER Voltage Range: Positive and negative volt ages from 1 millivolt full scale to 1000 volts full scale in thirteen ranges. Accuracy: ± 1 % of full scale on any range. Input Resistance: 10 megohms ±1% on 1 mv, 3 mv, and 10 mv ranges; 30 megohms ±1% on 30 mv range; 100 megohms ±1% on 100 mv range; 200 megohms ±1% on 300 mv range and above. AC Rejection: A voltage at power line or twice power line frequency 40 db greater than full scale affects reading less than 1%. Peak voltage must not exceed 1500 volts. AMMETER Current Range: Positive and negative cur rents from 1 microampere full scale to 1 ampere full scale in thirteen ranges. Accuracy: ±2% of full scale on any range. Input Resistance: Internal Shunt Full Scale Range Resistance Voltage D op . 0 0 1 m a 1 0 0 0 o h m s 1 m . 0 0 3 m a 3 1 6 o h m s 0 . 9 4 8 6 m . 0 1 m a 1 0 0 o h m s 1 m . 0 3 m a 3 1 . 6 o h m s 0 . 9 4 8 6 m . 1 m a 1 0 o h m s 1 m . 3 m a 3 . 1 6 o h m s 0 . 9 4 8 6 m 1 m a I o h m 1 m 3 m a . 3 1 6 o h m 0 . 9 4 8 6 m 1 0 m a . 1 o h m 1 m 3 0 m a . 1 o h m 3 m 1 0 0 m a . 1 o h m 1 0 m 3 0 0 m a . 1 o h m 3 0 m 1 0 0 0 m a . 1 o h m 1 0 0 m *For total insertion resistance add 0.07 ohms copper lead resistance at 25°C. OHMMETER Resistance Range: Resistance from 1 ohm center-scale to 100 megohms center-scale in nine decade ranges. © Copr. 1949-1998 Hewlett-Packard Co. vides at its output terminals to a volt age or current step applied to its input is shown in Fig. 8. Freedom from over shoot is evident, while the response is adequate for recording typical varia tions in dc devices. RACK MOUNTING STYLE Besides the cabinet style version of the instrument shown in Fig. 1, a rackmounting version is also being produced (Fig. 9). This version has been ar ranged with a panel height of only 5 % inches for minimal consumption of rack area. DESIGN GROUP Acknowledgment and appreciation are expressed to Craig Casey, John Lark and other members of the -hp- AudioVideo Division for valuable assistance in the development of the new volt meter. Donald Norgaard Accurocy: ±5% of reading from 0.2 ohm to 500 megohms; ±10% of reading from 0.1 to 0.2 ohm and from 500 megohms to 5000 megohms. Voltages and Currents: R x x x x x x x x x Open Circuit Short Circuit a n g e V o l t s C u r r e n t l 1 0 m v 1 0 m a l O 1 0 0 m v 1 0 m a l O O 1 0 m a l O O O 1 m a l O K 1 0 0 l à - a l O O K 1 0 p a l M 1 f à a l O M . 1 f i a l O O M . 0 1  ¡ i a AMPLIFIER Voltage Gain: 1000 maximum. AC Rejection.- 3 db at 1 cps, approximately 80 db at 50 and 60 cps. Output: Proportional to meter indication; 1 volt at full scale. (Full scale corresponds to 1.0 on upper scale.) Output Impedance: Less than 2 ohms at 0 cps. Noise: Less than 0.1% of full scale on any range. Drift: Negligible. GENERAL Isolation Resistance: At least 100 megohms shunted by 0.1 [Lf between common ter minal and case (power line ground). Power: 115/230 volts ±10%, 50-60 cps, 35 watts. Dimensions: Cabinet Mount: 1 1 W high, 7V4" wide, 10" deep. Rack Mount: 5'A" high, 19" wide, 10" deep. Weight: Net 12 Ibs., Shipping 17 Ibs. Price: Model 41 2A Vacuum Tube Voltmeter, Cabinet Mount, $350.00. Model 412AR Vacuum Tube Voltmeter, Rack Mount, $355.00. Prices f.o.b. Palo Alto, California. Data Subject to Change Without Notice

