For ConTech Lighting 6" Insulated Ceiling StopAire® Shallow Recessed Housing:... INSTALLATION PROCEDURES
advertisement
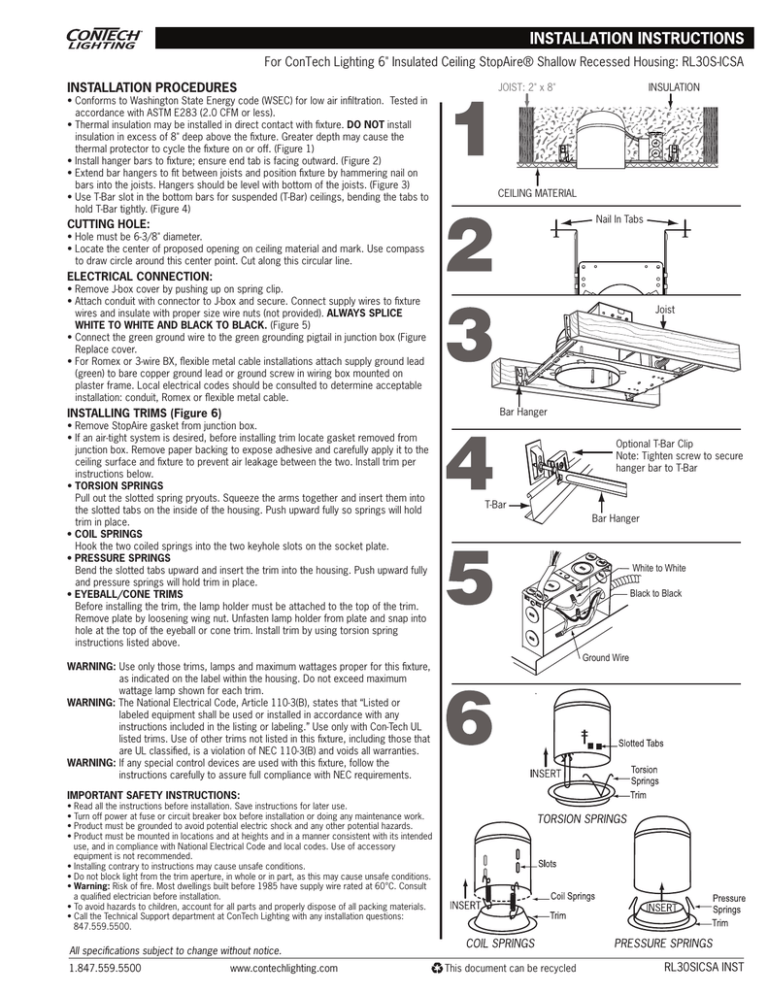
For ConTech Lighting 6" Insulated Ceiling StopAire® Shallow Recessed Housing: RL30S-ICSA INSTALLATION PROCEDURES • Conforms to Washington State Energy code (WSEC) for low air infiltration. Tested in accordance with ASTM E283 (2.0 CFM or less). • Thermal insulation may be installed in direct contact with fixture. DO NOT install insulation in excess of 8" deep above the fixture. Greater depth may cause the thermal protector to cycle the fixture on or off. (Figure 1) • Install hanger bars to fixture; ensure end tab is facing outward. (Figure 2) • Extend bar hangers to fit between joists and position fixture by hammering nail on bars into the joists. Hangers should be level with bottom of the joists. (Figure 3) • Use T-Bar slot in the bottom bars for suspended (T-Bar) ceilings, bending the tabs to hold T-Bar tightly. (Figure 4) JOIST: 2" x 8" INSULATION CEILING MATERIAL Nail In Tabs CUTTING HOLE: • Hole must be 6-3/8" diameter. • Locate the center of proposed opening on ceiling material and mark. Use compass to draw circle around this center point. Cut along this circular line. ELECTRICAL CONNECTION: • Remove J-box cover by pushing up on spring clip. • Attach conduit with connector to J-box and secure. Connect supply wires to fixture wires and insulate with proper size wire nuts (not provided). ALWAYS SPLICE WHITE TO WHITE AND BLACK TO BLACK. (Figure 5) • Connect the green ground wire to the green grounding pigtail in junction box (Figure Replace cover. • For Romex or 3-wire BX, flexible metal cable installations attach supply ground lead (green) to bare copper ground lead or ground screw in wiring box mounted on plaster frame. Local electrical codes should be consulted to determine acceptable installation: conduit, Romex or flexible metal cable. Joist Bar Hanger INSTALLING TRIMS (Figure 6) • Remove StopAire gasket from junction box. • If an air-tight system is desired, before installing trim locate gasket removed from junction box. Remove paper backing to expose adhesive and carefully apply it to the ceiling surface and fixture to prevent air leakage between the two. Install trim per instructions below. • TORSION SPRINGS Pull out the slotted spring pryouts. Squeeze the arms together and insert them into the slotted tabs on the inside of the housing. Push upward fully so springs will hold trim in place. • COIL SPRINGS Hook the two coiled springs into the two keyhole slots on the socket plate. • PRESSURE SPRINGS Bend the slotted tabs upward and insert the trim into the housing. Push upward fully and pressure springs will hold trim in place. • EYEBALL/CONE TRIMS Before installing the trim, the lamp holder must be attached to the top of the trim. Remove plate by loosening wing nut. Unfasten lamp holder from plate and snap into hole at the top of the eyeball or cone trim. Install trim by using torsion spring instructions listed above. Optional T-Bar Clip Note: Tighten screw to secure hanger bar to T-Bar T-Bar Bar Hanger White to White Black to Black Ground Wire WARNING: Use only those trims, lamps and maximum wattages proper for this fixture, as indicated on the label within the housing. Do not exceed maximum wattage lamp shown for each trim. WARNING: The National Electrical Code, Article 110-3(B), states that “Listed or labeled equipment shall be used or installed in accordance with any instructions included in the listing or labeling.” Use only with Con-Tech UL listed trims. Use of other trims not listed in this fixture, including those that are UL classified, is a violation of NEC 110-3(B) and voids all warranties. WARNING: If any special control devices are used with this fixture, follow the instructions carefully to assure full compliance with NEC requirements. IMPORTANT SAFETY INSTRUCTIONS: • Read all the instructions before installation. Save instructions for later use. • Turn off power at fuse or circuit breaker box before installation or doing any maintenance work. • Product must be grounded to avoid potential electric shock and any other potential hazards. • Product must be mounted in locations and at heights and in a manner consistent with its intended use, and in compliance with National Electrical Code and local codes. Use of accessory equipment is not recommended. • Installing contrary to instructions may cause unsafe conditions. • Do not block light from the trim aperture, in whole or in part, as this may cause unsafe conditions. • Warning: Risk of fire. Most dwellings built before 1985 have supply wire rated at 60°C. Consult a qualified electrician before installation. • To avoid hazards to children, account for all parts and properly dispose of all packing materials. • Call the Technical Support department at ConTech Lighting with any installation questions: 847.559.5500. All specifications subject to change without notice. 1.847.559.5500 www.contechlighting.com This document can be recycled RL30SICSA INST
