INSTALLATION PROCEDURES For ConTech Lighting Low Voltage Recessed Housing: LVR316
advertisement
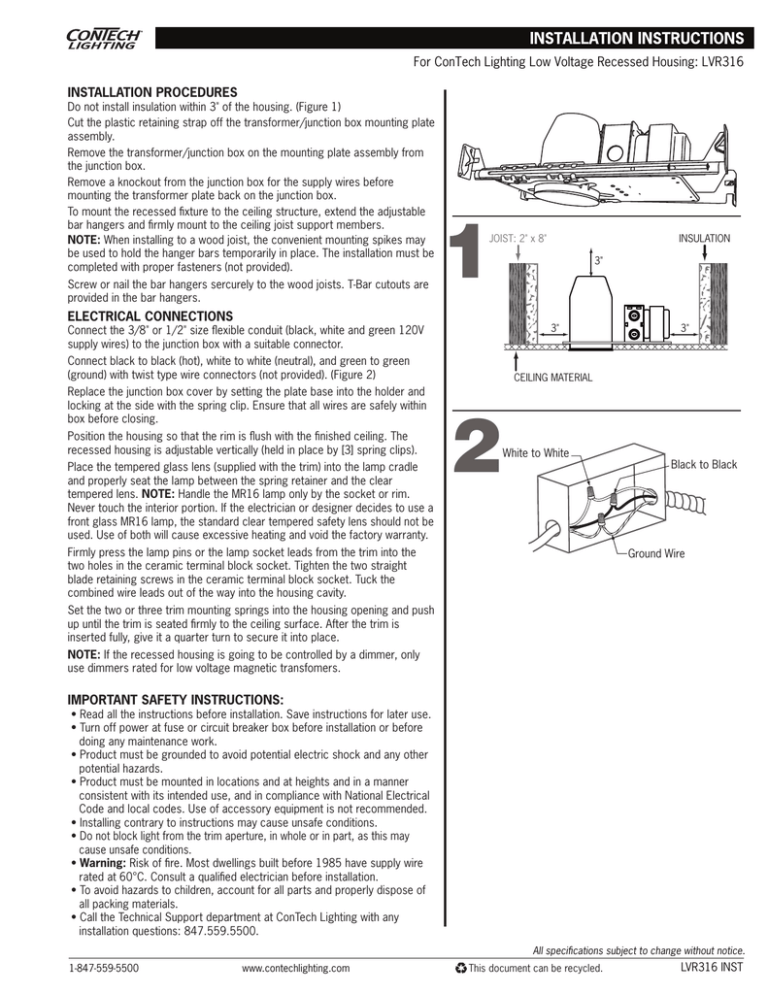
For ConTech Lighting Low Voltage Recessed Housing: LVR316 INSTALLATION PROCEDURES Do not install insulation within 3" of the housing. (Figure 1) Cut the plastic retaining strap off the transformer/junction box mounting plate assembly. Remove the transformer/junction box on the mounting plate assembly from the junction box. Remove a knockout from the junction box for the supply wires before mounting the transformer plate back on the junction box. To mount the recessed fixture to the ceiling structure, extend the adjustable bar hangers and firmly mount to the ceiling joist support members. NOTE: When installing to a wood joist, the convenient mounting spikes may be used to hold the hanger bars temporarily in place. The installation must be completed with proper fasteners (not provided). JOIST: 2" x 8" INSULATION 3" Screw or nail the bar hangers sercurely to the wood joists. T-Bar cutouts are provided in the bar hangers. ELECTRICAL CONNECTIONS 3" Connect the 3/8" or 1/2" size flexible conduit (black, white and green 120V supply wires) to the junction box with a suitable connector. Connect black to black (hot), white to white (neutral), and green to green (ground) with twist type wire connectors (not provided). (Figure 2) Replace the junction box cover by setting the plate base into the holder and locking at the side with the spring clip. Ensure that all wires are safely within box before closing. Position the housing so that the rim is flush with the finished ceiling. The recessed housing is adjustable vertically (held in place by [3] spring clips). Place the tempered glass lens (supplied with the trim) into the lamp cradle and properly seat the lamp between the spring retainer and the clear tempered lens. NOTE: Handle the MR16 lamp only by the socket or rim. Never touch the interior portion. If the electrician or designer decides to use a front glass MR16 lamp, the standard clear tempered safety lens should not be used. Use of both will cause excessive heating and void the factory warranty. 3" CEILING MATERIAL 2 White to White Firmly press the lamp pins or the lamp socket leads from the trim into the two holes in the ceramic terminal block socket. Tighten the two straight blade retaining screws in the ceramic terminal block socket. Tuck the combined wire leads out of the way into the housing cavity. Black to Black Ground Wire Set the two or three trim mounting springs into the housing opening and push up until the trim is seated firmly to the ceiling surface. After the trim is inserted fully, give it a quarter turn to secure it into place. NOTE: If the recessed housing is going to be controlled by a dimmer, only use dimmers rated for low voltage magnetic transfomers. IMPORTANT SAFETY INSTRUCTIONS: • Read all the instructions before installation. Save instructions for later use. • Turn off power at fuse or circuit breaker box before installation or before doing any maintenance work. • Product must be grounded to avoid potential electric shock and any other potential hazards. • Product must be mounted in locations and at heights and in a manner consistent with its intended use, and in compliance with National Electrical Code and local codes. Use of accessory equipment is not recommended. • Installing contrary to instructions may cause unsafe conditions. • Do not block light from the trim aperture, in whole or in part, as this may cause unsafe conditions. • Warning: Risk of fire. Most dwellings built before 1985 have supply wire rated at 60°C. Consult a qualified electrician before installation. • To avoid hazards to children, account for all parts and properly dispose of all packing materials. • Call the Technical Support department at ConTech Lighting with any installation questions: 847.559.5500. All specifications subject to change without notice. 1-847-559-5500 www.contechlighting.com This document can be recycled. LVR316 INST
