How to Make a Light Sensor Meter
advertisement

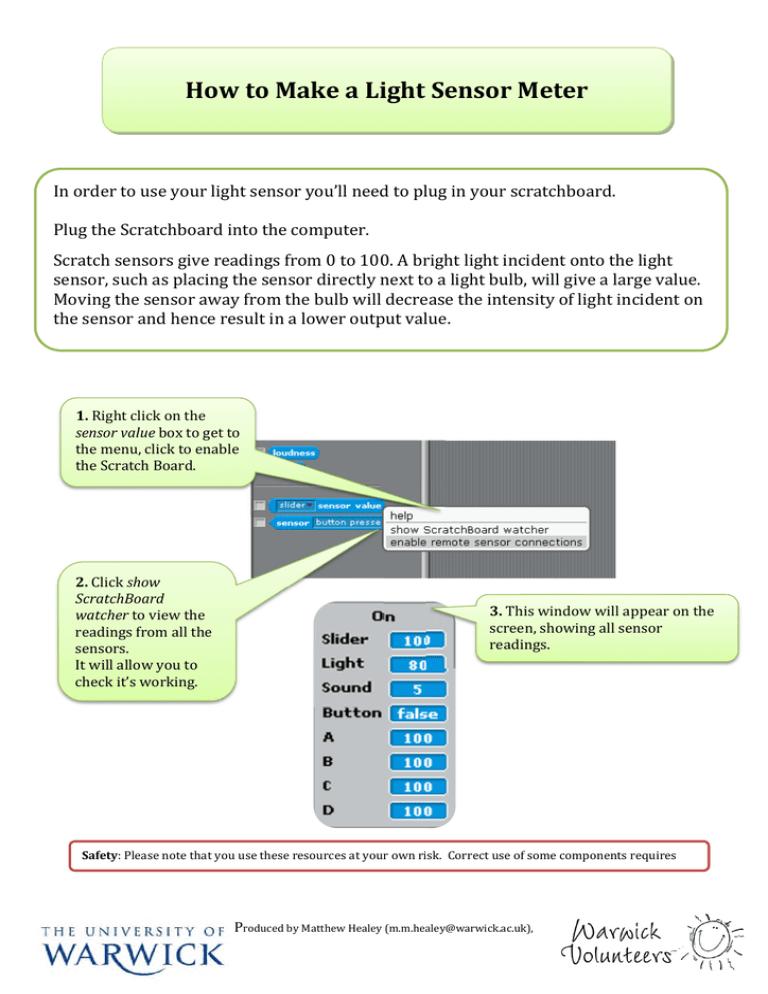
How to Make a Light Sensor Meter In order to use your light sensor you’ll need to plug in your scratchboard. Plug the Scratchboard into the computer. Scratch sensors give readings from 0 to 100. A bright light incident onto the light sensor, such as placing the sensor directly next to a light bulb, will give a large value. Moving the sensor away from the bulb will decrease the intensity of light incident on the sensor and hence result in a lower output value. 1. Right click on the sensor value box to get to the menu, click to enable the Scratch Board. 2. Click show ScratchBoard watcher to view the readings from all the sensors. It will allow you to check it’s working. 3. This window will appear on the screen, showing all sensor readings. Safety: Please note that you use these resources at your own risk. Correct use of some components requires care. Produced by Matthew Healey (m.m.healey@warwick.ac.uk), 2 4. Make a new variable called brightness or something similar. This will be the variable that stores how bright it is. 5. Make sure that the box next to your variable is ticked, as this will display the value on the stage 6. Right click on the brightness and select large readout to make the readout larger. Produced by Matthew Healey (m.m.healey@warwick.ac.uk) Technology Volunteers: go.warwick.ac.uk/techvolunteers Scratch Resources: go.warwick.ac.uk/scratchresources 3 7. Make a meter like the one shown here or find one online and import it in as the background. 8. Make a new sprite of a needle like object like the one shown here. Note: The centre of a sprite can be set in the Paint Editor ‘Set Costume center’. If the sprite you’ve created doesn’t rotate correctly – you may need to use this command. Produced by Matthew Healey (m.m.healey@warwick.ac.uk) Technology Volunteers: go.warwick.ac.uk/techvolunteers Scratch Resources: go.warwick.ac.uk/scratchresources 4 9. This loop means it will keep sensing and taking readings from the sensor. 10. Set the brightness value to that of the sensor 11. When the sensor detects light, make the needle point in a new direction 12. These values are to ensure that for no light the meter reads min and for very bright light it reaches max. It may take a little bit of experimenting to get this right. Produced by Matthew Healey (m.m.healey@warwick.ac.uk) Technology Volunteers: go.warwick.ac.uk/techvolunteers Scratch Resources: go.warwick.ac.uk/scratchresources 5 What you should expect to see is something like this (though your values may be different) Bright Dark The calculation works by rotating the sprite (needle/pointer) as the light sensor value increases. This is not simply setting the direction of the needle/pointer to the same as the sensor value since the sensor will give values from 0 to 100. We want our needle to rotate through an angular range of approximately 275 degrees. So we take the sensor value and multiply it by 2.75 to get the range we want. Then to ensure that the zero point is at min we need to subtract an offset value, this will vary depending on your meter. For the example above the offset is 105. Produced by Matthew Healey (m.m.healey@warwick.ac.uk) Technology Volunteers: go.warwick.ac.uk/techvolunteers Scratch Resources: go.warwick.ac.uk/scratchresources


