12e – Apple Resnet-secure
advertisement

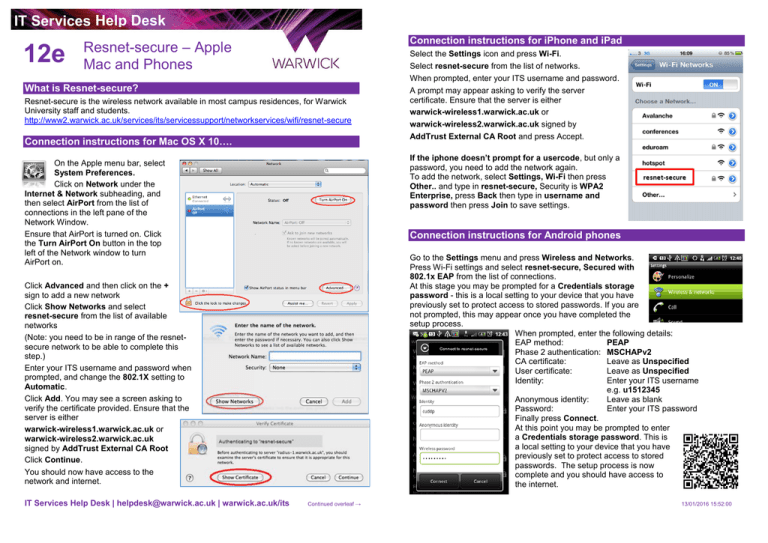
IT Services Help Desk 12e Connection instructions for iPhone and iPad Resnet-secure – Apple Mac and Phones Select the Settings icon and press Wi-Fi. Select resnet-secure from the list of networks. What is Resnet-secure? Resnet-secure is the wireless network available in most campus residences, for Warwick University staff and students. http://www2.warwick.ac.uk/services/its/servicessupport/networkservices/wifi/resnet-secure Connection instructions for Mac OS X 10…. If the iphone doesn’t prompt for a usercode, but only a password, you need to add the network again. To add the network, select Settings, Wi-Fi then press Other.. and type in resnet-secure, Security is WPA2 Enterprise, press Back then type in username and password then press Join to save settings. On the Apple menu bar, select System Preferences. Click on Network under the Internet & Network subheading, and then select AirPort from the list of connections in the left pane of the Network Window. Ensure that AirPort is turned on. Click the Turn AirPort On button in the top left of the Network window to turn AirPort on. Connection instructions for Android phones Go to the Settings menu and press Wireless and Networks. Press Wi-Fi settings and select resnet-secure, Secured with 802.1x EAP from the list of connections. At this stage you may be prompted for a Credentials storage password - this is a local setting to your device that you have previously set to protect access to stored passwords. If you are not prompted, this may appear once you have completed the setup process. When prompted, enter the following details: EAP method: PEAP Phase 2 authentication: MSCHAPv2 CA certificate: Leave as Unspecified User certificate: Leave as Unspecified Identity: Enter your ITS username e.g. u1512345 Anonymous identity: Leave as blank Password: Enter your ITS password Finally press Connect. At this point you may be prompted to enter a Credentials storage password. This is a local setting to your device that you have previously set to protect access to stored passwords. The setup process is now complete and you should have access to the internet. Click Advanced and then click on the + sign to add a new network Click Show Networks and select resnet-secure from the list of available networks (Note: you need to be in range of the resnetsecure network to be able to complete this step.) Enter your ITS username and password when prompted, and change the 802.1X setting to Automatic. Click Add. You may see a screen asking to verify the certificate provided. Ensure that the server is either warwick-wireless1.warwick.ac.uk or warwick-wireless2.warwick.ac.uk signed by AddTrust External CA Root Click Continue. You should now have access to the network and internet. IT Services Help Desk | helpdesk@warwick.ac.uk | warwick.ac.uk/its When prompted, enter your ITS username and password. A prompt may appear asking to verify the server certificate. Ensure that the server is either warwick-wireless1.warwick.ac.uk or warwick-wireless2.warwick.ac.uk signed by AddTrust External CA Root and press Accept. Continued overleaf → 13/01/2016 15:52:00 IT Services Help Desk 12e Connection instructions for iPhone and iPad Resnet-secure – Apple Mac and Phones Select the Settings icon and press Wi-Fi. Select resnet-secure from the list of networks. What is Resnet-secure? Resnet-secure is the wireless network available in most campus residences, for Warwick University staff and students. http://www2.warwick.ac.uk/services/its/servicessupport/networkservices/wifi/resnet-secure Connection instructions for Mac OS X 10…. If the iphone doesn’t prompt for a usercode, but only a password, you need to add the network again. To add the network, select Settings, Wi-Fi then press Other.. and type in resnet-secure, Security is WPA2 Enterprise, press Back then type in username and password then press Join to save settings. On the Apple menu bar, select System Preferences. Click on Network under the Internet & Network subheading, and then select AirPort from the list of connections in the left pane of the Network Window. Ensure that AirPort is turned on. Click the Turn AirPort On button in the top left of the Network window to turn AirPort on. Connection instructions for Android phones Go to the Settings menu and press Wireless and Networks. Press Wi-Fi settings and select resnet-secure, Secured with 802.1x EAP from the list of connections. At this stage you may be prompted for a Credentials storage password - this is a local setting to your device that you have previously set to protect access to stored passwords. If you are not prompted, this may appear once you have completed the setup process. When prompted, enter the following details: EAP method: PEAP Phase 2 authentication: MSCHAPv2 CA certificate: Leave as Unspecified User certificate: Leave as Unspecified Identity: Enter your ITS username e.g. u1512345 Anonymous identity: Leave as blank Password: Enter your ITS password Finally press Connect. At this point you may be prompted to enter a Credentials storage password. This is a local setting to your device that you have previously set to protect access to stored passwords. The setup process is now complete and you should have access to the internet. Click Advanced and then click on the + sign to add a new network Click Show Networks and select resnet-secure from the list of available networks (Note: you need to be in range of the resnetsecure network to be able to complete this step.) Enter your ITS username and password when prompted, and change the 802.1X setting to Automatic. Click Add. You may see a screen asking to verify the certificate provided. Ensure that the server is either warwick-wireless1.warwick.ac.uk or warwick-wireless2.warwick.ac.uk signed by AddTrust External CA Root Click Continue. You should now have access to the network and internet. IT Services Help Desk | helpdesk@warwick.ac.uk | warwick.ac.uk/its When prompted, enter your ITS username and password. A prompt may appear asking to verify the server certificate. Ensure that the server is either warwick-wireless1.warwick.ac.uk or warwick-wireless2.warwick.ac.uk signed by AddTrust External CA Root and press Accept. Continued overleaf → 13/01/2016 15:52:00
