6j IT Services Help Desk –
advertisement

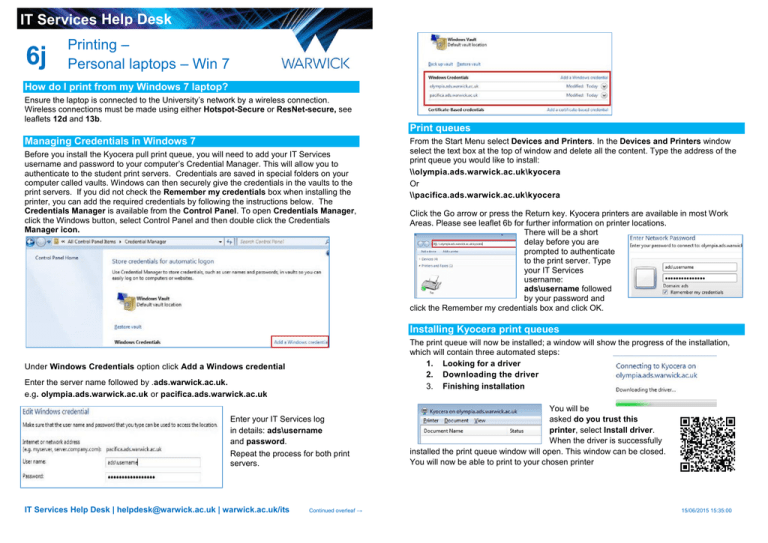
IT Services Help Desk 6j Printing – Personal laptops – Win 7 How do I print from my Windows 7 laptop? Ensure the laptop is connected to the University’s network by a wireless connection. Wireless connections must be made using either Hotspot-Secure or ResNet-secure, see leaflets 12d and 13b. Print queues Managing Credentials in Windows 7 Before you install the Kyocera pull print queue, you will need to add your IT Services username and password to your computer’s Credential Manager. This will allow you to authenticate to the student print servers. Credentials are saved in special folders on your computer called vaults. Windows can then securely give the credentials in the vaults to the print servers. If you did not check the Remember my credentials box when installing the printer, you can add the required credentials by following the instructions below. The Credentials Manager is available from the Control Panel. To open Credentials Manager, click the Windows button, select Control Panel and then double click the Credentials Manager icon. From the Start Menu select Devices and Printers. In the Devices and Printers window select the text box at the top of window and delete all the content. Type the address of the print queue you would like to install: \\olympia.ads.warwick.ac.uk\kyocera Or \\pacifica.ads.warwick.ac.uk\kyocera Click the Go arrow or press the Return key. Kyocera printers are available in most Work Areas. Please see leaflet 6b for further information on printer locations. There will be a short delay before you are prompted to authenticate to the print server. Type your IT Services username: ads\username followed by your password and click the Remember my credentials box and click OK. Installing Kyocera print queues The print queue will now be installed; a window will show the progress of the installation, which will contain three automated steps: 1. Looking for a driver 2. Downloading the driver 3. Finishing installation Under Windows Credentials option click Add a Windows credential Enter the server name followed by .ads.warwick.ac.uk. e.g. olympia.ads.warwick.ac.uk or pacifica.ads.warwick.ac.uk Enter your IT Services log in details: ads\username and password. Repeat the process for both print servers. IT Services Help Desk | helpdesk@warwick.ac.uk | warwick.ac.uk/its Continued overleaf → You will be asked do you trust this printer, select Install driver. When the driver is successfully installed the print queue window will open. This window can be closed. You will now be able to print to your chosen printer 15/06/2015 15:35:00 IT Services Help Desk 6j Printing – Personal laptops – Win 7 How do I print from my Windows 7 laptop? Ensure the laptop is connected to the University’s network by a wireless connection. Wireless connections must be made using either Hotspot-Secure or ResNet-secure, see leaflets 12d and 13b. Print queues Managing Credentials in Windows 7 Before you install the Kyocera pull print queue, you will need to add your IT Services username and password to your computer’s Credential Manager. This will allow you to authenticate to the student print servers. Credentials are saved in special folders on your computer called vaults. Windows can then securely give the credentials in the vaults to the print servers. If you did not check the Remember my credentials box when installing the printer, you can add the required credentials by following the instructions below. The Credentials Manager is available from the Control Panel. To open Credentials Manager, click the Windows button, select Control Panel and then double click the Credentials Manager icon. From the Start Menu select Devices and Printers. In the Devices and Printers window select the text box at the top of window and delete all the content. Type the address of the print queue you would like to install: \\olympia.ads.warwick.ac.uk\kyocera Or \\pacifica.ads.warwick.ac.uk\kyocera Click the Go arrow or press the Return key. Kyocera printers are available in most Work Areas. Please see leaflet 6b for further information on printer locations. There will be a short delay before you are prompted to authenticate to the print server. Type your IT Services username: ads\username followed by your password and click the Remember my credentials box and click OK. Installing Kyocera print queues The print queue will now be installed; a window will show the progress of the installation, which will contain three automated steps: 1. Looking for a driver 2. Downloading the driver 3. Finishing installation Under Windows Credentials option click Add a Windows credential Enter the server name followed by .ads.warwick.ac.uk. e.g. olympia.ads.warwick.ac.uk or pacifica.ads.warwick.ac.uk Enter your IT Services log in details: ads\username and password. Repeat the process for both print servers. IT Services Help Desk | helpdesk@warwick.ac.uk | warwick.ac.uk/its Continued overleaf → You will be asked do you trust this printer, select Install driver. When the driver is successfully installed the print queue window will open. This window can be closed. You will now be able to print to your chosen printer 15/06/2015 15:35:00


