Evaluation Board User Guide UG-319
Evaluation Board User Guide
UG-319
One Technology Way • P.O.
Box 9106 • Norwood, MA 02062-9106, U.S.A.
• Tel: 781.329.4700
• Fax: 781.461.3113
• www.analog.com
Evaluating the AD9835 200 mW Power, 5 V,50 MHz CMOS Complete DDS
FEATURES
Full featured evaluation board for the AD9835 evaluation board
Graphic user interface software for board control and data analysis
Connector to the EVAL-SDP-CB1Z system demonstration platform (SDP) board
Various power supply and reference link options
APPLICATIONS
DDS tuning
Digital demodulation
GENERAL DESCRIPTION
The AD9835 is a numerically controlled oscillator employing a phase accumulator, a sine lookup table and a 10-bit digital-toanalog converter integrated on a single CMOS chip. Modulation capabilities are provided for phase modulation and frequency modulation.
The EVAL-AD9835SDZ board is used in conjunction with a
EVAL-SDP-CB1Z board available from Analog Devices, Inc. The
USB-to-SPI communication to the AD9835 is completed using this Blackfin® based development board.
A high performance, on-board 50 MHz trimmed general oscillator is available to use as the master clock for the AD9835 system.
Various links and SMB connectors are also available on the
EVAL-AD9835SDZ board to maximize the usability.
Complete specifications for the AD9835 are provided in the
AD9835 data sheet, available from Analog Devices, and should be consulted in conjunction with this user guide when using the evaluation board.
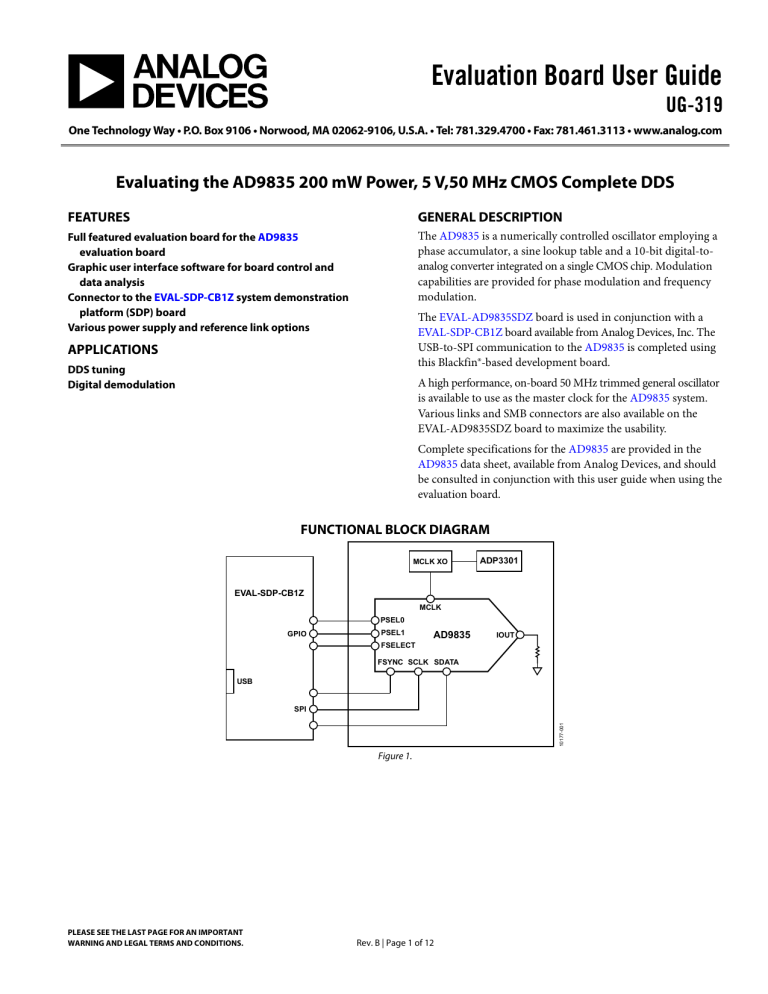
FUNCTIONAL BLOCK DIAGRAM
ADP3301 MCLK XO
EVAL-SDP-CB1Z
GPIO
PSEL0
PSEL1
FSELECT
MCLK
AD9835
FSYNC SCLK SDATA
IOUT
USB
SPI
Figure 1.
PLEASE SEE THE LAST PAGE FOR AN IMPORTANT
WARNING AND LEGAL TERMS AND CONDITIONS.
Rev. B | Page 1 of 12
UG-319
TABLE OF CONTENTS
General Description ......................................................................... 1
Functional Block Diagram .............................................................. 1
Revision History ............................................................................... 2
Evaluation Board Software .............................................................. 3
Installing the Software ................................................................. 3
Running the Software .................................................................. 4
Setting up the Digital Interface................................................... 5
REVISION HISTORY
9/11—Rev. A to Rev. B
Document Title Changed from EVAL-AD9835EB to
UG-319.................................................................................Universal
Updated Format..................................................................Universal
Changes to Features Section............................................................ 1
Replaced Figure 1 ............................................................................. 1
Deleted Introduction Section and Operating the AD9835
Evaluation Board Section ................................................................ 1
Added Applications Section and General Description Section . 1
Deleted Link and Switch Options Section and Set-Up
Conditions Section ........................................................................... 2
Deleted Evaluation Board Interfacing Section, Sockets Section,
Connectors Section, and Switches Section.................................... 3
Replaced Software Description Section with Evaluation Board
Software Section ............................................................................... 3
Replaced Figure 2 ............................................................................. 3
Evaluation Board User Guide
Select External MCLK Frequency...............................................5
Select Frequency and Phase Registers ........................................6
Loading Frequency and Phase Registers....................................6
Power Options ...............................................................................6
Initialize, Reset, SYNC, Clear, and Sweep..................................6
Example of Operation...................................................................7
Evaluation Board Schematics and Layout......................................8
Ordering Information.................................................................... 11
Bill of Materials........................................................................... 11
Deleted Table 2, Table 3, and Table 4; Renumbered
Sequentially ........................................................................................3
Added Figure 3; Renumbered Sequentially ...................................4
Changes to Table 1.............................................................................4
Changes to Figure 4...........................................................................5
Added Figure 5 and Figure 6............................................................5
Added Figure 7 to Figure 10 ............................................................6
Added Figure 11 and Figure 12 .......................................................7
Added Evaluation Board Schematics and Layout Section ...........8
Changes to Figure 13.........................................................................8
Added Figure 14 ................................................................................9
Changes to Figure 15.........................................................................9
Changes to Figure 16 and Figure 17............................................. 10
Added Ordering Information Section ......................................... 11
Changes to Table 2.......................................................................... 11
Rev. B | Page 2 of 12
Evaluation Board User Guide
EVALUATION BOARD SOFTWARE
INSTALLING THE SOFTWARE
The EVAL-AD9835SDZ evaluation kit includes the software and drivers on CD. The software is compatible with Windows®
XP, Windows Vista, and Windows 7.
To install the software, follow these steps:
1.
Install the software before connecting the SDP board to the USB port of the PC.
2.
Start the Windows operating system and insert the
EVAL-AD9835SDZ evaluation kit CD.
3.
Download the EVAL-AD9835SDZ LabVIEW™ software.
The correct driver for the SDP board, SDPDriversNET, should download automatically after LabVIEW is
UG-319 downloaded, supporting both 32-bit and 64-bit systems.
However, if the drivers do not download automatically, the driver executable file can also be found in the Program
Files / Analog Devices folder. Follow the on-screen prompts to install SDPDriverNet Version 1.3.6.0.
4.
After installation of the software and drivers is complete, plug the EVAL-AD9835SDZ into the SDP board and the
SDP board into the PC using the USB cable included in the kit.
5.
When the software detects the evaluation board, proceed through any dialog boxes that appear to finalize the installation (for example, Found New Hardware Wizard and Install the Software Automatically ).
Figure 2. Hardware Device Manager Window with SDP Board Plugged In
Rev. B | Page 3 of 12
UG-319
RUNNING THE SOFTWARE
To run the evaluation board program, do the following:
1.
Click Start/All Programs/Analog Devices/AD9835/
AD9835 Eval Board .
2.
If the SDP board is not connected to the USB port when the software is launched, a connectivity error displays (see
Figure 3). Simply connect the evaluation board to the USB
port of the PC, wait a few seconds, click Rescan , and follow the instructions.
3.
Ensure that all links are in their correct locations (see Table 1).
The main window of the AD9835 evaluation software then
Evaluation Board User Guide
Table 1. Default Setup for Link Positions
Link No. Position Function
LK3 B
LK5 B
LK6 A
DAC by connecting REFOUT to REFIN.
3.3 V digital supply for the AD9835 supplied from the EVAL-SDP-CB1Z board.
3.3 V analog supply for the AD9835 supplied from the EVAL-SDP-CB1Z board.
On-board linear regulator selected to supply power to the general oscillator.
Figure 3. Pop-Up Window Error
Rev. B | Page 4 of 12
Evaluation Board User Guide UG-319
SETTING UP THE DIGITAL INTERFACE
Figure 4. AD9835 Evaluation Board Software
The first step in setting up the AD9835 to take measurements is to set the DIGITAL INTERFACE in the software window (see
The SPI Frame Frequency (SYNC) box and SCLK Frequency box can also be set in this window. If the SPI interface speed has not been decided upon, leave the default values as shown in
.
SELECT EXTERNAL MCLK FREQUENCY
Having selected the digital interface specifics, next use the
EXTERNAL MCLK box to select the frequency to use. The boards are supplied with a 50 MHz general oscillator. If a different clock source is required, the CLK SMB connector can be used to supply a different MCLK value.
The general oscillator includes the AEL301 oscillators from
AEL Crystals.
Figure 6. EXTERNAL MCLK Input
Figure 5. Digital Interface
Rev. B | Page 5 of 12
UG-319
SELECT FREQUENCY AND PHASE REGISTERS
Frequency and phase registers can be selected using either
software or hardware. Figure 7 shows how to select the source
of control for the registers. To control the frequency and phase registers using the hardware pins, use SELSRC = 0 . To control the frequency and phase registers using the software bits, use
SELSRC = 1.
Evaluation Board User Guide
POWER OPTIONS
When Sleep is selected, the sleep bit is set to1. When this bit equals 1, the AD9835 is powered down, internal clocks are disabled, and the current sources and REFOUT of the DAC are turned off.
When Normal is selected, the sleep bit is set to 0 and the
AD9835 is powered up.
Figure 7. Selection Method
LOADING FREQUENCY AND PHASE REGISTERS
The desired output frequency and output phase can be loaded
using the inputs shown in Figure 8. Either the FREQ0 register
or the FREQ1 register can be loaded with frequency data. The frequency data is loaded in megahertz, and the equivalent hexadecimal code is shown to the right after data is entered. After data is loaded, the output appears on the IOUT pin. Similarly, the
PHASE0 register, the PHASE1 register, the PHASE2 register, or the PHASE3 register can be selected, and the phase data is loaded in degrees.
The analog output frequency from the AD9835 is defined by f
MCLK
/2 32 × FREQ where FREQ is the value loaded into the selected frequency register in decimals. This signal is phase shifted by
2π/4096 × PHASEx where PHASEx is the value contained in the selected phase register in decimals.
Figure 9. Power Options
INITIALIZE, RESET, SYNC, CLEAR, AND SWEEP
The initialize, reset, SYNC, and clear commands are set using the
buttons shown in Figure 10. To set up a DDS sweep, click
Sweep .
Figure 10. Commands
Figure 8. Frequency and Phase Load
Rev. B | Page 6 of 12
Evaluation Board User Guide
Initialise sets the frequency registers and the phase registers to the values chosen by users. It also sets SELSRC to 0. It is used in three different cases: when starting the program, after using reset, and after switching from sleep to normal.
When the reset bit = 1, the phase accumulator is set to zero phase, which corresponds to an analog output of midscale. Setting reset to 1 sets the FSELECT, PSEL0, and PSEL1 pins to 0.
Selection of the frequency/phase registers using the FSELECT and PSELx pins is synchronized with the MCLK rising edge when SYNC = 1. When SYNC = 0, the loading of the data and the sampling of FSELECT and PSELx occurs asynchronously.
When CLR = 1, SYNC and SELSRC are set to zero so that the pins are the default source. CLR resets to zero automatically.
The sweep function allows users to load a start frequency, stop frequency, increment size, number of loops, and delay between each frequency increment. These commands are then loaded to the part automatically from the EVAL-SDP-CB1Z board. When using the sweep function, SELSRC must be set to 1.
UG-319
EXAMPLE OF OPERATION
An example of configuring the AD9835 to output 1 MHz follows:
1.
Plug the EVAL-SDP-CB1Z board into the EVAL-
AD9835SDZ board and connect to the USB port.
2.
Start up the software located at Start / All Programs /
Analog Devices / AD9835 / AD9835 Eval Board . Users should see the SDP board communicating with the PC.
3.
Define MCLK; the default is an on-board 50 MHz oscillator.
4.
Ensure that all links are in the correct locations (see Table 1).
5.
Select the FREQ1 register.
6.
Load a 1 MHz excitation frequency and press the
ENTER key.
The output should appear on the IOUT output on the evaluation board.
For the FREQ0 register,
1.
Select the FREQ0 register, and load the FREQ0 register with 2 MHz.
2.
Press the ENTER key.
For the FREQ1 register,
1.
Select the FREQ1 register to load the 1 MHz associated with this register.
2.
Press the ENTER key.
Figure 11. Sweep Functionality
2
CH1 FREQUENCY: 1.000MHz
CH1 PEAK TO PEAK: 572mV
CH1 100mV CH2 100mV M 200ns
T 0.00000s
A CH1 216mV
Figure 12. 1 MHz Output Signal on the IOUT Test Point
Rev. B | Page 7 of 12
UG-319
EVALUATION BOARD SCHEMATICS AND LAYOUT
Evaluation Board User Guide
13 77-0 101
Figure 13. AD9835 Schematic Part A
Rev. B | Page 8 of 12
Evaluation Board User Guide UG-319
Figure 14. AD9835 Schematic Part B
Figure 15. Component Side View Layer 1
Rev. B | Page 9 of 12
UG-319 Evaluation Board User Guide
Figure 16. Component Side View Silkscreen
Figure 17. Component Side View Layer 2, Solder Side
Rev. B | Page 10 of 12
Evaluation Board User Guide
ORDERING INFORMATION
BILL OF MATERIALS
Table 2.
Reference Designator
C7
C2, C4
C8,C9
C10
CLK 1 , FSEL 1 , IOUT, PSEL1 1 , REFIN,
FSYNC, IOUT, MCLK, SCLK,
SDATA
Description
0.1 μF, ±10%, 50 V, X7R, ceramic capacitor
0.01 μF, ±10%, 10 V, 0603, X5R, capacitor
10 μF, ±10%,10 V, SMD tantalum capacitor
1 μF, ±10%,10 V,Y5V, 0603, ceramic capacitor
0.1 μF, ±10%, 16 V, X7R, 0603, capacitor
Straight PCB mount SMB jack, 50 Ω
Red test point
J1
J2, J3
LK3, LK5, LK6
LK1
R14
R15
R17, R18
R1, R2 1 , R3, R4 1 , R6 1 , R5, R11 1 ,
R13
U4
120-way connector, 0.6 mm pitch receptacle
2-pin terminal block (5 mm pitch)
3-pin SIL header and shorting link
2-pin SIL header and shorting link
10 kΩ, ±1%, 0603, SMD resistor
50 Ω, ±1%, 0603, SMD resistor
3.9 kΩ, ±1%, SMD resistor
300 Ω, ±1%, SMD resistor
100 kΩ, ±1%, SMD resistor
0 Ω, ±1%, 0603, SMD resistor
330 kΩ, ±5%, SMD resistor
200 mW power 5 V, 50 MHz complete DDS
Y2
1 Do not install.
2 DNP.
50 MHz, 3 mm × 2 mm SMD clock oscillator
UG-319
Manufacturer
Murata
Kemet
AVX
Yageo
Multicomp
Tyco
Vero
Part Number
GRM188R71H104KA93D
C0603C103K5RACTU
TAJA106K010R
CC0603ZRY5V6BB105
B0603R104KCT
1-1337482-0
20-313137
HRS (Hirose)
Campden
Harwin
Harwin
Multicomp
Multicomp
Multicomp
Multicomp
Multicomp
Multicomp
Multicomp
Analog Devices
Micro Chip
AEL Crystals
FX8-120S-SV(21)
CTB5000/2
M20-9990345 and M7567-05
M20-9990246
MC 0.063W 0603 10K
MC 0.063W 0603 50r
MC 0.063W 0603 6K8
MC 0.063W 0603 200r
MC 0.063W 0603 1% 100K
MC 0.063W 0603 0r
MC 0.063W 0603 330KR
AD9835BRUZ
24LC32A-I/MS
AEL301series
Rev. B | Page 11 of 12
UG-319
NOTES
Evaluation Board User Guide
ESD Caution
ESD (electrostatic discharge) sensitive device . Charged devices and circuit boards can discharge without detection. Although this product features patented or proprietary protection circuitry, damage may occur on devices subjected to high energy ESD. Therefore, proper ESD precautions should be taken to avoid performance degradation or loss of functionality.
Legal Terms and Conditions
By using the evaluation board discussed herein (together with any tools, components documentation or support materials, the “Evaluation Board”), you are agreeing to be bound by the terms and conditions set forth below (“Agreement”) unless you have purchased the Evaluation Board, in which case the Analog Devices Standard Terms and Conditions of Sale shall govern. Do not use the Evaluation Board until you have read and agreed to the Agreement. Your use of the Evaluation Board shall signify your acceptance of the Agreement. This Agreement is made by and between you (“Customer”) and Analog Devices, Inc.
(“ADI”), with its principal place of business at One Technology Way, Norwood, MA 02062, USA. Subject to the terms and conditions of the Agreement, ADI hereby grants to Customer a free, limited, personal, temporary, non-exclusive, non-sublicensable, non-transferable license to use the Evaluation Board FOR EVALUATION PURPOSES ONLY. Customer understands and agrees that the Evaluation Board is provided for the sole and exclusive purpose referenced above, and agrees not to use the Evaluation Board for any other purpose. Furthermore, the license granted is expressly made subject to the following additional limitations: Customer shall not (i) rent, lease, display, sell, transfer, assign, sublicense, or distribute the Evaluation Board; and (ii) permit any Third Party to access the Evaluation Board. As used herein, the term
“Third Party” includes any entity other than ADI, Customer, their employees, affiliates and in-house consultants. The Evaluation Board is NOT sold to Customer; all rights not expressly granted herein, including ownership of the Evaluation Board, are reserved by ADI. CONFIDENTIALITY. This Agreement and the Evaluation Board shall all be considered the confidential and proprietary information of ADI. Customer may not disclose or transfer any portion of the Evaluation Board to any other party for any reason. Upon discontinuation of use of the Evaluation Board or termination of this Agreement, Customer agrees to promptly return the Evaluation Board to ADI. ADDITIONAL RESTRICTIONS. Customer may not disassemble, decompile or reverse engineer chips on the Evaluation Board. Customer shall inform ADI of any occurred damages or any modifications or alterations it makes to the Evaluation Board, including but not limited to soldering or any other activity that affects the material content of the Evaluation Board.
Modifications to the Evaluation Board must comply with applicable law, including but not limited to the RoHS Directive. TERMINATION. ADI may terminate this Agreement at any time upon giving written notice to Customer. Customer agrees to return to ADI the Evaluation Board at that time. LIMITATION OF LIABILITY. THE EVALUATION BOARD PROVIDED HEREUNDER IS PROVIDED “AS IS” AND ADI MAKES NO
WARRANTIES OR REPRESENTATIONS OF ANY KIND WITH RESPECT TO IT. ADI SPECIFICALLY DISCLAIMS ANY REPRESENTATIONS, ENDORSEMENTS, GUARANTEES, OR WARRANTIES, EXPRESS OR IMPLIED, RELATED
TO THE EVALUATION BOARD INCLUDING, BUT NOT LIMITED TO, THE IMPLIED WARRANTY OF MERCHANTABILITY, TITLE, FITNESS FOR A PARTICULAR PURPOSE OR NONINFRINGEMENT OF INTELLECTUAL
PROPERTY RIGHTS. IN NO EVENT WILL ADI AND ITS LICENSORS BE LIABLE FOR ANY INCIDENTAL, SPECIAL, INDIRECT, OR CONSEQUENTIAL DAMAGES RESULTING FROM CUSTOMER’S POSSESSION OR USE OF
THE EVALUATION BOARD, INCLUDING BUT NOT LIMITED TO LOST PROFITS, DELAY COSTS, LABOR COSTS OR LOSS OF GOODWILL. ADI’S TOTAL LIABILITY FROM ANY AND ALL CAUSES SHALL BE LIMITED TO THE
AMOUNT OF ONE HUNDRED US DOLLARS ($100.00). EXPORT. Customer agrees that it will not directly or indirectly export the Evaluation Board to another country, and that it will comply with all applicable
United States federal laws and regulations relating to exports. GOVERNING LAW. This Agreement shall be governed by and construed in accordance with the substantive laws of the Commonwealth of
Massachusetts (excluding conflict of law rules). Any legal action regarding this Agreement will be heard in the state or federal courts having jurisdiction in Suffolk County, Massachusetts, and Customer hereby submits to the personal jurisdiction and venue of such courts. The United Nations Convention on Contracts for the International Sale of Goods shall not apply to this Agreement and is expressly disclaimed.
©2011 Analog Devices, Inc. All rights reserved. Trademarks and
registered trademarks are the property of their respective owners.
UG10177-0-9/11(B)
Rev. B | Page 12 of 12
