Installation of the wireless network eduroam with Windows 7 (UK)

Library and IT Services
Installation of the wireless network eduroam with Windows 7 (UK) for Tilburg University members.
Welcome to the installation guide of the wireless network eduroam. All universities in the
Netherlands offer the eduroam network. That means that you can use the internet via the eduroam network when you are at another university in the Netherlands.
This guide will help you to install the wireless network eduroam step-by-step on your computer with Windows 7. Also check the eduroam website .
Unfortunately not every university in the Netherlands uses the same wireless settings. This means that you might have to change the way eduroam is configured if you want to use it at another university. You can ask this at the IT helpdesk of the university in question.
Installation of eduroam
For the first steps in how to set up an eduroam network connection at another institute, please collect the information at the concerned institute. Consequently, follow the steps below.
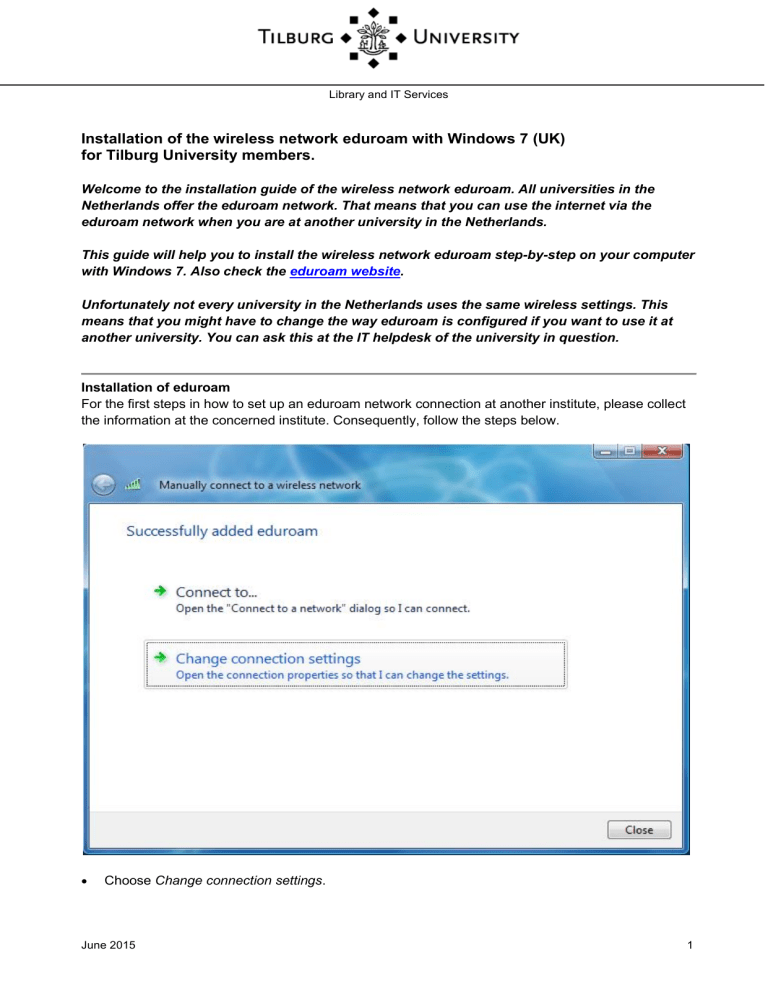
Choose Change connection settings .
June 2015 1
Library and IT Services
– Manual eduroam Windows 7
You will then be navigated to the next page:
Tilburg University
Make sure that the box Connect automatically when this network is in range is checked.
You can leave the other boxes unchecked.
June 2015 2
Library and IT Services
– Manual eduroam Windows 7
Tilburg University
Click on the Security tab.
Again make sure that WPA2-Enterprise with
The network authentication method should be
Also make sure that the box with
Now click on Settings .
AES encryption is selected.
Microsoft: Protected EAP (PEAP)
Cache user information...
is checked.
.
The following screen will pop-up:
June 2015 3
Library and IT Services
– Manual eduroam Windows 7
Tilburg University
At the top of the page check the box Validate server certificate .
Check in Trusted Root Certification Authorities
Make sure that the box with
June 2015
AddTrust External CA Root
Enable Fast Reconnect is checked.
Secured password (EAP-MSCHAP v2) should be selected
.
4
Library and IT Services
– Manual eduroam Windows 7
Then click on Configure .
Tilburg University
June 2015 5
Library and IT Services
– Manual eduroam Windows 7
The next pop-up will appear:
Tilburg University
Uncheck the box with Automatically use my Windows logon name and...
.
Click on OK .
After that click 2 more times on OK and on Close .
June 2015 6
Library and IT Services
– Manual eduroam Windows 7
Tilburg University
If everything was configured correctly, you will see a textbox pop-up at the bottom right of your laptop screen:
If this text box doesn't appear you have to go back to the Network and Sharing Center:
Click on Connect to a network..
.
June 2015 7
Library and IT Services
– Manual eduroam Windows 7
The following screen will pop-up:
Tilburg University
Double-click on eduroam .
You will then be navigated to the following page:
Click on Enter/select additional log on information .
June 2015 8
Library and IT Services
– Manual eduroam Windows 7
Now you will be directed to the next pop-up:
Tilburg University
Enter your user name followed by @uvt.nl
(!!!) and your password.
Leave the field “logon domain” empty
Click on OK .
After about 5 - 10 seconds your connection with the eduroam network is established. If you hold your mouse above the following icon (which should look the same as on the picture below) you will see the following:
You have now successfully configured eduroam on your laptop. The next time you start your computer at the UvT campus you will be automatically connected with the eduroam network.
This is the end of the installation guide of the eduroam network. If you have any question regarding this guide, you can contact us by e-mail lis-servicedesk@tilburguniversity.edu
or by telephone
June 2015 9
Library and IT Services
– Manual eduroam Windows 7
(013-4663111).
Tilburg University
June 2015 10


