FSAE Differential Mount Steven Tompkins Overview of completed prototype.
advertisement
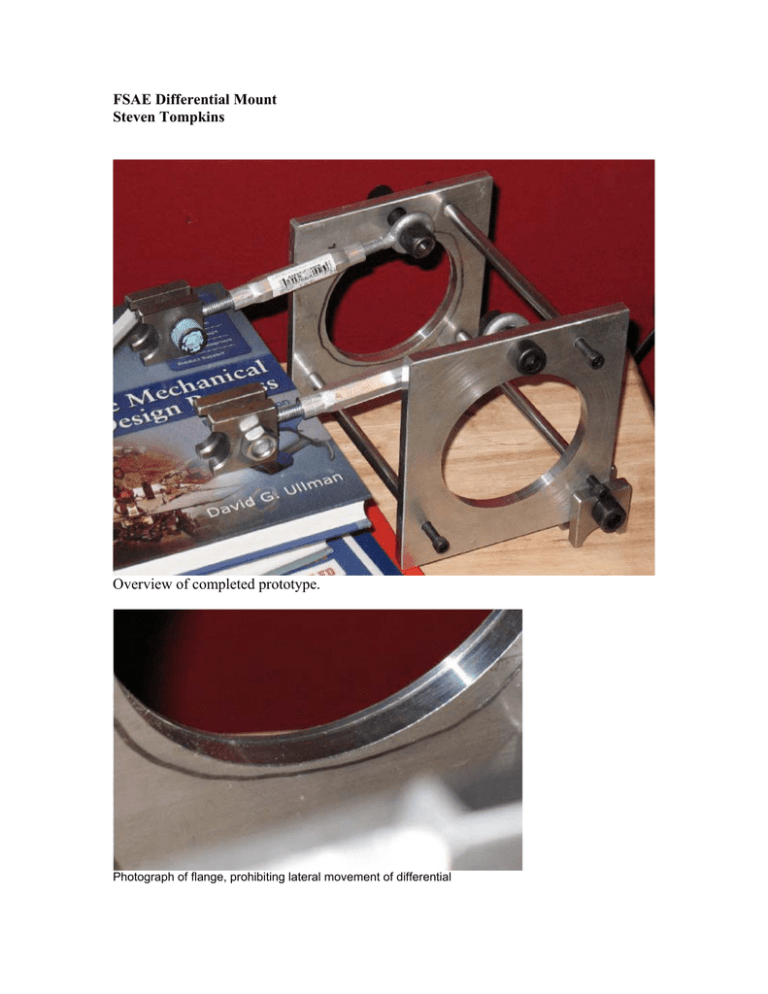
FSAE Differential Mount Steven Tompkins Overview of completed prototype. Photograph of flange, prohibiting lateral movement of differential Summary This project has been completed in conjunction with Hope College’s FSAE team. FSAE is an international competition where students design, fabricate, and test one-fourth scale formula one type cars. The goal for this project was to provide a mount for the differential onto the frame of the car. The concept of a differential mount is not new, but every car’s frame is unique and this is where the challenge lies in designing the differential mount. The differential that the team has purchased includes bearings. These bearings are the only components of the differential that can be captured. This mount was designed for a performance car and thus several performance-related requirements were identified. Because the frame of the car is steel, there should be steel components to ease the degree of difficulty of the welding process. The remaining fabricated components should be made from aluminum in order to reduce the weight of the mount. Related to the weight of the mount is the amount of space the mount occupies. The available area where the mount will be located has approximate dimensions of twelve by fifteen by six inches. The mount should be large enough that there are no concerns about its durability yet overcompensating will result in unnecessary weight. The design should also be simple enough to fabricate in the time allowed. All concepts considered included two aluminum plates (0.375 inch-thickness) with mirrored dimensions whose purpose is to capture the differential’s bearings. These concepts also shared three female threaded rods to be fastened in between the aluminum plates. The purpose of these rods is to keep the aluminum plates parallel and spaced correctly. Another component shared amongst the concepts is the steel tab (1.50 by 1.25 by 0.375 inches). These tabs will be welded to the frame on one end and either fastened to the aluminum plate with 0.5 inch diameter bolt or fastened to a turnbuckle with a 0.5 inch diameter bolt. Concepts utilizing a turnbuckle will incorporate one turnbuckle for each aluminum plate. The turnbuckles will allow for the position of the differential to be altered towards the front of the car and in turn will allow for the tension in the drivetrain to be adjusted. Because the differential will ideally be mounted six inches from the rear of the car, the deciding factor in choosing whether or not to employ the use of turnbuckles was finding a turnbuckle short enough in length while having a high enough load limit. The final design consists of two aluminum plates (6.25 by 6.00 by 0.375 inches), two turnbuckles (6 3/8 inch closed length, 130 pound limit), three female threaded rods (6 inch length, ¼-28 thread), and eight steel tabs (1.625 by 1.50 by 0.375 inches). The aluminum plates have two ½-inch clearance holes; one centered on the width of the plate and the other 0.50 inches from the bottom and 0.5 inches from the edge closest to the front of the car. They also have three ¼ -inch clearance holes spaced around a 3.936-inch diameter (0.312-inch deep) bore, concentric with a 3.930-inch through-bore. The smaller through-bore provides a “stop” for the bearings so they do not push all of the way through the plates. The plates will be press-fit onto the bearings so that the “stops” face outside of the car. The steel tabs include a 1.00-inch diameter half circle cut at one end centered on the 1.50-inch edge in order to fit on the car’s 1.00-inch diameter steel tube frame for welding. Finite element analysis of the fabricated components revealed a low factor of safety of twenty-five. This factor of safety occurred in the aluminum plate when the two ½-inch clearance holes were restrained and a one-hundred twenty pound force was located on the inside of the 3.936-inch bore, directed towards the front of the car.
