roller coaster ks3 maths - Mantle of the Expert.com
ROLLER COASTER KS3 MATHS
FILE 2
‘DESIGNING OUR OWN RIDE’
1. MAKING THE RIDE FIT THE AVAILABLE SPACE
We look at the issue that the ride must be designed to fit in a certain area of the park. Explain that at Alton Towers, no ride must go above treeheight, because of planning restrictions. This means that the park has to be ingenious – and use existing environment elements, eg hills, valleys, etc.
The height restriction at Alton Towers is actually a useful constraint.
Without it, students will tend, in designing their own rides, to go for the tallest/fastest possible. With the height restriction, they will need to think more precisely about use of hills etc to create the height needed for the ride.
Look at an aerial image of the Nemesis ride – this image can be shared as a handout, or projected on the whiteboard. (Images can be obtained using google earth, or at www.webaviation.co.uk)
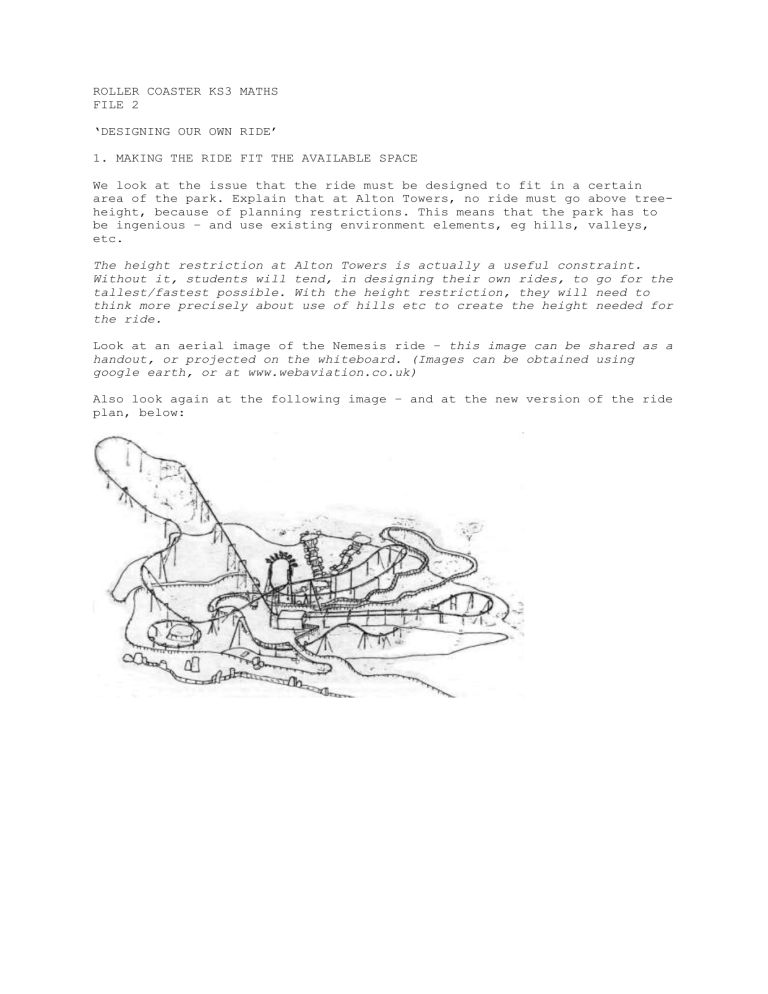
Also look again at the following image – and at the new version of the ride plan, below:
Examine these images together, highlighting how the landscape has been shaped to fit the ride. A pit or quarry hollow has actually been dug
(visible on the sketch), to create a deeper drop for the ride.
A hill is used for the first hill of the ride; there are two other, smaller hills that are used to create some height. What becomes clear is that the ride almost seems to be ‘suspended’ between these points on higher ground.
It travels from ‘A’ – the station; to ‘B’, at the top of the lift hill; to
‘C’ (the bottom of the first drop). Then there are three sections:
Section 1: from ‘C’ to ‘D’
Section 2: from ‘D’ to ‘E’
Section 3: from ‘E’ to ‘F’
(Students have previously made side-elevation views of these three sections)
The pattern of the ride, then, may look entangled but it is basically simple.
The ride also uses lines between trees etc (Trees in the park are subject to preservation orders.)
PLANNING OUR RIDE
We distribute a map of the given area in Alton Towers, where our new ride will be situated. (See below.) This includes details of heights of hills, and natural obstacles (trees; lake; buildings, a monorail etc.).
Reveal the map arrived with a memo about the site from Alton Towers:
Merlin Entertainments, Alton Towers Resort
TO ALL RIDE DESIGNERS
Please find enclosed a map of the site for the new roller coaster ride at
Alton Towers. Your ride must fit into this space.
Points to remember:
The new ride will be gravity-driven. The lift hill has to take the train up to a certain height, so it can get the momentum it needs to take it around the track and over all the different elements. So you must make sure the lift hill is high enough.
Planning restrictions mean that no ride at Alton Towers can go above tree-height.
It is essential that you do not disturb existing trees, ponds, buildings, or excavate any hills on the site. The monorail can also not be moved.
When we built Nemesis, we had to get permission to dig a pit in the ground, to get the height and depth we needed for the ride; and you might decide it is be necessary to do this for your ride as well. It is possible to dig to a maximum depth of 16.5m at this site. (We will, of course, need exact details of the size and depth of any excavations you propose.)
Best wishes,
John Wardley
Alton Towers Resort
TRACK LAYOUT FOR OUR RIDE DESIGNS
We now need to decide the track layout for our rides – section by section:
Where will we place the ride station, and the lift hill?
Again refer to the Nemesis model:
LIFT HILL
What is the height difference there between the station, and the top of the lift hill, on Nemesis ? What is the length of the lift hill?
Our measurements will need to be a similar height / length.
With these figures in mind, mark a possible place for a station on our map, and a route for a lift hill. At this stage, we should mark our plans in pencil, so we can change them later, as we work on the rest of the design.
Students need to recognise that the station should be placed close to one of the hills. (They should be able to work this out themselves!)
Stress that we are creating a gravity-driven ride with a conventional chain lift-hill – ie we are not going to be using the LIM system
(’Linear Induction Motor’) which is used on some rides (such as ‘Rita’) to achieve high-speed acceleration from the very start of the ride. All speed and acceleration on our ride will be gravity-generated.
FIRST DROP
Looking at the Nemesis model: what is the difference between the top of the lift hill, and the lowest point reached on the first drop? What is the length of the track for the first drop?
Our measurements will need to be a similar height / length.
Again, mark in pencil a possible route for the first drop. If it appears that we will need to dig some kind of quarry pit to give us the depth we need for the first drop, we should mark that on the map, too.
STATION AND BRAKE RUN
We also need to have enough space for the station, and the brake run into the station. This needs to be a long straight line of track (as in
Nemesis ), or it could have a single bend in the centre (so the first half is the brake run, then the track bends into the station, as in
Oblivion ).
The track must be long enough for one train to pull in to the waiting area outside the station, while another train is in the station. Again, students should use the Nemesis side-elevation as a guide. (In reality,
I’m not sure the side-elevation view is accurate here – but as I have said, we can use it as a working guide for our purposes, as if it is accurate.)
This work can be done in teams, pairs, or as individuals.
We should record on the map the height we want at different points, eg the station, the bottom of the first drop.
We have to remember that, whatever we do with the rest of the track, it will have to end at the brake run – so where we put the brake run is crucial.
OTHER KEY POINTS IN THE TRACK
We now have a station/starting point for the ride; a high point (top of lift hill); and a point at the bottom of the first drop.
We now need to determine the rest of the track layout.
1.
SECTION ONE
On Nemesis , the first stretch of track, after the first drop, is from point C to point D. It covers a distance of roughly 83m. (This refers to distance, not to track length – which is longer, of course, because of the different ride elements that are added.)
From point C - the low point at the bottom of the first drop - to point D, there is a height difference of some +18m.
So we now need a stretch of track from the bottom of the first drop on our plan, to another point on the map – roughly as long, and with a similar height difference, as the Nemesis track.
Note that, on Nemesis , the stretch of track is pretty straight; and ours should be, too.
(The golden rule is: head for the hills! So as you exit the first drop, head straight for a hill; it will give you the height point you need.)
2.
SECTION TWO
On the Nemesis plan, the next stretch of track goes from point D to point E. The height difference between point D and point E is about minus 5m.
It covers a distance of some 82m. Again, it is pretty straight.
So we now need a similar stretch of track on our plan – similar in length, and with a similar height differential. It should also be basically straight. (We could again use a hill to head towards.)
3.
SECTION THREE
On Nemesis , the next section of track goes from point E to point F.
The height difference here is minus 4m.
It covers a distance of some 103m.
Again, it is pretty straight – it curves but it is basically headed in one direction.
It is designed so that, on turning at the end, it takes us into the brake run.
So we now need a similar stretch of track on our plan – similar in length, and height difference; and basically straight.
We will now have ‘vector’ diagrams for our track layouts. The distances covered should be similar to the ‘Nemesis’ model – ensuring that the ride will be a similar length. It is important for future tasks that this is the case.
THINGS TO NOTE
At points where the ride changes direction, tight bends are good, both to reduce the space taken up by the ride, and to add to the
‘thrill’ factor. It would be a useful exercise for students to measure the angle of the bends on the Nemesis track, and to use this as a guide – specifying in their own designs the angles.
If we do this properly, then achieving a track layout that produces a satisfying/exciting ride experience should actually be a challenge in itself, and we may have to do several drafts before we arrive at a final solution.
Students will be inclined to want to use the pond in some way in their ride. They might want to take the ride over the water, or even under the water.
The map we have given them actually makes this very difficult to do, as long as we use the Nemesis model and create basically three quite straight sections of track after the first drop.
Students should not be allowed to find an easy way out of this (i.e. by making the track bend round, rather than go straight) – if they are determined to use the water, they will need to find a way to do it!
(The only way I can see is to use the hill, top left of the map, as the lift hill, rising on the left hand side – and then either going outside the trees at the top of the hill, or through the avenue between them. The first drop will then be on the right side of the hill. If it descends through the avenue of trees, it will have to go into a bend – as the Nemesis ride does on the first drop - to avoid another crop of trees on the hillside. The bottom of the first drop will then be in a quarry pit at the bottom of the hill, to the left of the pond. From there, you could shoot across to one of the hills, for the first stretch of track, in part crossing over the pond. Even so, students have to be aware that Alton Towers is a historic site; so they can’t do anything that might be seen as damaging the environment (e.g. they couldn’t build concrete supports for the ride in the pond itself); and also, if they are going to take the ride over the pond, they will have to bear in mind the tree-height restriction: so they have to calculate, how high above the water will the ride need to be – and does this take them above tree height?)
The design work undertaken so far can be marked on the basis of (a) does it meet the various restrictions and criteria; and (b) is the maths work accurate? I sometimes feel that it is odd in ‘Mantle’ projects, to mark work – after all, we don’t ‘mark’ people’s work in real life contexts, do we? But I see no problem here in the teacher, working as a kind of ‘project supervisor,’ assessing the work so far, and pointing out things that will need to be improved before the work is submitted to Alton Towers (‘We need to make sure that everything is accurate – we can’t submit a plan that isn’t accurate, they just won’t accept it, will they?’)
THE SHAPE OF THE RIDE
Looking again at the side-elevation graphs we did of Nemesis , students may observe a pattern.
There are two ride elements on the first drop: the barrel roll and the helix
Then, the three sections that follow all rise in the middle to another element (loop/zero-g roll/barrel roll).
For the turns from one section to another, the ride uses stall turns.
CHOOSING RIDE ELEMENTS
Distribute the ‘Ride Elements’ pack of cards (below). We have to choose up to five different elements we will include in our ride.
Students should ONLY choose ride elements from the cards given out – i.e. they should not try to invent completely new elements. (There are limits to what roller coasters can do. The basic elements that every ride uses are known. Roller coaster designers do try to invent new things – eg the ‘freefall drop’ on the ‘Thirteen’ ride at Alton Towers; but that of course demands great technical know-how and years of research. If you do not restrict students to the ride elements on the cards, but allow them to invent things, you will find that they come up with ride elements that are
(a) impossible to build from a technological point of view, and (b) would probably kill the passengers.)
We have to consider, not just what we’d like to include in the ride, not just what looks exciting – but what will fit in with the site we are using in the park (always remembering the height restriction!), and the overall shape of the ride track which we have mapped out so far.
We can now choose ride elements for our rides – following the Nemesis pattern:
We first select two elements for the first drop – one half-way (or 2/3) down, and one at the bottom
Then, we choose one element to be placed in the middle of each section – be it a loop, a corkscrew etc.
(We can’t add too many elements because of space/length/cost, and the fact it is a gravity-driven ride - and so the momentum gathered from the first drop will only take you over a certain number of loops and rolls etc).
Remember that we can’t add any element that is above tree-height.
We should also choose ride elements for the turns between sections (banked curve/stall turn)
Students should be aware that creating a good ride does not depend on having lots of different elements, or choosing the biggest and most extreme elements; after all, the ride elements for ‘Nemesis’ are quite simple - a loop, a helix, a couple of barrel rolls, and a zero-g roll – but it is still an exciting ride.
Students should also be discouraged from choosing a ‘big’ element (such as a loop) for half-way down the first drop – where the ride hasn’t really got up much speed yet.
Finally, we can’t place a high element like a loop in Section 3, at the end of the ride, when it is starting to run out of speed.
Banked Curve
Where the roller coaster train leans to one side as it turns
Barrel Roll
Where the train is rotated sideways 360 degrees, as if it were rolling in a barrel.
Batwing
A sidewinder (a half-loop and a half-corkscrew) that enters an immelmann. The train exits the track travelling in the opposite direction to which it entered.
Bowtie
Similar to a Batwing inversion, but the train exits travelling in the same direction as it enters (the second halfcorkscrew is reversed).
Cobra Roll
An inversion where the track resembles a snakes head, made up of an Immelman entering a sidewinder.
The train enters the inversion before being flipped upside down twice and exiting in the opposite direction.
Corkscrew
Where the track looks like a corkscrew. Two
360 degree looping twists in a row. A corkscrew can also have just one 360 degree twist.
Dive Loop
The track turns upwards and to the side before diving down in a halfvertical loop and exiting at 90 degrees from where it entered.
Fly-to-Lie/Lie-to-
Fly
Essentially a half barrel roll. Fly-to-Lie is where the train is flipped from the flying position to face the sky. Lie-to-fly is flipping back to the fly position.
Stall Turn
(or ‘Hammer Head’)
A high speed turnaround, where the train goes up a hill, goes through a relatively sharp banked turn, and heads back downward in the opposite direction.
Helix
Also known as a
"horizontal loop."
A spiral section of track.
Helixes can be flat
(parallel to the ground) or inclined (on a diagonal plane). Some helixes also change direction mid-helix.
Immelmann
The train enters the inversion by heading upwards before turning on its side and exiting in the opposite direction.
Named after a World
War II German fighter pilot.
Pretzel Loop
The pretzel loop is a downwards half-loop and an upwards half-loop.
The train will enter and exit travelling in the same direction. The train briefly adopts the 'lie' position but enters and exits in the 'fly' position.
Top Hat
The train is shot up vertically, twisted, travels over the top of the element, and then straight back down, usually through another twist, exiting the element travelling in a different direction than the train originally travelled.
Inverted Top Hat
Same as Top Hat except the train travels over the top of the element inverted
Trick Track
Found mostly on Mine
Train Roller Coasters.
Element in which the track is uneven, which makes the train wobble from side to side and up and down.
Vertical Loop
A loop that turns the rider upside down once.
A loop positioned at an angle is an "Inclined
Loop"
.
Zero-Zero-g roll
A zero-G roll is a barrel roll, integrated with an
‘airtime’ hill.
Essentially, it’s a hill with a 360 degree twist in the middle.
.
ASSESSING HEIGHT/DEPTH
We need to mark the height of the different elements we will be using on the rides.
If we are using a loop, we should check the height of the loop on Nemesis .
How high can our loop be, given (a) the height restriction at the park, and
(b) the limits on how deep we may dig on the Alton Towers site?
We could then estimate the height of other elements. (There’s also an opportunity here for some more precise maths work, if you wish – eg what would be the minimum height/size of the loop in, say, a pretzel roll, for the train to get round?)
SIDE-ELEVATION VIEW
We now need to create a side-elevation view of our rides, as a continuous graph (as we did with Nemesis ). We should accurately mark heights and distances.
One option here, which could be fun, is for students to photocopy and cut out the side-elevation view when they have drawn it, and attach it to a plan view – to construct a mini-version, in paper, of the ride. This is how
John Wardley used to design rides before the days of computer programmes – in fact, it is how he designed ‘Nemesis’!
LENGTH OF TRACK
Now we have drawn our side-elevation, we can measure the length of track in each section of our ride.
Lift hill
First drop (b to c)
Section One (c to d)
Section Two (d to e)
LENGTH OF TRACK
Section Three (e to f)
Break run and station
(f to a)
TOTAL
CALCULATING SPEED/DURATION OF OUR RIDE
We can use the figures we reached for the speed (in metres per second) of
Nemesis as a guide to calculate the speed of our own ride designs. Eg: we can take the speed in metres per second for the first hill on Nemesis .
Knowing the length of our track on the lift hill, we can calculate the duration of this part of our ride. We can do the same for the first drop – and so on throughout the ride.
SW7
SPEED
Metres per second
(based on
LENGTH OF
TRACK ON OUR
DESIGNS
DURATION
Lift hill
First drop
Nemesis)
Section One (c to d)
Section Two (d to e)
Section Three (e to f)
Brake run (f to g)
TOTAL -
(I have no doubt that you can’t assume that the speed of our ride will be the same as Nemesis in different sections – it will depend on various factors such as the ride elements used, etc. – but this will give us a rough guide, and I think it’s adequate for our purposes.)
SHARING
At this point, it would be useful, if they have been working in teams, for students to prepare a demonstration on their initial ideas for the ride.
EG: they prepare a kind of working display wall for their plans; and then have to make a formal presentation, as if this is an early rehearsal / preparation for when we present our plans to Alton Towers executives. Other members of the class could ask questions after each presentation. This may seem to take us away from maths work. But it consolidates the work that students have been doing; makes them articulate what they have done and why; and puts them on the spot when they have to answer questions. They also learn from sharing with each other.
The teacher can ‘stand in’ as an executive from Alton Towers, for the purposes of this exercise – just to increase the formality of the presentations, and add to the pressure!
ESTIMATING NUMBER OF PASSENGERS PER HOUR
We look at stats for rides in Alton Towers (below) and calculate the no. of passengers per hour on each ride, based on the no. of trains operating on the track; the frequency of trains; the duration of the ride; the number of passengers on each train, etc. ‘We will have to work this out for our own rides – so I thought it would help if we looked at how many passengers they get on rides at the moment...’
You can find a figure for the number of passengers per hour on rides at
Alton Towers on the internet – but that won’t mean much to students and won’t help them work out passenger numbers for their own rides.
ROLLER COASTER DESIGN PROJECT (SW7)
ALTON TOWER RIDE STATISTICS
NAME OF RIDE Nemesis
Length of track
715m
Duration of ride
Passengers
1 minute 20 secs
32 per train
No. of trains 2
Description Nemesis has two trains on the track at any one time.
Train ‘A’ is loading while the other train (‘B’) is going round the track. ‘A’ sets off up the lift hill as
‘B’ is just arriving at the station, having completed its journey round the track.
NAME OF RIDE Oblivion
Length of track
Duration of ride
373m
1:15
Passengers 16 per train
No. of trains 7
Description Oblivion has more trains than any other ride at Alton Towers.
There are seven. At any one time, two trains are in the station, unloading and loading passengers; one train is going up the lift hill; one is ready to drop; one is at the start of the brakes; and two are queuing up to get into the station.
There is a fast turn-over of passengers on this ride. A new train starts its ascent up the lift hill about every 40 seconds. But Oblivion can only do this – and have seven trains on the track – because the actual ride (if you take away time spent on the lift hill, and waiting to get back in the station at the end) is VERY short. From the moment you start to fall down the near-vertical drop into the tunnel below, to the time the brakes slow you down, is a mere 13 or so seconds!
NAME OF RIDE Air
Length of track
840m
Duration of ride
Passengers
1:30
28 per train
No. of trains 3
Description Air has three trains. As one train (‘A’) is preparing to set off up the lift hill, another train (‘B’) is just pulling into the station, having completed its journey.
Meanwhile, a third train (‘C’) is at that moment about half-way through its journey round the track.
It takes about 50-55 seconds from the moment a train arrives in a station, unloads its passengers and loads a new set of passengers – before it is ready to set off.
NAME OF RIDE Rita
Length of track
647m
Duration of ride
Passengers
0:25
20 per train
No. of trains 2
Description Rita has two trains. As one train (‘A’) sets off, the next train (‘B’) pulls into position in the station for passengers to get on.
It takes about 50-55 seconds for passengers to get on, before ‘B’ is ready to set off. In this time, ‘A’ has completed its journey round the track, and pulled in to the station behind ‘B’, so its passengers can get off.
CALCULATING PASSENGERS PER HOUR ON OUR RIDES
We can review the figures for passengers per hour we have arrived at. A target of 1400 – 1500 passengers per hour seems normal on rides; some are higher and some lower.
We have to assess:
(a) how many trains can we run on the track?
(For safety reasons, most designs will have to follow the Nemesis or Air pattern – ie two or three trains max. Only if the ride was very short would it be possible to follow the Oblivion model.)
(b) how many passengers per train? This depends on type of coaster, number of cars or rows, and how many passengers in each car/row. On Nemesis , each car (or row) contains four passengers; there are eight cars/rows altogether. You couldn’t have more than four passengers in a car – because the ride is designed to go through some narrow tunnels. Thirteen only has two passengers in a row (with 20 passengers per train altogether).
(c) how many trains can we run in an hour?
(Bearing in mind the duration of the ride, plus unload/load times in the station.)
Putting these figures together, we should have a figure for passengers per hour. (If the figure is low, again we will have to go back to the drawing board!)
This task could be made simpler, depending on the ability level of the class. The ‘Using Maths’ book simply asks you to assume that if a ride lasts three minutes, you could have 20 rides an hour. (Not enough!)
CALCULATING COST OF STEEL TRACK
Having our plan and elevation views, we have to calculate the length of our ride, in metres. This can involve a complicated mathematical calculation – or we devise a simpler method (based on a single figure of £x per metre of track), depending on the ability level of the class.
Ross and I struggled to find detailed information on the budgets for building a roller coaster. Games such as Roller Coaster Tycoon include budgets – but they are about as realistic as the house prices on a Monopoly board. Presumably theme parks / roller coaster manufacturers deliberately keep the details of ride budgets a secret, for trade reasons. So Ross made up some figures that he thought would engage pupils in useful and challenging maths work – based on a price of:
£ x per metre of track in the station
£ x per metre of track on the ride – but with an increasing scale of costs depending on the height that the ride goes to. (The higher the ride at any one point, the higher the cost)
You could equally prepare budget costs/price-scale based on:
£ x per metre of track in the station
£ x per metre of track on the ride
£ x per metre for track supports – on the basis that a ride will need a support every x metres. (Pupils then need to base the budget for supports on an accurate knowledge of the height of their ride at any point, length of track, etc.)
You can add extra details: eg for every three metres of ride there must be a cross section that holds the track in place, which holds three legs, three chords, 3 diagonals, 4 ribbons (thin bars). So you could also ask the class to calculate: how many cross sections do you need to order? At £x per cross section unit? And/or: how many legs do you need, how many diagonals, etc…
The final total, of course, will only be part of the budget of the ride – it doesn’t include the cost of the station building, the trains, construction costs, marketing, etc. I am sure that the figure we get will not be true-to-life, but this is still a useful exercise for our purposes.
ASSESSING AREA TO BE EXCAVATED
It is possible to ask students to calculate the size of earthworks and excavations to accommodate the ride. This should not take the form of one huge ‘pit.’ Rather, the excavations should closely follow the shape of the track. This will involve ‘trenches’ for the ride; it will pass close to rock faces, through tunnels, etc. Students will need to mark on their plan the areas (pits and trenches) to be excavated, and also mark how deep it will be at different points. Trenches for tunnels will need to be wide enough to allow passengers to go through them safely – and yet they should look very narrow, making passengers think they are close to crashing into the walls at the sides. This then becomes a mathematical issue: how wide should the trenches and tunnels around the track be, exactly?
In order to determine the require width of trenches, however, we first need to determine (a) the width of the train, and (b) the kind of train that will be used on the ride.
WIDTH OF TRAIN
The width of the train is dependent to a large part on the number of passengers carried in each car. Four abreast is normal; some trains are only two abreast, but obviously that may restrict the number of passengers that can be carried.
TYPE OF RIDE
Distribute ‘Bolliger and Mabillard’ pack containing images of ride types
(below): Flying, Inverted, Sitting Down etc. We have to choose the type of ride we feel would be most suitable for our ride.
It might be an idea to review what Alton Towers currently offers – eg distribute copies of the park map (available from the park or on the internet). From the way the rides are illustrated on the map, it should be possible to work out the kind of ride each one is; in teams, the class labels them (‘flying’, ‘inverted’ etc) with post-it notes. Should we choose a type of ride that Alton Towers doesn’t have at present?
Having decided on the type of ride, and the number of passengers in a car/row, we can now assess (a) the width and height of the train (perhaps basing our calculations on the average human body height/width); and (b) the width and height needed for tunnels and trenches – always allowing enough distance between train and walls etc for safety, and remembering passengers’ tendency to stretch their arms out as they ride on trains, etc.; but not making them too wide or high, that you lose that sense of dangerous ‘near-misses’ on the ride.
We can now mark the trenches/pits required for our ride on the map. (This will have to be done accurately - to ensure that the construction team on site makes them the right size!)
TYPES OF B&M COASTERS
Sitting Coaster
A "typical" sit-down coaster.
Flying Coaster
The first B&M Flying Coaster was 'Air' at Alton
Towers in 2002. Riders are hoisted into a horizontal flying position in the station so they can experience the sensation of flight.
Diving Machine
Diving Machines, or 'Dive Machines,' have one predominant feature - a vertical drop! They are characterized by their short, wide trains, and holding brake over their vertical drops. The first one, Oblivion , was built at Alton Towers in 1998.
There are only three Diving Machines in the world! The most recent one, SheiKra at Busch
Gardens, adds an inversion and water splash to the vertical dive.
Floorless Coaster
An above-track roller coaster with trains that lack floors - hence the name.
Stand-Up Coaster
Riders experience this coaster in a standing position. There are seven B&M stand-ups in the world.
Inverted Coaster
The Inverted Coaster first appeared at Six Flags
Great America in 1992 as 'Batman: The Ride,' and was the first coaster to hang beneath the track without a floor, and perform inversions.
Below is an example of an inverted coaster car design.
