Experiment #1
advertisement
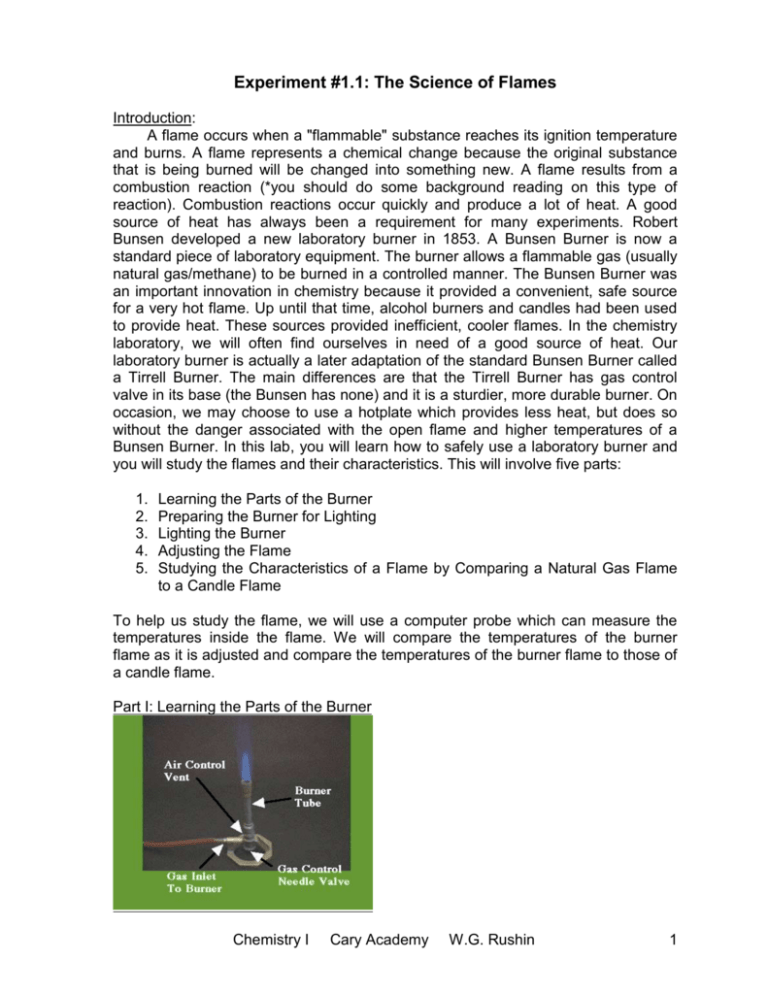
Experiment #1.1: The Science of Flames Introduction: A flame occurs when a "flammable" substance reaches its ignition temperature and burns. A flame represents a chemical change because the original substance that is being burned will be changed into something new. A flame results from a combustion reaction (*you should do some background reading on this type of reaction). Combustion reactions occur quickly and produce a lot of heat. A good source of heat has always been a requirement for many experiments. Robert Bunsen developed a new laboratory burner in 1853. A Bunsen Burner is now a standard piece of laboratory equipment. The burner allows a flammable gas (usually natural gas/methane) to be burned in a controlled manner. The Bunsen Burner was an important innovation in chemistry because it provided a convenient, safe source for a very hot flame. Up until that time, alcohol burners and candles had been used to provide heat. These sources provided inefficient, cooler flames. In the chemistry laboratory, we will often find ourselves in need of a good source of heat. Our laboratory burner is actually a later adaptation of the standard Bunsen Burner called a Tirrell Burner. The main differences are that the Tirrell Burner has gas control valve in its base (the Bunsen has none) and it is a sturdier, more durable burner. On occasion, we may choose to use a hotplate which provides less heat, but does so without the danger associated with the open flame and higher temperatures of a Bunsen Burner. In this lab, you will learn how to safely use a laboratory burner and you will study the flames and their characteristics. This will involve five parts: 1. 2. 3. 4. 5. Learning the Parts of the Burner Preparing the Burner for Lighting Lighting the Burner Adjusting the Flame Studying the Characteristics of a Flame by Comparing a Natural Gas Flame to a Candle Flame To help us study the flame, we will use a computer probe which can measure the temperatures inside the flame. We will compare the temperatures of the burner flame as it is adjusted and compare the temperatures of the burner flame to those of a candle flame. Part I: Learning the Parts of the Burner Chemistry I Cary Academy W.G. Rushin 1 1. Take your burner apart and identify the gas inlet, needle valve, air vent, burner tube/barrel. You should be able to separate the burner into 3 pieces. Now reassemble the burner. Part II: Preparing the Burner for Lighting 1. Connect the rubber hose to one of the gas jets. Obtain some matches. Make sure the burner is not positioned close to anyone or anything flammable. If you have long hair, make sure it is tied back with a rubber band, etc. If you have loose clothing, such as a tie or a shirt that hangs at the elbows, take the necessary steps to ensure that the clothing will not get acquainted with the flame. 2. Make sure the needle valve is open so that the gas will be able to enter the barrel. Adjust the air vent so that there is only a small slit visible. Note: Do not proceed to part III unless you know the location of the fire blanket and fire extinguisher and understand their use. When using a burner, you must always be aware of where you are in relation to the open flame. Loose clothing and long hair are dangerous around open flames. Part III: Lighting the Burner 1. Decide which member of the lab team will be responsible for the match and which member will be responsible for controlling the gas supply. Light a match and place it just over the top edge of the barrel cap. Your partner should now turn the gas valve slowly to introduce the flammable natural gas. The gas should ignite and then you can adjust the level of gas vs. air to get the flame you want. No-No's: 1. If the gas blows out your match without igniting, immediately turn off the gas supply until you have a new match lit. If you leave the raw gas running while your partner is lighting the match then a flammable cloud of gas is forming around your lab station. Rule of thumb: the gas valve should only be in the on position when 1) you have a lit match ready to start the burner flame or 2) your burner is in operation and producing a controlled flame. 2. If your flame goes out during an experiment, immediately turn off the gas supply until you have a new match lit. Reason: see above. 3. Do not leave flames unattended. Note: Sometimes a burner will "backburn". "Backburn" is when the gas ignites at the base of the burner and burns inside the barrel. The base and barrel of the burner will get hot. A properly functioning burner will not get hot except at Chemistry I Cary Academy W.G. Rushin 2 the very top of the barrel. If this happens, turn off the burner, cut the air supply, and re-ignite. Part IV: Adjusting the Flame Your burner flame can be adjusted two ways: 1) you can adjust how much gas is flowing into the burner using the benchtop valve or the needle valve in the burner base or 2) you can adjust how much air (oxygen) is feeding the flame by opening or closing the air control vent. 1. Adjust the gas flow by turning the main valve. Try to get the tallest and shortest flames that you can. I would leave the needle valve open and adjust the gas flow with the benchtop valve. It's easier. 2. Adjust the air intake by opening the vent wide open and then screwing it closed. Observe what happens to the flame as it gets more and less oxygen. 3. Adjust your flame to be of medium height and have an "inner blue cone". Let me check it. See the picture for a good example of an inner blue cone. Part V: Studying the Characteristics of a Flame by Comparing a Natural Gas Flame to a Candle Flame To study flames we will use two types of data; qualitative data and quantitative data. Qualitative data is information gathered using the basic senses (such as sight, touch, and smell) and is referred to as observations. Quantitative data is information gathered using instruments which generate numerical measurements. We will observe the flames and note differences and we will measure flame temperatures using a computer probe. Setting Up the Vernier "Lab Pro" Probe System: 1. Make sure that there is a Lab Pro Interface connected to your computer by way of a USB cable. The interface should also be plugged in to receive power. The interface is what allows the probes to communicate with the computer. We have many different types of probes including ones that will measure temperature, pH, voltage, etc. These probes are plugged into the interface Chemistry I Cary Academy W.G. Rushin 3 which allows them to send data to the computer. We will use a thermocouple to measure flame temperatures. 2. Obtain a thermocouple which is able to measure temperatures in the range of -200 to 1,400 *C. Connect the probe to the Channel 1 port on the interface. 3. Go into programs and open Data Logger. This software is designed to receive the data from the probe and display it to you on the computer. 4. When you open Data Logger, it should recognize that the interface is connected and will also be able to automatically detect the type of probe & port that you are using. To begin collecting temperature data, you simply need to click the "Collect" button. Studying the Flames: 1. Due the fact that we want very specific temperatures and not a record of temperatures over time, you will have to manually record your data points. At the end of the experiment you would be able to print out all the data taken by the probe but you would have a hard time figuring out which of the hundred temperatures represented the temperature in the highest part of a candle flame for instance. 2. Record room temperature. 3. Stand a candle in a plastic dish and light it. Record temperatures in highest part of the flame, the middle, and at the bottom. 4. Using beaker tongs (caution: do not let the plastic covering on the tongs get burned in the flame), hold a glass beaker (containing a small amount of water) above the candle flame and observe what happens. Clean and dry the beaker. 5. Cover the candle with a beaker or jar and observe what happens. 6. Light your burner and record the same three measurements for a gas flame with low, medium, and high oxygen (total of nine measurements). Now adjust your flame to get your best inner blue cone. Measure the temperature at the top of the inner blue cone. 7. Adjust your burner until the flame is blue. Using beaker tongs, hold a glass beaker (containing a small amount of water) above the burner flame and observe what happens. Now adjust the burner flame so that it is yellow. Hold the glass beaker above the yellow flame and observe what happens. Clean and dry the beaker. Questions: 1. What type of chemical reaction do flames represent? What substance must be present for a flame to occur? What are the main chemical products of this type of reaction? Write a general chemical equation for this type of reaction. 2. What is the chemical name and formula of natural gas? What is the chemical name and formula for the main ingredient of a candle? 3. Name three other substances that could produce a flame. 4. Name three examples (other than those in this lab) where flames are used for some practical purpose. Chemistry I Cary Academy W.G. Rushin 4 5. What is the difference between potential and kinetic energy? What represents the potential energy for the burner? What represents the potential energy for the candle? What forms of energy are present in the flame? 6. Draw diagrams of the candle and natural gas flames showing the measured temperatures and colors observed. 7. Describe what substances and conditions produced the hottest flame temperature. What color did you observe for the hottest flame? 8. Describe what substances and conditions produced the coldest flame temperature. What color did you observe for the coldest flame? 9. Give two reasons for the greater efficiency of a natural gas flame. 10. What causes the yellow color in a flame? Why does your candle flame burn yellow? Explain what causes a natural gas flame to burn yellow. 11. Explain your observations for the beaker tests. Lab Report #1.1: (45 points) title page (1 pt) abstract (8 pts) procedure (1 pt) data (7 pts) questions (28 pts) Chemistry I Cary Academy W.G. Rushin 5
