ADDING/EDITING A MEMBER This is a quick start guide. Full

ADDING/EDITING A MEMBER
This is a quick start guide. Full directions appear below. To see the full instructions for any function, click the hyperlink in the text box.
Note: You will only be able to access the “Add a Member” function if you have permission to add, edit or delete all members’ information.
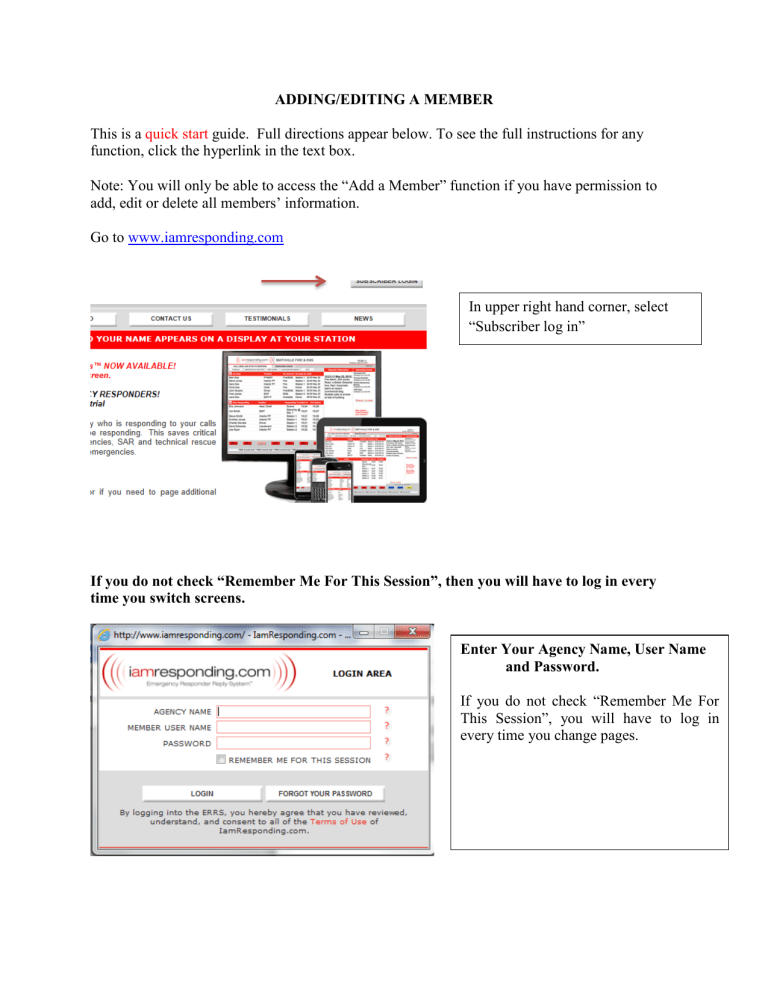
Go to www.iamresponding.com
In upper right hand corner, select
“Subscriber log in”
If you do not check “Remember Me For This Session”, then you will have to log in every time you switch screens.
Enter Your Agency Name, User Name and Password.
If you do not check “Remember Me For
This Session”, you will have to log in every time you change pages.
The home page will load. Press on
“Administrative Functions”.
You will only be able to access the administrative functions if you have permission to do so.
Hover over the Manage Members button, and click the “Add a Member” button. To “Edit”, choose “Edit a
Member”
Enter all of the mandatory fields. Mandatory fields have a * .
First and Last Name are mandatory.
A User Name and Password will automatically be created. This can be changed.
If you enter an Email Address and hit “update” at the bottom of the screen when finished, the user name, password, and other information will be emailed to the member.
Text Message address: enter the text address. If you do not know the text address, have the member send a text to an email address, and you will see the address.
You must enter at least one call in number in order to have the system recognize the member calling.
Two persons may not share the same phone number.
Up to six phone numbers may be entered.
Text address: This permits messages to be sent via text.
Pager: This permits messages to be sent via alpha - pager.
Membership Information
Select a Member Category. If one does not exist that you desire, select
“Other”, and a new box will appear for you to create a category. Pressing
“Delete Category” will remove that category from the list from the entire department.
Default call in response: Select the drop down. If the member calls in, and does not enter a “response code” by pressing a number on the phone, this message will appear as the
“responding to” choice.
Default On screen and App Response:
Select the drop down. If the member utilizes the app to enter a response code, this choice will appear as the
Dispatch Information
If dispatch messaging is enabled for your agency, these boxes will be live.
Select how you want to receive messages.
Hover over the ?
to receive more information.
If you want to receive dispatches to the app, you must also move this to
“yes”.
Select the dispatches you want to receive. You must select at least one.
System Permissions
Select “yes” or “no”. Please note:
If someone has ability to “add, edit or delete all member’s information”, they will have the ability to act as an administrator. They will have the ability to log into all member’s profiles and change privileges of any member.
Permitting a member to edit their own profile will not permit the member to change their own privileges.
FULL DIRECTIONS
Please Note: If you enter an email address for the member that you are adding (in either the
Email Address or Secondary Email Address fields), the system will automatically send an email to the member after they have been added. That email will tell them about the system that they have been added to, and will provide them with their log-in information. They will be instructed to log into the system in order to update or add any additional member information for their member profile.
User Tip: In order to speed the process of adding new members, consider completing only the following fields: Member First Name, Member Last Name, Membership Category, Email
Address, and Maximum Response Time (The user name and member password fields will automatically be completed by the system). The system will then send an email to the newly added member, with instructions about how to log-in and complete the remaining fields. If the member is NOT granted permission to add, edit or delete all members’ information, then they will NOT be able to edit their permission levels when they log-in to edit their member profile.
The following is a summary of the fields in the “Add a Member” profile section (fields with an asterisk are mandatory fields) ( Please Note: Clicking on the “?” symbol next to certain data fields will open a text box with further information about the corresponding field ):
*Member First Name. This is the member’s full first name.
*Member Last Name. This is the member’s full last name.
*User Name. The system automatically assigns a user name to each member to utilize when logging into the system. The user name can and should be edited by each individual member to something that they will remember. Please note that when logging into the system, user names are capital sensitive and must be entered exactly as they appear in this field. For system security purposes, user names can not be duplicated within this system, so it is possible that you may have to try two or more choices in order to select a truly unique user name. After a user name has been edited, it will be "starred out" and replaced by asterisks the next time that someone views that member's profile.
*Member's Password. The system automatically assigns a password to each member to utilize when logging into the system. The password can and should be edited by each individual member to something that they will remember. Passwords must be between 6 and 20 characters.
Please note that when logging into the system, passwords are capital sensitive and must be entered exactly as they appear in this field. For system security purposes, member passwords can not be duplicated within this system, so it is possible that you may have to try two or more choices in order to select a truly unique user name.
CONTACT INFORMATION
User Tip: Members of your agency with permission to add, edit or delete all members’ information will not be able to view the user names and passwords of other members, other than when initially adding a member, or when editing a user name or password. If a member has forgotten their user name or password, simply go to the administrative functions page, and then the edit a member page for that member, and click "update" at the bottom of the page.
That member will automatically be sent an email by the system with their complete member profile information, including their user name and password.
Email Address. This is the member’s primary e-mail address. An email address must be entered in order for members to retrieve forgotten passwords, and in order for members to receive emails through sent through the email interface. An email address also must be added in order for the member to receive automatically generated emails notifying them that they have been added into this system, and which also notify them any time that their member profile is edited. User Tip:
All members should add “@iamresponding.com” and “@emergencysmc.com” as permitted addresses within their spam filters so that they can receive important messages automatically generated by this system.
Secondary Email Address. If the member has more than one email address, enter a secondary email address here. Any emails sent to the member through this system will be sent to both email addresses.
Business Telephone No / Home Telephone No / Mobile No / Additional Telephone No 1 /
Additional Telephone No 2 / Additional Telephone No 3. There are up to six unique telephone numbers which can be entered by each member as the numbers from which they will call into the system to report that they are responding to a dispatch. The telephone numbers entered in these fields should be all of the telephone numbers from which the member might call to report that he
or she is responding to a dispatch. If a member calls the system from a telephone number other than the numbers entered in these fields, the member’s name will not appear in the “Now
Responding” section of your agency’s home page.
Text Message Address. This address will receive messages from the system, including schedule reminders and messages sent through the text message interface. User Tip: If you can not locate the correct text message address for a particular wireless phone carrier, Google “text message address for [insert carrier name here]”, and you should be able to quickly locate the correct text message address to use .
Pager Address. If you have an alpha-numeric pager, this address can receive messages sent to such pagers through the outbound messaging interface. User Tip: Addresses entered here must be entered in SMTP format, which means that they are entered in a format similar to email addresses (e.g. pagernumber@pagerservice.com). If you can not locate the correct address for a particular pager, Google “pager address for [insert pager service provider’s name here]”, and you should be able to quickly locate the correct pager message address to use .
ADDRESS
Enter the relevant information.
Street. This is the member’s street portion of their mailing address.
City/Town. This is the member’s city/town portion of their mailing address.
State. This is the member’s State portion of their mailing address.
Zip Code. This is the member’s zip code of their mailing address.
MEMBER INFORMATION AND PREFERENCES
*Membership Category. Utilize this pull down menu to select the member’s job function and/or certification levels within your agency. If the applicable selection is not included within the drop-down menu of choices, select “Other” at the very bottom of the drop-down list of choices.
You can then create a new selection by typing that into the “Other” field which is immediately below the Membership Category field. Once you have added a new selection for one member within your agency, that new selection will be added to the drop-down list of choices for all other members within your agency. If you are adding multiple jobs or certifications as a single choice, consider using well known abbreviations, and separating each job or certification with a comma.
Other. After selecting “Other” under “Membership Category,” use this field to enter job functions and/or certifications that are not already included in the pull down menu of the
Membership Category field. If you have already selected a job category in the “Membership
Category” field, do not enter anything in this field.
Assigned Station. Select the station to which the member is assigned.
Default Call In Response. This relates to what will appear within the “Now Responding” section of your home page when this member calls into this system to report that they are responding to an event. Your department’s system administrator has already selected the available locations or other information that will appear in the “Responding To” column of the “Now Responding” portion of your home page when members call into this system. When members call into this system, they are prompted to enter a number between “1” and “9” that indicates where they are responding to. If they simply hang up the phone without entering any number, then a default
“Responding To” location is displayed. Your department has a department-wide default. Each member can set their own default within this field of their member profile. They can select from any of the choices set by your system administrator. This is what will appear on the screen when this member calls into the system if this member does not enter a number between “1” and “9” when they call into the system.
Default On Screen and App Response. App users should select one of the drop down choices to select a default response choice. When the “respond now” function in the app is utilized, this choice will be pre-selected.
*Maximum response time from time member calls system. Select the appropriate number here.
The number selected corresponds to a number of minutes. The selected number of minutes will be added to the time that a member calls into the system, and will create a maximum estimated time of arrival. For instance, if the number chosen is “5”, then the ETA will be the time that the member called, plus 5 minutes. This is intended to be a maximum ETA only – The member may arrive sooner than the ETA, but is not expected to arrive later than the ETA. User Tip: Many agencies adopt a policy or protocol that instructs members not to call into the system unless they are within the number of minutes set within this field from the destination to which they
are responding. For example, a member with an ETA of + 5 minutes should only call the system when he/she is within 5 minutes of the member’s reported destination.
Receive text message reminder one hour before next scheduled shift? If “yes” is selected, and if a correct text message address has been entered in the above field, this member will automatically receive text message reminders one hour before their scheduled shifts. If “No” is selected, these reminder messages will not be sent for this member.
DISPATCH INFORMATION
Send dispatch information to my: Select each choice where you want dispatches sent to. If you use the push notification for the app, you must choose at least one other choice. These choices relate to the information in the CONTACT INFORMATION section.
Priority Messaging: Verizon users have an extremely reliable choice to receive dispatches of text messages. Check this box to receive dispatches from this Priority Messaging System. Users enter their address as follows: ##########@vzemag.biz
Push Notifications to My App: Move this to “yes” in order to receive push dispatches to your app. Dispatches will not “pop up” on the smart phone if you do not select “yes” but dispatches will still appear in the Incident Section of the app.
Send me these dispatches. You must select at least one of the choices to receive these dispatches. You may select as many as you desire.
PRIVILEGES
*Permitted to edit this member's schedule? Selecting “Yes” will permit this member to edit his/her own schedule. The default setting is “yes”. If “No” is selected, this member will not be able to edit his/her own schedule.
*Permitted to edit all members' schedules? Selecting “Yes” will permit this member to edit all other members’ schedules, including their own schedule. The default setting is “no”. If “No” is selected, this member will not be able to edit the schedules of any other members.
*Permitted to clear "Now Responding" screen? Selecting “Yes” will permit this member to clear the “Now Responding” section of your agency’s home page. The default setting is “No”. If “No” is selected, this member will not be able to clear the “Now Responding” section of your agency’s home page. User Tip: We suggest that you only grant this permission to certain members of your department who can be trusted not to clear the screen during the middle of an event.
*Permitted to add, edit or delete all members’ information? Selecting “Yes” will permit this member to add, edit and delete the member profile of any member of your agency. Please Note:
Members with this privilege will be able to modify their own permission levels, as well as the permission levels of any other members. Members with this privilege will also have access to be able to view the user names and passwords of all of your agency’s members. Therefore, this
privilege should be reserved for administrators only.
The default setting is “No.” If “No” is selected, this member will not be able to add, edit or delete the member profiles of any other members, will not be able to edit their own privileges, and will not be able to view the users names or passwords of other members.
*Permitted to edit message scroll? Selecting “Yes” will permit this member to add, edit and delete messages from the scrolling message bar that appears on your agency’s home page. The default setting is “No.” If “No” is selected, this member will not be able to add, edit or delete messages for the scroll bar that appears on your agency’s home page.
*Permitted to run reports? Selecting “Yes” will permit this member to run reports in the reports section of the administrative functions. The default setting is “No.” If “No” is selected, this member will not be able to run reports.
*Permitted to send text messages / emails? Selecting “Yes” will permit this member to send outbound emails, text messages and alpha-pages to your agency’s members through this system.
The default setting is “No.” If “No” is selected, this member will not be able to send outbound emails, text messages and alpha-pages to your agency’s members through this system. The
default setting is “No.” If “No” is selected, this member will not be able to send messages through this system. User Tip: We suggest that you allow all of your members to have access to this function. Every message that is sent through this system is stored, and is viewable in the reports section of this system in a report that details who sent the message, when it was sent, who it was sent to, the method by which the message was sent, and the text of the message.
Therefore, if any members abuse their privilege by sending inappropriate messages, such abuse is easily discovered and confirmed, and the message-sending privileges of any abusing member can be immediately terminated. When every member has access to this function, intra-agency communications are much more accessible, reliable and consistent, because they can all be sent through this single system.
*Permitted to update messaging groups? Selecting “Yes” will permit this member to add, edit and delete your outbound messaging groups. The default setting is “No.” If “No” is selected, this member will not be able to add, edit or delete your outbound messaging groups. User Tip: We suggest that you only allow administrators and certain officers to have access to this privilege.
*Permitted to Access Expiration Tracker? Selecting “Yes” will permit this member to access the administrative functions associated with the Expiration Tracker function, including the ability to edit items being tracked, and expiration dates. The default setting is “No.” If “No” is selected, this member will not be able to edit the Expiration Tracker settings or dates (See Section 21 of these instructions for a more complete description of the Expiration Tracker Function). User Tip:
We suggest that you only allow administrators and certain officers to have access to this privilege.
*Permitted to Administer Attendance and Service Tracker? Selecting “Yes” will permit this member to access the Attendance and Service Tracker, including all related reports. The default setting is “No”. If “No” is selected, this member will not be able to edit the database, but will be able to see their own information, such as attendance at meetings, drills and trainings.
*Permitted to edit System Functions? Selecting “Yes” will permit this member to edit certain system functions and settings for your department’s system. The default setting is “No.” If “No” is selected, this member will not be able to edit the system settings and functions that are controlled through this section of your system (See Section 18 of these instructions for the settings that can be controlled here). User Tip: We suggest that you only allow administrators and certain officers to have access to this privilege.
*Permitted to Edit Apparatus Status? Selecting “Yes” will permit this member to edit the “in service” or “out of service” status of any apparatus entered in your system (through the “System
Functions” section discussed in section 18). The default setting is “Yes.” If “No” is selected, this member will not be able to edit the status of any of your apparatus. Tip: The system will automatically store and report who makes any changes to the status of any of your apparatus
(based on who logged in to make the change), so we encourage you to grant this permission to all of your members. If you enable automated messages about apparatus status changes (See
Section 18(b)), then each message will also indicate who made the apparatus status change.
*Permitted to edit his/her own profile? Selecting “Yes” will permit this member to edit his/her own member profile. The default setting is “Yes.” If “No” is selected, this member will not be able to edit his/her own member profile. Please Note: If a member has permission to edit his/her own member profile, but does NOT have permission to add, edit or delete all members’ information (discussed above), then they will be able to view their permission settings, but will not be able to change any of their own permission settings. Only members with permission to add, edit or delete all members’ information will be able to edit permission levels. User Tip: We suggest granting this permission to all members, so that they can update their profiles whenever they change phone numbers, email addresses, addresses, etc, without having to go through your agency’s system administrator.
*Permitted to edit calendar functions? Selecting "Yes" will permit this member to edit the department's master calendar. The default setting is "No."
Emergency Contact information. Here, your members can enter all of their emergency contact information, so that it is readily available if and when needed.
Register Member. Select this to enter all information. Upon pressing this button, the member information will automatically be sent to the member’s email address. Any time “Register
Member” is pressed, all of the member’s information will be sent via email to the member. This is a method for the member to be sent his user name and password without having to reset it.


