Pictorial vs. Orthographic Views
Engineering Graphics ORTHOGRAPHIC PROJECTION
People who work with drawings develop the ability to look at lines on paper or on a computer screen and
"see" the shapes of the objects the lines represent. Visualization is an essential skill when working with technical information. Architects, engineers, machinists, carpenters, welders, installers -- many types of workers create or use drawings. Technical drawings and sketches provide a clear, concise, exact method of representing three-dimensional information. Starting at the Industrial Revolution the process and theory of technical drawing has evolved into a universal graphical language.
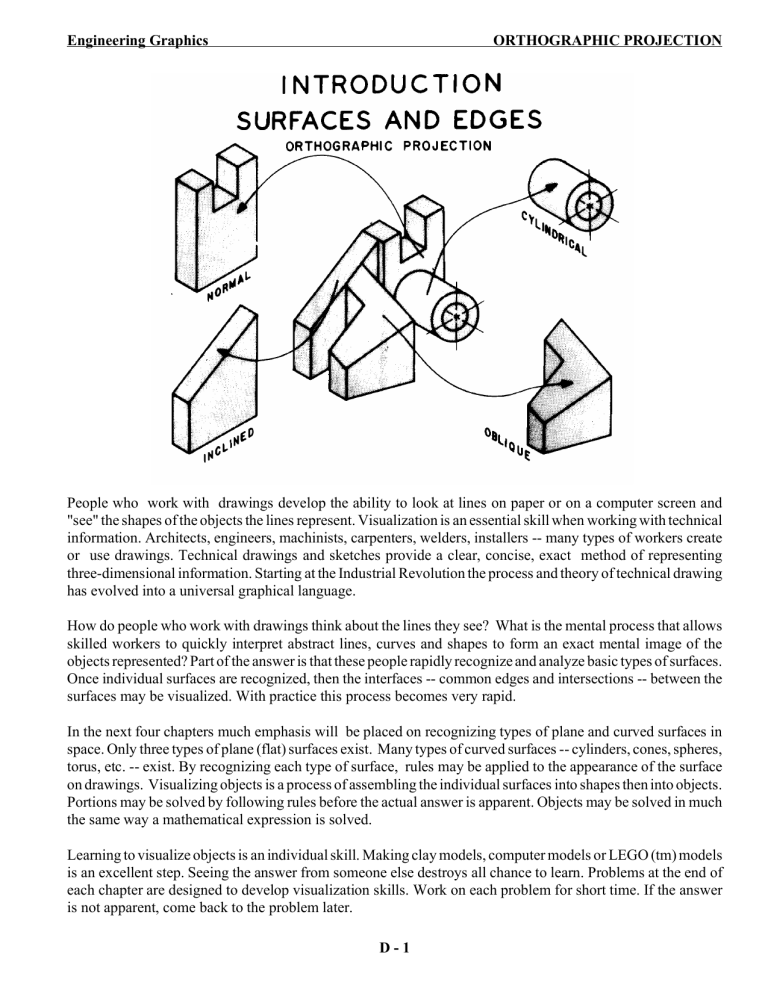
How do people who work with drawings think about the lines they see? What is the mental process that allows skilled workers to quickly interpret abstract lines, curves and shapes to form an exact mental image of the objects represented? Part of the answer is that these people rapidly recognize and analyze basic types of surfaces.
Once individual surfaces are recognized, then the interfaces -- common edges and intersections -- between the surfaces may be visualized. With practice this process becomes very rapid.
In the next four chapters much emphasis will be placed on recognizing types of plane and curved surfaces in space. Only three types of plane (flat) surfaces exist. Many types of curved surfaces -- cylinders, cones, spheres, torus, etc. -- exist. By recognizing each type of surface, rules may be applied to the appearance of the surface on drawings. Visualizing objects is a process of assembling the individual surfaces into shapes then into objects.
Portions may be solved by following rules before the actual answer is apparent. Objects may be solved in much the same way a mathematical expression is solved.
Learning to visualize objects is an individual skill. Making clay models, computer models or LEGO (tm) models is an excellent step. Seeing the answer from someone else destroys all chance to learn. Problems at the end of each chapter are designed to develop visualization skills. Work on each problem for short time. If the answer is not apparent, come back to the problem later.
D - 1
ORTHOGRAPHIC PROJECTION
Pictorial vs. Orthographic Views
Pictorial drawings give quick three-dimensional views of objects. They are often used for advertising, repair manuals, and general information.
Shapes are easier to visualize and intersections of surfaces can be seen.
Pictorials distort the lengths of lines and angles at corners. These drawings cannot be used for production.
This drawing is an isometric pictorial.
Engineering Graphics
Production (detail) drawings describe the shape of the object by looking directly at the faces of the object. In this way the true length lines and true angles at corners may be seen. Multiple views are needed. These views are two-dimensional. Views are obtained by looking in the direction of the arrows shown in the isometric above.
Multiple views are needed. FRONT, TOP and
RIGHT SIDE views are used here.
Dimensions and notes give size and manufacturing instructions. Dimensions are placed where the shape shows best.
Engineers, architects and designers "see" objects in pictorial mental images. They must convert pictorial ideas into orthographic form for production.
Workers and others must convert the orthographic drawings back into pictorial images in order to analyze the shapes and use the information. The transition from pictorial - to orthographic - to pictorial is a constant process.
By far, the most difficult step is converting orthographic drawings to pictorials. This process requires looking at two-dimensional images to get three-dimensional shapes.
Computer modeling is simplifying this process.
D - 2
Engineering Graphics
Multiple View Drawings
Orthographic views may be obtained by placing an object inside a "glass box". Faces of the box are at right angles. Surfaces on the object are aligned parallel to the faces of the box when possible. Views are drawn by projecting lines and surfaces to each face of the box.
Orthographic views are two-dimensional.
In the front view there is no way to show the difference in level (depth) between the surfaces.
ORTHOGRAPHIC PROJECTION
Projection planes of the glass box are perpendicular to each other. Three regular planes are shown. Left side, bottom and back planes may also be used.
These planes are also used by computer graphics systems.
The line of sight for each view is perpendicular to each projection plane. Looking perpendicular to a plane gives the true size of the plane in a particular view -- the other projection planes appear in edge-view.
Surface 1,2,3,4 is parallel to the front projection plane. It will appear as a surface (true size) in the front view.
In the top view 1,2,3,4 appears as edge-of surface A-B.
In the side view 1,2,3,4 appears as edge-of-surface C-D.
"Reading" orthographic views involves integrating this type of information about every surface on the object to form a mental image.
D - 3
ORTHOGRAPHIC PROJECTION
Six Regular Orthographic Views
Six regular views of an object may be projected.
Rule: Each feature of an object must be shown as visible lines in at least one view.
Drafters must decide which views to draw.
Sometimes additional (auxiliary) views are needed to clarify shapes and remove ambiguities. Dimensions, for example, must be placed on the "true shape" views. Partial views may be drawn.
Notice the hinge locations when unfolding the plastic box. Observe the alignment of the views: front-top-bottom, and front-rightleft-back. Views must be placed on the page or computer screen in this form.
Engineering Graphics
This graphic shows the AMERICAN
STANDARD
ARRANGEMENT OF VIEWS.
Views must be sketched or drawn according to this alignment.
People who work with drawings expect to find the views of objects in this form.
Front, top and bottom views must be aligned vertically. All corners and features must project vertically.
Front, right side, left side and back views must be aligned horizontally.
Features and corners must project horizontally.
D - 4
Engineering Graphics ORTHOGRAPHIC PROJECTION
Orthographic Views are Two-Dimensional
Surfaces on an object are at different levels.
__A is more to the front, then B, then C
__D is more to the top, then E
__F is more to the right, G is more to the left.
If a line separates two surfaces, there must be a difference in level between the surfaces.
When surfaces A, B and C are projected to the front projection plane, they appear next to each other. Depth is lost. The person reading the drawing must look at an adjacent (top or side) view to see which surface is in front.
When F and G are projected to the side view, they appear next to each other. Width is lost. The surfaces are at different levels. Look at the front or top views to see which surface is more to the right or left.
D and E appear next to each other in the top view.
Height is lost. Look at the front or side views to see which surface is higher and which surface is set down lower.
D - 5
ORTHOGRAPHIC PROJECTION
Common Dimensions Between Views
Major dimensions for objects are commonly named
HEIGHT, WIDTH AND DEPTH. Orthographic views are two-dimensional so each view can show only two of the three dimensions.
In any two adjacent views, all three dimensions may be seen.
WIDTH is the common dimension between the front, top (and bottom) views.
__Top view shows width and depth
__Front view shows width and height.
Width is projected vertically between the views.
Engineering Graphics
HEIGHT is the common dimension between the front, right side, (left side and back) views.
__Front view shows height and width
__Side view shows height and depth.
Height is projected horizontally between the views.
DEPTH is the common dimension between the top and side views. While DEPTH is measured in a horizontal direction in space, it must be measured in a vertical direction in the top view.
__Side view shows depth and height
__Top view shows depth and width.
Depth is measured horizontally in the side view and vertically in the top view.
D - 6
Engineering Graphics ORTHOGRAPHIC PROJECTION
Transferring the DEPTH Dimension
Several methods of transferring depth are shown. Dividers are the quickest and most accurate tool. Use the paper method for plain paper sketches.
On grid papers, count the "units" to transfer depth.
A miter line may be used to geometrically transfer depth from the side-to-top and the top-to-side views.
This technique is used on drawings created with Tsquares or drafting machines. This technique may be used to transfer depth measurements on computer drawings.
The miter line technique may be used on two dimensional CAD drawings.
D - 7
ORTHOGRAPHIC PROJECTION Engineering Graphics
Views are shown in standard arrangement. Notice the common dimensions between the views. Also, note the line of sight between the views. For example, the arrow shows the direction to look at the front view to get the side view. And, the direction to look at the side view to get the front view.
Actually holding an object and turning it as shown will help verify the views and the projection theory on previous examples. Be sure you turn the object correctly to draw each view. At first people tend to draw some views backward!
Clay Models
Carving clay models of objects is the most effective way to experience the transition from real objects to paper drawings. Creating models from drawings will strongly reinforce the transition from abstract lines on paper to real objects.
Styrofoam packing blocks also make good modeling material.
D - 8
Engineering Graphics
Visualizing Objects
Carving models (or just thinking through the steps) is an effective way to visualize objects. Starting with a solid block, observe the outlines of the top, front and side views. Cut away material from the object to leave the profiles shown.
No material is left in the open areas. This means that the object must be cut all the way across: top to bottom, front to back, right to left respectively.
ORTHOGRAPHIC PROJECTION
From the front view, cut away the block as shown. This cut creates surfaces A and B.
__line 1,2 is added to the top view
__line 9,10 is added to the side view.
In the top view, remove the block shown. This creates surface C.
__Hidden line 1,2 is added to the front view.
__Lines 3,6 and 5,4 are added to the side view.
A similar process is used in computer solids modeling.
"Tools" are shaped then mathematically subtracted from an object.
Cut the block from the top of the object. This completes the shape outlined in the first picture.
__Surface D is created
__line 1,2 is added to the front view
__line 3,4 and 5,6 are added to the top view.
D - 9
ORTHOGRAPHIC PROJECTION
Building Objects by Joining Solids
Objects may be visualized by imagining the basic shapes which were joined.
Basic shapes include:
__cones
__rectangular solids
__cylinders
__pyramids
__torus
__spheres
Engineering Graphics
Pieces include cylinders and plates in this example.
Objects are often combinations of added shapes minus subtracted shapes.
These concepts are used in computer solids modeling. Libraries of shapes may be provided which generate geometric solids. The solids may then be added together (union) or subtracted away.
Two rectangular solids are first joined together, then a cylinder is subtracted to create the final shape.
D - 10
Engineering Graphics ORTHOGRAPHIC PROJECTION
Linetypes Used on Drawings
A number of special linetypes are used on drawings. The most common line codes are shown:
__Object lines are solid lines which represent the visible edges of objects.
__Hidden lines represent features which cannot be seen. These lines must be shown to give complete information about the shape of the object. Hidden lines are short dashes- 1/8" or so.
__Center lines define the center geometry of holes or symmetry on an object. They are longshort dashed lines. 3/4" long and 1/8" short segments.
Examples of preferred hidden and center line representations are shown.
Center lines should intersect at the centers of circles.
Preferred hidden line intersections are shown.
CAD software does not always support these preferences.
Visible edge lines are most important. They have precedence over other linetypes.
Hidden lines are second in importance. Often there are hidden lines behind visible lines on a drawing. The hidden lines cannot be shown because the visible lines are most important.
This makes reading a drawing a bit harder.
Center lines have no visibility. They are least in importance.
D - 11
ORTHOGRAPHIC PROJECTION Engineering Graphics
Creating Multi-view drawings from Pictorials
A pictorial shows the shape of the object for easier visualization.
Identify the surfaces by placing a letter in each bounded area.
Sketch the top, front and side views by looking directly at each face.
__A,B and C are seen in the top view. They are at different levels to each other. (Top to bottom).
__J, K and L are seen in the front view. J and K are at different levels. L and K are at different levels. J and L are at the same level. (Front to back).
__ R, S, T, and U are seen in the side view. They are all at different levels. (right to left). R extends down behind U creating the hidden line in the side view.
Orthographic front and top views must align vertically.
Front and side views must align horizontally.
This object has normal, inclined, oblique and cylindrical surfaces.
__N1 and O are seen in the front.
__N2, C (circular hole), I and O are seen in the top.
__N3, I and O are seen in the side view.
Note the location of each surface in each view:
FRONT:
__N2, I and N3 appear as edge-of surface.
__N1 is a true view, O is foreshortened.
TOP:
__N1, N3 and C (cylinder) appear as edge-of-surface.
__O and I are foreshortened.
SIDE:
__N1 and N2 appear as an edge-of-surface
__O and I are foreshortened.
D - 12
Plotted
Curve
Engineering Graphics ORTHOGRAPHIC PROJECTION
Creating Pictorial Views from Orthographic Views
Front, top and side views of an object are given.
These views are complete with no missing lines.
Label surfaces by placing a letter (neatly!) in each surface. Labeling surfaces is important to assure that all surfaces are accounted for.
Sketch a box to enclose the pictorial:
__11 units width (upward to left)
__8 units height (vertical)
__8 units depth (upward to right).
Sketch the surfaces on the outer faces of the isometric box first.
Surface A is seen from the front view.
Sketch surface A on the front face of the isometric box. Use the dimensions from the orthographic views.
Surface B is seen in the right side view.
Sketch surface B on the right side face of the box. Surface A and surface B share an edge.
Sketching the surfaces on the faces of the isometric box helps locate corners which will be needed for other surfaces later.....
D - 13
ORTHOGRAPHIC PROJECTION
Sketching Isometric Pictorials
Surface C is seen from the top view.
Sketch C on the top plane of the isometric box.
Surface E and surface C share an edge.
Engineering Graphics
Surface D shares a horizontal edge with surface A.
D is parallel to C and two units below.
Sketch D on the pictorial starting at the top edge of A and working back 5 units.
Surface E is parallel to surface B and 6 units to the left of B. E shares a vertical edge with A.
Sketch E on the pictorial, starting at A and extending upward to the right 5 units.
D - 14
Engineering Graphics
Isometric Pictorial
Surface F is seen from the top view. It is 3 units up from the bottom face. F shares an edge with
A also.
Starting from A sketch F upward to the right 5 units deep and 6 units wide.
ORTHOGRAPHIC PROJECTION
Surface G is seen from the front view. It shares edges with D, E, F, b and C.
Sketch the closed shape of surface G on the pictorial. This completes the view.
Hidden lines are usually not shown on pictorial views.
Normal Surface Pictorial
Label the surfaces on the object.
__Sketch (or draw) isometric box.
__Modify box per shape of top view.
__Locate surface A, B and C on the faces of the box.
__Sketch interior surfaces from common edges.
D - 15
ORTHOGRAPHIC PROJECTION
Inclined Surfaces on Pictorials
Inclined surfaces may be plotted by locating the endpoints on the inclined edges on the isometric axes. Sketch the angled lines by connecting the endpoints.
Measurements on Isometrics can only be made along the isometric axes.
__upward to the left (width)
__upward to the right (depth)
__vertical (height).
Engineering Graphics
Angles must be converted to coordinate measurements. Calculate (or measure) distances X and Y from the 60 degree angles. Use the distances X and
Y along the isometric axes to locate point O on the pictorial.
Angular dimensions must be converted to coordinate distances.
Measure isometric distances A and B from the orthographic view and transfer upward to the left
(width) on the isometric view.
Measure distances C and D from the orthographic view and transfer vertically (height) on the isometric view.
D - 16
Engineering Graphics ORTHOGRAPHIC PROJECTION
Oblique Edges and Surfaces on Pictorials
Oblique edge 8 - 4 is the line of intersection between two inclined surfaces.
Sketch each inclined surface on the faces of the isometric box to locate the line of intersection.
Locate edge 6 - 7 and sketch the entire surface using parallel edges.
Locate edge 2 - 3 and sketch the entire surface using parallel edges.
Intersection line 4, 8 can be located from the common point between the two construction surfaces.
Locate oblique surfaces by fixing points on the edges of the isometric box.
__extend 1, 2 to locate A on the top-front edge
__plot 4 on the front-bottom edge
__plot point 5 on the side-bottom edge
__locate point 2 on the top-side-back edge.
Sketch parallel lines to locate interior points.
Locate 1 on A - 2
Locate 5 on A - 4
__5, 6 is parallel to 3, 4 and 2, A
__1, 6 is parallel to 4, A. These lines locate point
6.
D - 17
ORTHOGRAPHIC PROJECTION Engineering Graphics
Circular Edges and Cylinders in Pictorial Views
Circles show as ellipses in pictorial views. Three orientations are possible.
__circle in the top face - fig. 1
__circle in the front face - fig. 3
__circle in the side face - fig. 2
"Four center" ellipses may be used for correct appearance in isometric pictorials.
Four construction lines, even on sketches, are needed to locate the centers for arcs which approximate true ellipses. Approximate ellipses are usually used on isometrics.
4 center ellipses
__Sketch rhombus 1,2,3,4 on the pictorial.
(Use correct radius for each ellipse).
Fig 1:
__Locate mid-point for each side A,B,C,D.
__Sketch line from obtuse angle to opposite midpoint. (2 lines).
Fig 2:
__Sketch a small arc at corner 1 and 3 using intersection of 2-A : 4-B and 2-D : 4-C.
Fig 3:
__Sketch long arcs using 4 and 2 as centers.
Similar constructions for top or side ellipses are shown.
Four center ellipses may be used for freehand sketches or for drawings using either a compass or a computer.
Sketch an ellipse at each point along the cylinder where an intersection occurs. This will insure an accurate looking picture.
Sketch a new rhombus and new ellipse for each diameter circle in the pictorial.
D - 18
Engineering Graphics ORTHOGRAPHIC PROJECTION
Circles and Curves in Pictorials
Correct directions for ellipses in each face are shown.
Center lines follow the isometric axis direction for each face.
Correct ellipse orientation and centerline direction is essential to produce accurate pictorial views.
Other curves in pictorial views may require a number of points. Transfer X and Y distances from the orthographic view using construction lines 1 through 9 as shown.
Use parallel line constructions to locate points.
Sketch a smooth curve through the points.
An irregular curve may be used on drawings to draw a smooth curve through the points. Some
CAD software provides polyline constructions with curve-fitting to draw smooth curves.
D - 19
ORTHOGRAPHIC PROJECTION Engineering Graphics
D - 20
Engineering Graphics ORTHOGRAPHIC PROJECTION
D - 21
ORTHOGRAPHIC PROJECTION Engineering Graphics
D - 22
Engineering Graphics ORTHOGRAPHIC PROJECTION
D - 23
ORTHOGRAPHIC PROJECTION Engineering Graphics
D - 24
