Accelerated Life Test of a CEBAF QA Quadrupole
advertisement
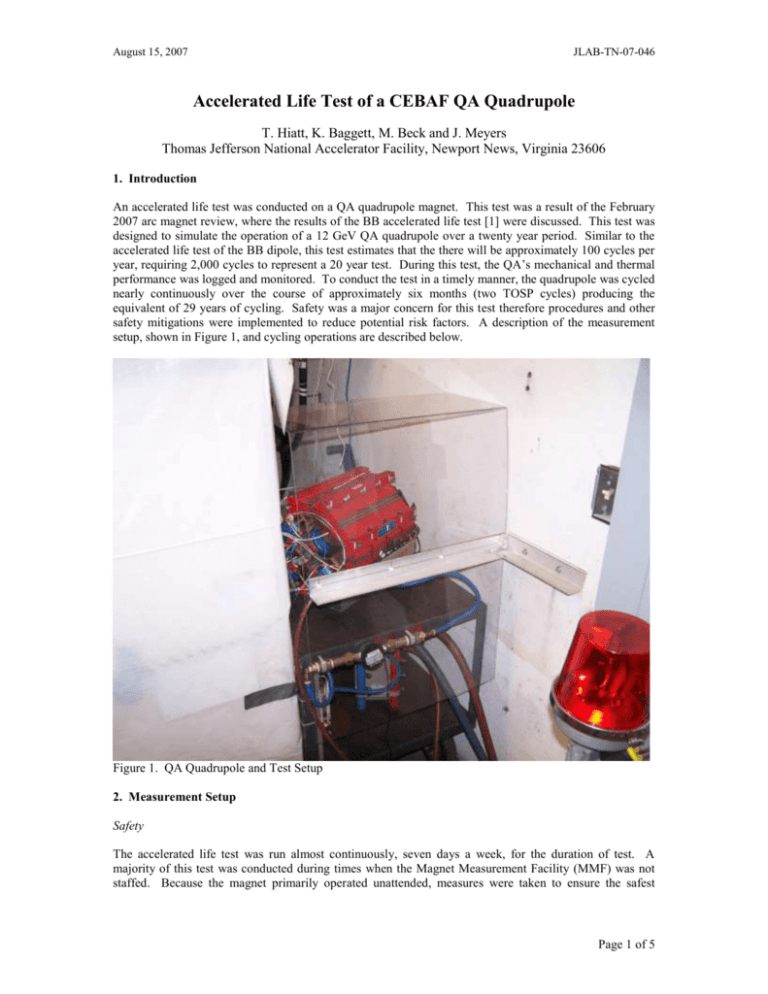
August 15, 2007 JLAB-TN-07-046 Accelerated Life Test of a CEBAF QA Quadrupole T. Hiatt, K. Baggett, M. Beck and J. Meyers Thomas Jefferson National Accelerator Facility, Newport News, Virginia 23606 1. Introduction An accelerated life test was conducted on a QA quadrupole magnet. This test was a result of the February 2007 arc magnet review, where the results of the BB accelerated life test [1] were discussed. This test was designed to simulate the operation of a 12 GeV QA quadrupole over a twenty year period. Similar to the accelerated life test of the BB dipole, this test estimates that the there will be approximately 100 cycles per year, requiring 2,000 cycles to represent a 20 year test. During this test, the QA’s mechanical and thermal performance was logged and monitored. To conduct the test in a timely manner, the quadrupole was cycled nearly continuously over the course of approximately six months (two TOSP cycles) producing the equivalent of 29 years of cycling. Safety was a major concern for this test therefore procedures and other safety mitigations were implemented to reduce potential risk factors. A description of the measurement setup, shown in Figure 1, and cycling operations are described below. Figure 1. QA Quadrupole and Test Setup 2. Measurement Setup Safety The accelerated life test was run almost continuously, seven days a week, for the duration of test. A majority of this test was conducted during times when the Magnet Measurement Facility (MMF) was not staffed. Because the magnet primarily operated unattended, measures were taken to ensure the safest Page 1 of 5 possible conditions. A TOSP (QA Accelerated Life Test with Unattended Operations, Division Serial Number A-07-001-T) was used for guidance on how to properly conduct operations during the test. A convenient physical barrier was already in place, as the perimeter of the MMF was enclosed by a fence that was secured using the CANS system. Only trained and authorized individuals were allowed to enter the MMF unescorted. The QA was placed on a cart and positioned in the southeast corner of the test lab next to one of the large Danfyisik box power supplies. The box power supply was not used during the QA accelerated life test, and was draped with plastic in case of a magnet water leak. A lexan guard was fabricated and mounted to the wall to block any potential water leak from spraying onto electrical panels mounted on the wall adjacent to the experiment, shown in Figure 1. A 40 inch tall red beacon was set in front of the experiment to identify the magnet as a potential electrical hazard. In addition to the physical barriers, standard klixon temperature sensors were attached to the exit cooling line of each of the four coils and interlocked to the 70 V / 20 A Danfysik power supply for temperature protection. The klixons were designed to open at ~85 C. Control Hardware Twelve, 3-wire RTDs were used to record temperature information. Temperatures were measured on the top and bottom of all four coils, on the LCW supply and return line, on the magnet core itself and in the air approximately 6 inches above the magnet. Figure 2 shows the RTD connections. Figure 2. RTD Locations A FP-1600 network interface module, two 8-channel FP-RTD-122 3-wire RTD temperature modules, and a FP-AI-110 analog input module, used to monitor LCW flow, were used for Ethernet based data acquisition. Page 2 of 5 An Omega FTB4607 ¾” pulse output water meter (flow meter) in conjunction with an Omega DPF-701-A 6 digit rate meter (read back/analog output box) was placed on the ¾” LCW supply line used to measure and monitor the LCW flow. Control Software A control computer was used for automated data collection and instrumentation using software written with the National Instruments LabWindows/CVI IDE. The data acquisition software used a timer to control power supply cycling through the standard function calls and serial connection between the control computer and the Danfysik. Every minute, the control software updated a data file with the date, time, the twelve temperature readings, LCW flow, current and voltage for the duration of the measurement. Data files included the data for a twenty-four hour period that started and ended at 0600. The control computer would also monitor the magnet dwell time at each current extreme, the updating of the history file, and the power supply interlock status. If a fault condition occurred in any of these parameters, it would send an alpha page to the on call staff to alert of the fault. Windows operating system updates on the control PC were postponed during the entire test period, to avoid unnecessary risk of introducing incompatible software updates. A secondary monitoring program was setup on a second, independent PC that was geographically separated from the test area in the MMF. Its function was to monitor the primary control software as a redundant system during the course of operations. The monitoring computer was located in T. Hiatt’s office on the 4 th floor of the ARC building to minimize conditions in which both PCs could simultaneously fail due to power outage. The monitoring PC used software written in Borland Builder C++. If the monitoring program detected a problem such as magnet over temperature, LCW interruption or a control computer malfunction, an alpha page was issued to the on-call magnet measurement staff. The monitoring program would also update an HTML web page every minute so that the measurement staff could remotely monitor temperatures and cycling profiles using a standard web browser. If the LCW flow dropped below 0.3 gpm, it would send a text page indicating low flow, while the control computer, if operational, would shut down the power to the magnet. Instrumentation Calibration Flow Calibration LCW flow through the magnet was measured using an Omega DPF-701-A 6 digit rate meter (flow display) in conjunction with a FTB4607 ¾” pulse output water meter (flow meter). The analog output of the DPF701-A was read by National Instruments FP-AI-110 DAC for computer data logging. A sight-glass flow meter was used to control the LCW flow through the magnet and provided adequate calibration for the Omega meter. RTD Calibration Ten of the twelve RTDs that were used for the QA accelerated life test were calibrated according to the following procedure prior to the BB accelerated life test [1]: Ten, 3-wire RTDs, used with National Instruments field point hardware: FP-1601 Ethernet controller, the FP-RTD-122 RTD temperature sensor, and the FP-AI-110 analog input, were placed in an ice bath. The 10 RTDs averaged 31.79 F with a standard deviation of 0.273 F or a normalized standard deviation of 0.9%. The ice bath was warmed to boiling, where the RTDs read back an average of 211.80 F with a standard deviation of 0.372 F, a normalized standard deviation of 0.2%. Several stops were made along the way and the RTDs demonstrated a maximum standard deviation of less than 1 F (0.6 C), which is within the accuracy required for the accelerated life test. 3. Cyclic Operations Cycling Hysteresis was run between -18 and 18 amps using a smooth ramp of 5 amps per second, and was run prior to setting the magnet to the soak current. The magnet soaked for 34 minutes at a high current of 17 amps Page 3 of 5 49 48 47 46 45 44 43 42 41 40 39 38 37 36 35 34 33 32 31 30 COIL 1_TOP COIL 4_BOT SUPPLY_LINE RETURN_LINE 7: 02 : 8: 07 04 : 9: 20 06 10 : 27 :0 7 11 :33 :0 9 12 :41 :1 13 1:4 :1 9 3 14 :56 :1 4 15 :59 :1 7 16 :07 :1 9 17 :15 :2 0 18 :21 :2 2 19 :29 :2 4 20 :44 :2 7 21 :02 :2 22 8:1 :3 6 0 23 :33 :3 2: 0: 4 8 34 : 1: 02 36 : 2: 18 38 : 3: 34 40 : 4: 49 42 : 5: 00 44 :1 5 Temperature (C) and a low current of 0 amps, allowing sufficient time for the magnet to stabilize within 1 C of its maximum coil temperature. Figure 4 shows a typical 24 hour cycle period at several locations. Table 1 shows peak temperatures at several locations. Time (hh:mm:ss) Figure 4. Typical 24 Hour Cycling Period Showing Four of the Twelve RTDs 8/14/2007 Maintenance Periods The magnet was essentially cycled continuously, 24 hours a day, 7 days a week. Initial maintenance inspections occurred three days per week, but were reduced to two days once the test was verified that it was running predictably, in an effort to increase the cycling between maintenance periods. On maintenance days, the magnet was deenergized and inspected for nut torque, terminal lead torque and given a general visual inspection for coil cracking or splitting, cooling plate separation and klixon adhesion. Mechanical Issues In the early stages of the test it was found that the ¼-20 stainless steel nuts that were holding the core quadrants together were relaxing approximately 2 ft-lbs, from the specified torque value of 10 ft-lbs. To investigate what was causing this loosening, the existing all-thread and nuts were replaced. Still, several nuts in each quadrant were loose at subsequent maintenance inspections. Ultimately, Spiral Lock© nuts were used to replace the stainless steel nuts on one quadrant, Lock-Tite 242© was added to the existing nuts on another quadrant, lock washers were installed on a third quadrant and the nuts on the fourth quadrant were not modified. For the remainder of the test, the Spiral Lock© and Lock-Tite© quadrants did not experience loosening, while the lock washer and unmodified quadrants continued to loosen between maintenance periods. To investigate the reusability of the Spiral Lock© nuts, they were removed and rechecked over the course of several maintenance periods to ensure that the locking mechanism in the nuts did not degrade when the nut was removed and reused. The Spiral Lock© nuts continued to be effective after removal and reinstallation. Page 4 of 5 0 amps 17 amps for 34 minutes for 34 minutes (°C) (°C) Supply Line 32.6 32.8 Return Line 32.4 37.2 Magnet Top 33.7 35.5 Air 24.8 25.6 Coil 1 * 32.5 46.7 Coil 2 * 32.4 44.6 Coil 3 * 32.4 46.2 Coil 4 * 32.6 46.5 ---------------LCW Flow 0.3 gpm 0.3 gpm * Average of top and bottom temperatures RTD Location Table 1. Temperature and Flow Conditions for Various Soak Times 8/14/2007, 06:34:00 and 07:10:09 4. Conclusion The accelerated life test ran for 2,934 cycles over a six month period from February 26, 2007 to August 15, 2007. There were occasional down periods, outside of the periodic maintenance, that lasted more than a few hours due to power outages or other circumstances, otherwise the test ran continuously. The only mechanical issue of note was associated with the loosening of torque on the nuts holding the core quadrants together, likely due to thermal cycling at 12 GeV operating currents. Nut loosening was overcome with the use of Spiral-Lock© nuts in place of the standard nuts or the use of Lock-Tite 242© in conjunction with the standard nuts. 5. References [1] T. Hiatt et al., “Accelerated Life Test of a CEBAF BB Dipole with H-Steel”, JLab TN 05-038. Page 5 of 5

