HOW TO EXTRACT DNA FROM ANYTHING LIVING Category Skills
advertisement
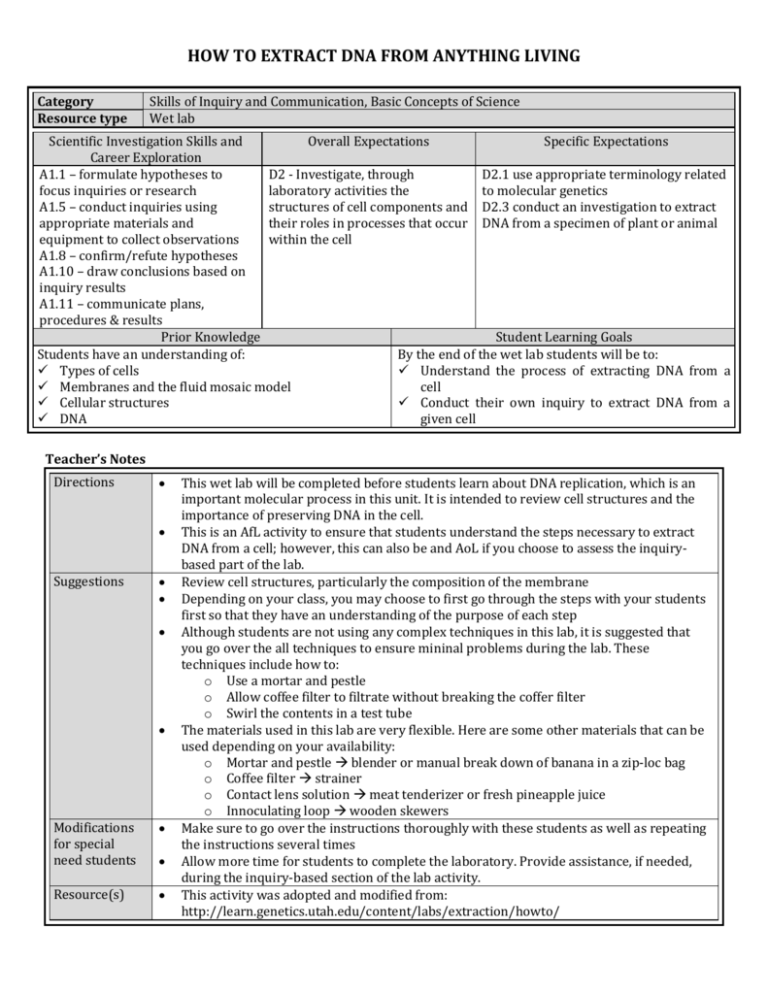
HOW TO EXTRACT DNA FROM ANYTHING LIVING Category Resource type Skills of Inquiry and Communication, Basic Concepts of Science Wet lab Scientific Investigation Skills and Overall Expectations Specific Expectations Career Exploration A1.1 – formulate hypotheses to D2 - Investigate, through D2.1 use appropriate terminology related focus inquiries or research laboratory activities the to molecular genetics A1.5 – conduct inquiries using structures of cell components and D2.3 conduct an investigation to extract appropriate materials and their roles in processes that occur DNA from a specimen of plant or animal equipment to collect observations within the cell A1.8 – confirm/refute hypotheses A1.10 – draw conclusions based on inquiry results A1.11 – communicate plans, procedures & results Prior Knowledge Student Learning Goals Students have an understanding of: By the end of the wet lab students will be to: Types of cells Understand the process of extracting DNA from a Membranes and the fluid mosaic model cell Cellular structures Conduct their own inquiry to extract DNA from a DNA given cell Teacher’s Notes Directions Suggestions Modifications for special need students Resource(s) This wet lab will be completed before students learn about DNA replication, which is an important molecular process in this unit. It is intended to review cell structures and the importance of preserving DNA in the cell. This is an AfL activity to ensure that students understand the steps necessary to extract DNA from a cell; however, this can also be and AoL if you choose to assess the inquirybased part of the lab. Review cell structures, particularly the composition of the membrane Depending on your class, you may choose to first go through the steps with your students first so that they have an understanding of the purpose of each step Although students are not using any complex techniques in this lab, it is suggested that you go over the all techniques to ensure mininal problems during the lab. These techniques include how to: o Use a mortar and pestle o Allow coffee filter to filtrate without breaking the coffer filter o Swirl the contents in a test tube The materials used in this lab are very flexible. Here are some other materials that can be used depending on your availability: o Mortar and pestle blender or manual break down of banana in a zip-loc bag o Coffee filter strainer o Contact lens solution meat tenderizer or fresh pineapple juice o Innoculating loop wooden skewers Make sure to go over the instructions thoroughly with these students as well as repeating the instructions several times Allow more time for students to complete the laboratory. Provide assistance, if needed, during the inquiry-based section of the lab activity. This activity was adopted and modified from: http://learn.genetics.utah.edu/content/labs/extraction/howto/ TEACHING STRATEGIES The DNA extraction protocol can vary according to materials and reagents used but all DNA isolation procedures involve opening (lysing) cells to expose the DNA; breaking down cell membranes with detergent; breaking down proteins with an enzyme; and precipitation and collection of DNA. The DNA extraction lab can also be taught using various strategies. We have included 3 different strategies below for you to choose from depending on the class. 1) ‘DISCOVERY’ PROTOCOL (ON BOARD) - In this strategy, the teacher uses scaffolding questions and visual aids to guide students to come up with the major steps of extracting DNA from the banana before the actual lab. Below are some guiding questions for the teacher to consider. Find some cells Hold up a banana. ‘Where is the DNA in this banana?’ ‘How do we get at it?’ The first step in DNA extraction is the collection of sample cells. All cells contain DNA so this can be done by collecting a sample from a plant or swabbing a person's check, or taking blood samples from the subject being studied. Break / Isolate the cells ‘What would be the first step in order to get to the DNA?’ The next step in the process is to break open, or lyse, the cells so the DNA can be collected. Lysing a cell is often performed by bead beating or sonicating the sample, vortexing it, or blending it. In our lab we mush it with a pestle and mortar (or you could squish it in plastic bags!). Break open the cells ‘How do we get into the cells (what are the membranes made up of?)’ To get rid of the lipid bilayers of the outer membrane and the nuclear membrane (‘lipid’ i.e. ‘fatty’), by adding detergent. Remove proteins / debris ‘What is in the beaker now?’ We need to remove all the unnecessary debris found in the solution. This is completed at the same time as the detergent above. Adding salt to the solution causes the cellular debris and unwanted proteins in the solution to clump together. Scientists can centrifuge the sample to separate the cellular debris to the bottom of the test tube while the DNA remains in the liquid. Instead of doing this, we are going to leave this debris at the bottom while adding alcohol (the next step) above it. Isolate DNA ‘Where do you think the DNA is now? What needs to happen so we can see the DNA?’ After the DNA is released from the cell, it must be precipitated from the solution. Finally therefore, an alcohol, such as isopropyl alcohol, is added and mixed into the solution. Because the DNA is not soluble in the alcohol, it will precipitate out and become visible to the naked eye and easily tested. 2) VISUAL REPRESENTATION (on PowerPoint) - PowerPoint is found on our wiki page: http://molecular-biology-resource-binder.wikispaces.com/3-Wet+lab 3) RECIPE TYPE LABORATORY - Students follow the instructions provided for them on a handout GUIDING QUESTIONS: DESIGNING THEIR OWN EXPERIMENTS Some guiding comments and questions that can be used to scaffold this section of the lab; Consider using different soaps o Does powdered soap work as well as liquid detergent? o What about shampoo? Hand soap? Face wash? o Does the concentration of soap affect how much DNA will be extracted? Consider the alcohol you use o Does the percentage of alcohol content make a difference? o What about the temperature of the alcohol? (Hint: what do you know about enzymes and their functionality in relation to temperature?) Consider all of the steps in the protocol o Are all the steps necessary or can you leave out certain steps? o Could you improve the protocol to give a higher yield or purer DNA Information taken from: DNA extraction protocol from University of Utah, accessed 18th December 2010 http://learn.genetics.utah.edu/content/labs/extraction/howto/ DNA Extraction Explained | eHow.com accessed 13th February 2011 http://www.ehow.com/facts_6076388_dna-extraction-explained.html#ixzz1DriwsMxJ STUDENT HANDOUT Date: ______________________________ Name: ____________________________ Introduction: Genetic screening, forensics, and the study of cancer are some of the many reasons that DNA is extracted from organisms. In order to conduct any investigation related to DNA, the extraction of DNA is an essential first step of a longer laboratory process. In this lab, you will be extracting DNA from different sources and based on your understanding of the cell and structure of DNA you will critically analyse the experimental design. Materials: - 1/5 medium sized banana 1 tablespoon liquid detergent 1/8 teaspoon salt Contact lens solution (4-5 drops) 70 – 95% Isopropyl Alcohol (COLD – should be in the fridge beforehand – to be collected by one member of your group at the beginning of the lab) 200mL cold water Mortar and pestle 1 Beaker 2 Test tubes Coffee filter Teaspoon Tablespoon Inoculating loop Procedure: 1. Using a mortar and pestle, mix 1/5 of a medium sized banana, 1/8 teaspoon (less than 1mL) of table salt and 200 mL of cold water (for this experiment, you can use the measurements on the side of the beaker). 2. Strain the blender contents into a clean beaker. This is known as the ‘filtrate’. 3. Add 1 tablespoon (15 mL) of liquid detergent into the beaker with the filtrate. Gently swirl the mixture then let it stand for 5-10 minutes. DO NOT SHAKE IT ENOUGH TO MAKE IT FOAMY. 4. Pour the mixture into a test tube so that it is about 1/3 full. 5. Add 4 – 5 drops of the contact lens solution into the test tube. Gently swirl the test tube from side to side to mix the contents. 6. In a separate test tube, fill it 1/3 of the way with isopropyl alcohol. 7. Hold the first test tube (with the filtrate in) at about a 45 degree angle. 8. SLOWLY pour the isopropyl alcohol down the side of the filtrate test tube so that it forms a layer on top of the mixture. 9. Using an inoculation loops, collect the stringy material by gently twisting it around the skewer. Design Your Own Experiment Now that you have successfully extracted DNA, you are ready to design your own experiment to extract DNA from different sources. You will follow a similar procedure as the one above, however you may choose to use different materials, and different amounts. Be sure to consider the function of all the materials you use. Use the space provided below to write down the experimental design you have chosen to explore. Once you have produced your experimental design, show your teacher and begin the extraction process. Be sure to record your results and observations in the space provided. Analysis: 1. Describe the appearance of the DNA that you have extracted. 2. How is the DNA similar to and/or different from the way that you thought it would be? 3. Explain how the soap works to break up the cell wall. 4. Explain what happened in the final step when the isopropyl alcohol was added to the extract. 5. Why is it important to pour the isopropyl alcohol slowly so that two distinct layers are formed? 6. List two reasons why it is important for scientists to extract DNA from an organism. 7. Would DNA from a crime scene be different from DNA that you isolated?

