Get Started Entering Your Family History
into PAF 5 in 10 Easy Steps
Step 1
Install the PAF software. If you haven't done so already, use your browser to go to
www.familysearch.org and follow the “Order/Download Products” link to the "Software Downloads Free" section. A CD-ROM of the PAF program also may be available for a minimal shipping fee.
Step 2
When you install the PAF 5 program, you can have a PAF icon placed automatically on your PC's
Windows desktop. Double-click on the little PAF icon on your desktop. The icon is a little brownish
rectangle that has a tiny photo of a family. Once you open the program, it appears on your Windows
taskbar as a tiny photo of one person (the child in the photo). (If the icon isn't on your desktop, open
the PAF program by pulling up the Start menu and accessing FamilySearch under Programs.)
Step 3
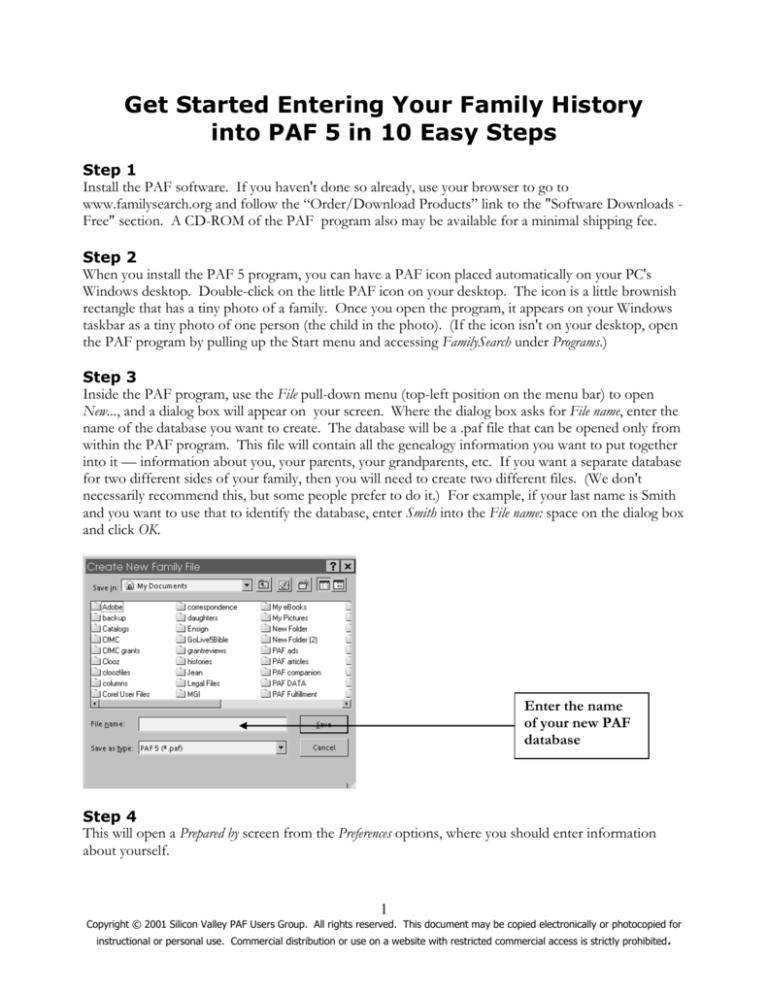
Inside the PAF program, use the File pull-down menu (top-left position on the menu bar) to open
New..., and a dialog box will appear on your screen. Where the dialog box asks for File name, enter the
name of the database you want to create. The database will be a .paf file that can be opened only from
within the PAF program. This file will contain all the genealogy information you want to put together
into it — information about you, your parents, your grandparents, etc. If you want a separate database
for two different sides of your family, then you will need to create two different files. (We don't
necessarily recommend this, but some people prefer to do it.) For example, if your last name is Smith
and you want to use that to identify the database, enter Smith into the File name: space on the dialog box
and click OK.
Enter the name
of your new PAF
database
Step 4
This will open a Prepared by screen from the Preferences options, where you should enter information
about yourself.
1
Copyright © 2001 Silicon Valley PAF Users Group. All rights reserved. This document may be copied electronically or photocopied for
instructional or personal use. Commercial distribution or use on a website with restricted commercial access is strictly prohibited.
You may find it necessary to enter text on each line (this is a bit of a bug). You can enter spaces or just
x's. Don’t worry about the line that asks for your AFN. If you have an AFN, enter it. If you don't
know what an AFN is, leave it blank and don't worry about it for now. When you're finished with that
screen, click OK.
Step 5
This brings up a blank "family group sheet" screen. This is a screen on which you can enter
information about a mother, a father, and their children, as well as information about the children’s
grandparents.
This is the
“home”
position
The upper-left box on this page is the "home" position. If you double-click on that blank box, it will
bring up an Add Individual form that you can fill in with information about the person.
2
Copyright © 2001 Silicon Valley PAF Users Group. All rights reserved. This document may be copied electronically or photocopied for
instructional or personal use. Commercial distribution or use on a website with restricted commercial access is strictly prohibited.
Enter the
individual’s
name
Enter birth,
christening,
death, and burial
dates and places
here
Enter other
information
After you enter a name (just type the name the way you would say it, for example Sally Smith), PAF will
ask you if it has selected the correct last name (or surname) for the person, which is indicated by
enclosing the last name in "/" marks. If you enter the name Sally Smith, PAF will ask you if
Sally/Smith/ is correct. If you don't want PAF to ask you this for every name you enter, you can turn
off this feature (see item 10 below). PAF also will ask you to specify the person’s gender. When you
click Save in the upper right corner of this form, it will save the information, and the basic information
will appear on the screen in the box on the "family group sheet."
The Events section of this screen has blanks for events such as birth, christening, death, and burial. The
first line of each event is for the date the event occurred, and the second line is for the place where it
occurred. This is not the section to enter names or descriptive details, just dates and places. If you
know the name of a county where an event occurred, you can enter the county name between the city
and state (for example, Pittsburgh, Allegheny, Pennsylvania). Since different countries may have different
government structures, place entries may differ considerably from person to person.
Always use a woman's maiden name. If, as a married woman, she went by another name (for
example, if Sally Smith became Sally Jones after she was married), you can enter that name as
Married Name in the bottom section of the form, under Other.
You can also add nicknames, aliases, and other information in that section. You can enter
titles such as Sir and Dr. in the Titles space.
It's fine to leave spaces blank if you don't have that information. Also, you can always come
back and edit or add information.
If you don't have exact dates, you can enter something like abt 1950 (using whatever year is
correct) to indicate that the event happened about 1950. (Caution: Don't type abt. 1950 or
bef. 1950 with a period in the abbreviation, or PAF won't recognize it as an abbreviation.)
Depending on the options you chose when you installed your PAF 5 software, the Add
Individual or the Edit Individual form may have spaces for what PAF calls LDS Ordinances. If you
don't know what this refers to, don't worry. It refers to specific ordinances performed by
3
Copyright © 2001 Silicon Valley PAF Users Group. All rights reserved. This document may be copied electronically or photocopied for
instructional or personal use. Commercial distribution or use on a website with restricted commercial access is strictly prohibited.
members of the LDS Church, or The Church of Jesus Christ of Latter-day Saints, which
sponsors the free PAF software. We'll tell you how to hide the LDS Ordinances blanks and
otherwise personalize PAF in Step 10.
Now you can double-click on the Spouse box, below the top left box, and a new "Edit Individual" form
will pop up. You can enter the information for the spouse of the person in the top left box. When
you're finished with the form, click Save.
Enter the
spouse’s name
and other
information on
this form
PAF's default is to bring up an "Edit Marriage" form after you enter information about a father. Some
people find it handy to have this screen pop up automatically, and others are annoyed by it.
Enter the
marriage
date and
location
4
Copyright © 2001 Silicon Valley PAF Users Group. All rights reserved. This document may be copied electronically or photocopied for
instructional or personal use. Commercial distribution or use on a website with restricted commercial access is strictly prohibited.
In Step 10 we'll tell you how to change this feature if you don’t like the default. Whether or not you
have the box pop up automatically, you should enter marriage information into this box for each
couple.
When either spouse is in the "home" position, a Marriage box will appear just below the "home" box.
Double-click on the Marriage box to open the Edit Marriage form, where you can enter the date of the
marriage and where it took place. Be sure to fill in only the date of the marriage on the line that says
Marriage:. The location of the marriage (if you know the location) goes on the next line. This step may
at first be confusing, if you're wondering whether you should enter the name of the spouse here. In
the Marriage box, enter no names, just dates and places.
Double-click on
this box to enter
date and location
information
about the
marriage
It is not uncommon for a person to have had more than one spouse during his or her lifetime. To
enter a second marriage for an individual, put the person in "home" position and single-click on the
person's box. Using the Add pull-down menu at the top of the screen, select spouse. This will give you
the option (with which you are now becoming familiar) of whether to use an existing name or whether
to add a new name. Once you have added an additional marriage for an individual, by putting that
person in "home" position you can select which spouse you want to appear with that person. With
each separate spouse, you can list the children that came from that particular mother and father.
Another question about marriages that comes up is whether to list people who had children but who
may not have been legally married. We can see that PAF assumes, by use of the word spouse, that
partners are married. However, the important thing to record is who the mother and father are for
each child. Whether or not they were married may be impossible to determine. Even if you know a
couple were not married (as in the case of a medieval European king who had children with a mistress),
list them as mother and father. Similarly, list all children, whether or not they were considered
legitimate according to the laws of the land or the doctrines of a given church.
5
Copyright © 2001 Silicon Valley PAF Users Group. All rights reserved. This document may be copied electronically or photocopied for
instructional or personal use. Commercial distribution or use on a website with restricted commercial access is strictly prohibited.
Step 6
Next let's enter parents. Gather your information about the parents of the person in the "home" (top
left) box, and double-click on the upper right box. First, a dialog box will pop up asking whether you
want to "Add New Individual" or "Select Existing Individual." In this case, the word existing refers not
to whether the person is alive, but to whether you've already entered the person's name in the database.
If you're just starting out, you'll select Add New Individual. Since this is the default choice, you can just
hit the Enter key on your keyboard, and a form identical to the one you filled in for the person in the
"home" position will now pop up. This is where you'll enter the information about the father of the
person in the "home" box. Note that by default, PAF provides the same last name that was in the
record of this person's offspring.
Double-click on
this box to bring
up an “Add
Individual”
screen for the
father of the
person in
“home” position
For the sake of consistency, when you enter information in the two boxes at the upper right, enter
information about a father in the top-right box, and enter information about a mother in the box
below it. (You may be tempted to buck tradition and enter the mother's information in the top box
throughout, which you are, of course, free to do. However, you will soon learn that PAF automatically
assigns male gender to the name you list in the top box. Also, when you share files and information
with others, you may wish you'd used the standard approach.)
In the Family view (in other words, the "family group sheet" view), you will see pedigree information
(in other words, parents, with connecting arrows to earlier and later generations) ONLY about the
person in the "home" position. If you want to see pedigree information about the spouse of the
person in the "home" position, click on the little up-and-down arrows just above the upper-right
corner of the spouse's information box on this page (see next illustration). This will put the spouse in
"home" position, so that you can see the spouse's pedigree lines to the right. Also, do not worry that
information about a person is lost if you switch positions from spouse to spouse — PAF saves
everything you enter, as soon as you click Save or OK on one of the forms.
Step 7
Now enter information about children. If you double-click within the big box on the bottom that says
Children, PAF will bring up the dialog box asking whether you want to add a new person or select an
existing person. If you're just getting started, you'll indicate that it's a new person, which will bring up
6
Copyright © 2001 Silicon Valley PAF Users Group. All rights reserved. This document may be copied electronically or photocopied for
instructional or personal use. Commercial distribution or use on a website with restricted commercial access is strictly prohibited.
the Add Individual form that you've already seen several times. Fill it in with information about the
oldest child in the family. When you finish with that child and select Save, PAF will ask whether you
want to add another child. Repeat this process for all children in the family. If you enter children in an
order other than oldest-to-youngest, you can fix this later, but it's easier to just enter the information
oldest-to-youngest in the first place.
Double-click on
this little doublearrow box to put
the spouse in
“home” position
Double-click inside this
large box to begin
entering information
about children, oldest
to youngest (see Step 7)
Step 8
Congratulations! You've now filled in three generations! You still have a lot to add, but you've done
the basics. Here are some things that you will want to be sure to check for each individual (or
"record") you enter. Double click on the person's name to bring up the Edit Individual form, then
consider some additions to the information, which you can enter using these buttons:
Enter Notes information
here
This button brings up a
list of all the Sources for
this individual
This button allows you to
add digitized images and
other Multimedia
Enter Contact information
about the entry here
Enter general Source
information about the
individual here
If you have extra information about the person that doesn't seem to belong on any of the
spaces on the form, you can put it in the Notes section. To the right of the form itself, below
the Help button, are four buttons with pictures on them. The Notes button is the top-left one
7
Copyright © 2001 Silicon Valley PAF Users Group. All rights reserved. This document may be copied electronically or photocopied for
instructional or personal use. Commercial distribution or use on a website with restricted commercial access is strictly prohibited.
of these four buttons. (If you pass your mouse pointer over the buttons and leave it in place
for a second or two, little signs will pop up telling you what the buttons are.) Click on this
button, and it will bring up a blank form where you can type whatever information you want to
add. It may also bring up a Select Notes box that lets you pick what kind of Note you are
entering.
The bottom-left button just below the Notes button is a place where you can enter contact
information about the person named in the entry, or about someone who is a source of
information about the person named in the entry.
The top-right of the four picture buttons accesses a listing of all the sources you have entered
for this individual. If you're just starting, the list will be empty. Note that underneath the four
buttons with pictures is a larger button that says Individual Sources. This is the button you will
select to add information about the sources of information not included in the individual
Source (s) listings on the lines for Birth, Christening, Death, etc. When you click on the little s
off to the right side of the place information for Birth, Christening, Death, Burial, etc., PAF
will bring up a listing of all of the sources in your database. If you haven’t entered any sources
yet, you will have to start from scratch in entering source information; once you’ve entered a
source, you can select it from this list, so that you don’t have to retype it. The reason the word
Sources is plural is because sometimes different information on the form will come from
different places. For example, a great-great-aunt may give you information about her son's
college graduation date, but other information about him may come from his military records
or from other family members. In PAF, the Individual Sources category is for general
information about the individual, in addition to information included through the Source
buttons.
The bottom-right button with a picture of a camera is the place you can add “multimedia”
information to your database. Don't be concerned if you don't have family videos to add —
multimedia also includes digitized (scanned) snapshots, or a scan of a birth certificate or marriage
certificate. If you don't have those or don't even know how to create them, remember that you
can always add those things later. In the meantime, start collecting your family history
information, including photos and certificates, and keeping them in a safe, dark, dry
place.
Step 9
Before you go any further entering more names, let's change our perspective. Click once on the name
of one of the children in the big box at the bottom of the screen, or click on the "home" box. Clicking
once on the box should make it change shade. Now, at the upper left of your screen, below the menu
bar, click on the "Pedigree" tab. This will bring up the Pedigree view of your database.
PAF has taken your information and created a pedigree chart that contains two or three generations.
Once you enter even more generations, little arrows will appear to the left or right of a name on the
pedigree chart, allowing you to navigate through it to see the relationships among individuals. As you
get more names into your database and navigate through a Pedigree view, you may find it frustrating to
get to the far-right side of the chart and not be able to move farther right to add more names. (This
frustrated us!) There’s an easy solution to this: You can right-click on any name on the Pedigree page
and select an option that says “Move to Primary,” and PAF will put that name in the position at the far
left of the page. Now you can add a whole screenful of names. This one feature can save you a great
deal of time in entering names. PAF has many right-click features for you to explore.
8
Copyright © 2001 Silicon Valley PAF Users Group. All rights reserved. This document may be copied electronically or photocopied for
instructional or personal use. Commercial distribution or use on a website with restricted commercial access is strictly prohibited.
The Pedigree view
of your PAF
database
Some people wonder if there is a “right” type of screen to use for entering information. The answer is
that you should work with whatever is easiest for you. If you enter names in the Family view, you will
have easy access to three generations at once, and it’s easy to add marriage information. If you enter
names in the Pedigree view, and if you have marriage dates for all or most of the people whose names
you are entering, you will want to keep the “Edit Marriage” box in automatic pop-up mode, or you will
need to right-click on a name and select the “Edit Marriage” option. You may find that if you are
entering a long string of names with little information, the Pedigree view will help you keep them all
straight more easily. Or you may find that if you are entering a great deal of information about a
smaller cluster of people, the Family view is easier to use. If you are going back to add or correct
information about an individual, the Individual view will be helpful. You can develop a system that
works well for you.
If you click on the Individual tab at the upper left, to the right of the Pedigree tab, PAF will bring up a
listing of all of the individuals whose information you have entered. They will be alphabetized by
surname.
You will note on that screen, as well as on the Edit Individual form, that PAF creates a “RIN” for each
person. This is just a way for identifying entries in your database, and you do not need to worry about
whether the RIN numbers are in any particular order. RIN numbers are just there for your
convenience, mostly as a way to look up someone quickly.
In the Individual view, you can sort the entries in different ways by clicking on the heading for each
column. Want to sort in reverse alphabetical order? Just click the heading for the Full Name column.
Want to sort by birth date or birth place? Just click the heading on those columns. Go ahead and click
some columns and experiment a little — you won't break anything!
9
Copyright © 2001 Silicon Valley PAF Users Group. All rights reserved. This document may be copied electronically or photocopied for
instructional or personal use. Commercial distribution or use on a website with restricted commercial access is strictly prohibited.
The Individual view
of your PAF database
Step 10
We've been promising you big things for Step 10, and here they are. You can fix PAF to look and act
however suits you. You can change many of PAF’s features so that the program works in a way that is
comfortable and easy for you to use. Many of these changes are made by pulling down the Tools pulldown menu and selecting Preferences at the bottom of that menu. A set of boxes will come up, each
with its own tab. By clicking on a specific tab, you can bring up the options related to that topic. For
example, you can click on the “Names” tab to change the way names appear on the screen and the way
you enter names. Similarly, you can change the way the PAF program appears on your screen.
You can click these
tabs to change many
options about how
PAF works
These are some specific things you can do so that PAF will work just the way you want:
If you want PAF to quit asking you whether it has selected the correct surname (indicated by
"/" marks), on the "Names" tab, unselect "Verify surname marks."
On the "Prepared By" tab, you can enter information about the person who has prepared the
database (which is probably you), if you didn't do this earlier.
10
Copyright © 2001 Silicon Valley PAF Users Group. All rights reserved. This document may be copied electronically or photocopied for
instructional or personal use. Commercial distribution or use on a website with restricted commercial access is strictly prohibited.
On the "General" tab, you can hide the LDS Ordinances information by removing the checkmark from "Use LDS data." Or, if you want the LDS data to show but it doesn't, click on the
box beside "Use LDS data."
Also on the "General" tab is an option that allows you to change the number of times you can
close your PAF database file before PAF will prompt you to make a backup copy. It is an
excellent idea to keep a current backup copy of your database. Store it on a floppy disk or
other removable medium (Zip disk, on another computer on a network system, etc.). If your
computer's hard drive crashes, you could lose all of your family history information unless you
have backed up the file and stored it elsewhere.
If you want PAF to quit popping up the "Edit Marriage" box every time you enter another
couple, go to the "General" tab and uncheck "Edit marriage when created." (Just don't forget
to enter those dates and places later. We keep this option unchecked when we are entering
names of people whose marriage information is missing. When we are entering information
about people who are more likely to have marriage information, we activate this feature.)
If you find PAF's basic grey-and-greyer screen to be (pardon us for saying this) boring, you can
add color! On the "General" tab, click on the "Colors" button at the bottom. This brings up a
box that shows you different elements on the screen whose colors you can change (see
illustration below). In the little window, put your mouse pointer on the feature you want to
change (for example, click on the word "Name" to bring up "Name text" as a feature to
change) and then you can pick a color for that feature. Note that "Name Text" refers to the
letters themselves, and "Name Background" refers to the color of the little box the name is in.
(Even as smart as we are, this confused us for a little while. Experiment a bit.) Click the
"Change Color" button and pick a color you like. If you don't like the basic colors, select
"Define Custom Colors" and click on the rainbow chart to pull up that color. You can change
the color's darkness or lightness by moving the black arrow up or down on the narrow vertical
color bar at the right.
Click the Colors box
to access ways to
change the way PAF
looks on your screen
11
Copyright © 2001 Silicon Valley PAF Users Group. All rights reserved. This document may be copied electronically or photocopied for
instructional or personal use. Commercial distribution or use on a website with restricted commercial access is strictly prohibited.
There they are — 10 easy steps that start you on your way to putting your family history into a
computerized database.
Some people wonder if they should use PAF or use a commercially available computerized database
program. They worry that once they start with PAF, they won’t be able to switch to another program
later. This isn’t something to worry about. PAF (and many other family history software programs)
can import and export the information you enter in what is called GEDCOM format, which allows you
to export and import the information between programs. If you want to use another program at some
time, just be sure that it is capable of reading GEDCOM.
Within PAF, many basic tasks, such as saving your file as a GEDCOM file, opening a GEDCOM file,
or opening a zipped file, are not difficult. The best way to learn how to do these things is to
experiment a little, and if you can't figure it out easily, pull down the "Help" menu and search for an
answer. PAF 5 has excellent "Help" that can answer most of your questions.
As you collect family history information, it's important that you document where the information
comes from. Telling you how to document sources goes far beyond the scope of this little information
article, however. The Silicon Valley PAF Users Group has published a book that helps you know just
how to document the sources for all of your family history records. You can find ordering information
for this book, Family History Documentation Guidelines, at www.svpafug.org. We highly recommend using
this book from the beginning as you start entering information into your database. It is not a tutorial
on how to use PAF; instead, it deals only with issues related to documenting your family history. It can
help you document your sources correctly, from the beginning.
For additional basic information about how to get started with PAF, work through the PAF tutorials
you can download from the www.familysearch.org site. You can download them by going through the
procedure as if you are going to download PAF 5, but selecting the tutorials instead of the PAF 5
download. Once you download the tutorials, access them by opening the PAF program, pulling down
the Help menu, and selecting Lessons. This will automatically open your computer's browser window,
since the lessons are programmed to be read from within a browser, as if they were Web pages. You
may want to select a "work offline" feature as your browser opens. When the lessons open, a welcome
message will appear in your browser screen. To select lessons or parts of lessons, click on the words in
the dark blue section at the left of your screen. Do not click on the white-background main section of
the screen, as words there are not hyperlinked. To go from section to section within each lesson, click
on the numbers underneath the lesson titles in the dark blue section. (We confess that this approach
confused us briefly, as it is not how browser windows typically operate.)
You also can access the “Getting Started Guide," also on PAF's Help pull-down menu. It lists a
number of PAF's new features. Don't worry if some of these terms don't make sense to you at first;
you'll have plenty of time to explore PAF and its many features. Now, go enter those names, and
remember to document your sources!
These instructions brought to you free of charge and with our best wishes
by the Silicon Valley PAF Users Group
www.svpafug.org
12
Copyright © 2001 Silicon Valley PAF Users Group. All rights reserved. This document may be copied electronically or photocopied for
instructional or personal use. Commercial distribution or use on a website with restricted commercial access is strictly prohibited.


