Navisworks Quantification
advertisement
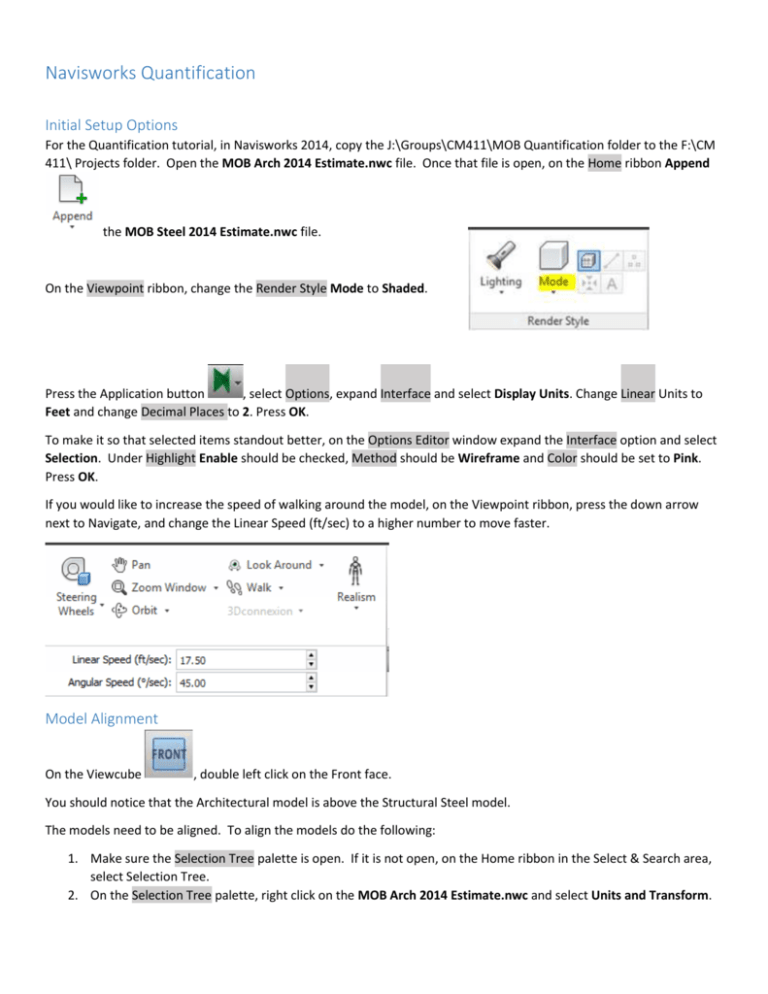
Navisworks Quantification Initial Setup Options For the Quantification tutorial, in Navisworks 2014, copy the J:\Groups\CM411\MOB Quantification folder to the F:\CM 411\ Projects folder. Open the MOB Arch 2014 Estimate.nwc file. Once that file is open, on the Home ribbon Append the MOB Steel 2014 Estimate.nwc file. On the Viewpoint ribbon, change the Render Style Mode to Shaded. Press the Application button , select Options, expand Interface and select Display Units. Change Linear Units to Feet and change Decimal Places to 2. Press OK. To make it so that selected items standout better, on the Options Editor window expand the Interface option and select Selection. Under Highlight Enable should be checked, Method should be Wireframe and Color should be set to Pink. Press OK. If you would like to increase the speed of walking around the model, on the Viewpoint ribbon, press the down arrow next to Navigate, and change the Linear Speed (ft/sec) to a higher number to move faster. Model Alignment On the Viewcube , double left click on the Front face. You should notice that the Architectural model is above the Structural Steel model. The models need to be aligned. To align the models do the following: 1. Make sure the Selection Tree palette is open. If it is not open, on the Home ribbon in the Select & Search area, select Selection Tree. 2. On the Selection Tree palette, right click on the MOB Arch 2014 Estimate.nwc and select Units and Transform. 3. Make the adjustments show on the graphic to the right. This will move the model down so they align. Navigating the Model A few tools that will help you navigate around the models are the following: Select is a tool that can be used to select objects in the model. If you hold down the CTRL key several objects can be selected. The Select tool is found on the Home ribbon. Select Box is a tool that allows several objects to be selected while dragging a box around the objects. The Select Box tool is found on the Home ribbon by pressing the down arrow under the Select tool. Once an object or set of objects has been selected, the option for turning off all the objects that are not currently selected. becomes available allowing Other useful navigation tools can be found on the Navigation bar. (It should be visible) If it is not visible, go to the View ribbon and select Navigation Bar . The tools below are found on the Navigation bar. Orbit allows the view to be rotated by left clicking the mouse. Holding down the center roller button on the mouse allows up and down movement. Zoom Box allows the view to be zoomed into the box created by left clicking and dragging. Walk allows the view to walk to different areas of the model. Pressing the left mouse button and moving the mouse up allows the view to move forward. Moving the mouse left or right moves the view left or right. Press the roller button and move the mouse either up or down moves the view up or down. Rolling the roller button changes the angle of the view. People that I have talked with tell me that using the walk tool is the most common method used to move around the model. Quantification On the Home ribbon, select the Quantification tool . This opens the Quantification palette. Make sure the Quantification palette is pinned screen. open so it doesn’t slide off the Project Setup Select the Project Setup button on the Quantification palette. You will be prompted, Would you like to view Quantification getting started tutorials now?, Select Remind Me Later. If for some reason you selected never, the tutorials can be found by selecting Help in Navisworks. The quantification Setup Wizard now appears on the screen. For this tutorial, we will be making a catalog, aka a database. Once you have created at catalog, you can reuse what you have made by selecting Browse to a catalog. Select CSI-48. Select Next. Select the Imperial units. On the Setup Quantification: Select Takeoff Properties window, change the Model Volume to Cubic Yards. Select Next. Select Finish. Before going on, Save the project on your thumb drive F:\CM 411\projects\MOB\Navis Estimate.nwf. Catalog Items & Resources Overview The catalog is essentially the database file from which you will choose what items to include in the takeoff. In common terms, the catalog is like a store with the estimate being comparable to a shopping cart in the store where you place the items that you need for a project. Inside the catalog there are two things that can be created: Items and Resources. Items are things like slabs, gypsum walls, and footings. The resources would be things like 3000 psi concrete, #4 rebar, forms, metal studs, gypsum board, etc. For this tutorial, we are going to work under the assumption that the estimates that are typically performed are at the design development (DD) stage of estimating. What this means is that the tutorial will estimate the CY of footings, the SF of wall, etc, but not go to the resource level of the catalog. Item Catalog By importing the CSI 48 catalog, the headings for the 48 divisions are brought into the catalog. What needs to be created now are the items for the takeoffs that are going to be performed. Open the Item Catalog Creating Groups for Items On the Item Catalog, in the left column select item Concrete then select New Group. The Group Name is SOMD, the Work Breakdown Structure is 31.31 and the Description is Slab on Metal Deck. Create the Groups in the table below WBS Parent 03 05 05 08 09 WBS 31.30 20.15 10.15 10.00 20.00 Group Name/Description SOG/Slab on Grade LH Joists HSS Steel Doors and Frames Wall Partition Systems Creating Items Now that the groups are made, the items that will populate the groups need to be created. Select the new group, SOMD and then select New Item. For the Item Name use 2.5" LW W3x20, Work Breakdown Structure 100 and the Description 2.5” LW Concrete on W3x 20 GA Metal Deck. Change the color to Gray with 50% transparency. Create the items in the table below. You can copy the item and then paste on the phase and then update the information as needed. WBS Parent 03.31.30 05.20.15 05.10.15 08.10.00 09.20.00 Item WBS Item Name / Description 100 3209 2404 06x06x5/8 100 200 210 220 300 5” Concrete Slab 32LH09 24LH04 HSS 06 x 06 x 5/8 3’0” x 7’ 0” Single Panel Door HM Frame Brown/50% 3’0” x 8’ 0” 3/4 HR Single Panel Door HM Frame 3’0” x 8’ 0” 1 HR Single Panel Door HM Frame 3’0” x 8’ 0” Wood Door Single Panel Door HM Frame 3’8” x 8’ 0” 3/4 HR Single Panel Door HM Frame For the Item calculations below, make the changes to the formula for the Area variable 2 1/2" metal stud partition w/1 layer 5/8" gyp. ea. Side Green/50% =Length*Height 3 5/8" metal stud partition w/1 layer 5/8" gyp. ea. Side =Length*Height 6" metal stud partition w/1 layer 5/8" gyp. ea. Side =Length*Height 2ms5-1L1L 3ms5-1L1L 6ms5-1L1L Color/ Transparency Gray/50% Red/50% Item Calculation The Custom Item Calculation allows for the Area to be calculated based upon the length and height of the wall rather than using the net area provided by the model. Now all the items that are going to be taken off are created in the catalog, the final preparations can be made to perform the takeoff. Close the Item catalog window. Performing Takeoff Viewing what you want to estimate To be able to visually verify what is taken off, the color of the model will be changed to white and made mostly transparent. On the Viewpoint ribbon, on the Mode tool, change to Shaded. On the Selection Tree right click on the MOB Arch 2014 Estimate.nwc file and select Override Item, Override Color. Select the color White. Right click on the model again and Override the transparency to 50%. Also change the Steel model to white. Right click on the model again and Override the transparency to 50% In this tutorial, selected Doors, Walls, Slabs and Joists will be taken off. To make it easier to see when these items are taken off, the other objects on the model will be turned off. On the Selection Tree, expand the Arch model and select all the families except for Doors, Floors, Structural Framing, and Walls. On the Home ribbon, select Hide . Select the entire Steel model and Hide it. All that is visible in the model are the objects that will be taken off. Count Takeoff (doors) To see all the doors in the model, on the Selection Tree select Doors. With the model being white and transparent, the doors should be visible as pink wireframe rectangles throughout the model. The doors that are going to be taken off are the Single_Plain Panel_Hollow Metal Frame1 doors. On the Selection Tree expand the Doors family and select this grouping of doors. Take a minute and walk through the model. As your walking through the model, if you want to get a feeling of where the various types of doors underneath the Single_Plain Panel_Hollow Metal Frame1 are, expand the group and select on the various types of doors to see the locations. On the Quantification palette, select the 1 HR doors that were created in the catalog, WBS item 210. On the Selection Tree, expand the 3'-0" x 8'-0" 1 HR UCSD doors and select each instance of the doors. Right click on the highlighted doors and select Quantification and select Takeoff to 3’0” x 8’0” 1 HR Single Pane Door HM Frame. On the Quantification palette, on the lower right hand portion of the palette should be listed the doors. Do the same process for the 3’0” x 8’0” Wood Doors. For the 3’0” x 8’0” ¾ HR UCSD doors, expand the group and select the 3 doors. This time, drag them to the appropriate item in the catalog. This is another method for takeoff. Assign the rest of the doors in the Single_Plain Panel_Hollow Metal Frame1 group to the appropriate items in the catalog. Wall Area Takeoff (partitions) The only two types of wall that will be taken off for this tutorial are A2A and A3A. To better see what types of wall these are expand the Partition A2A and select one of the Basic Walls. Open the Properties palette, Home, Display, Properties On the Properties palette, look at the Revit Type tab. On the Description row it states, 2 1/2" metal stud partition w/1 layer 5/8" gyp. ea. Side. We now know what item in the catalog to assign wall type A2A. When you look on the Properties palette, on the Revit Type tab, you see the Description of the wall type Repeat the process of A3A. After the A3A walls have been taken off, select the first Basic Wall under the A3A wall type and try to assign it to the catalog. As you try to assign it the error below appears: Navisworks tracks which objects have been taken off and will warn you if you try to takeoff objects a second time. Select NO on the window that appears. Review the rollup quantities for the walls. Remember that these quantities by default are the net areas of the wall rather than the gross area of the walls and since we changed the calculation method in the item catalog, we now have the gross area of the walls By default, the Unconnected Height is not set in Navisworks. I have made changes to an XML file in the background to make this happen. If you are not working on a computer in the Snell Building’s computer you will need to copy the file from the following link (right click and Save As): WEB Link and place it at the following location on your computer: C:\Program Files\Autodesk\Navisworks Manage 2014\Quantification\takeoff_maps to have the Unconnected Height appear. Collapse the Walls group on the Selection Tree. Also takeoff the A6A wall type. Slab Area Takeoff (building slabs) On the Selection Tree, Expand Floors, Floor. Select the Concrete – 5” group of objects. As you look at the model observe that the ground level floor is select in the Pink wireframe. Expand the Concrete – 5” object and select the Floor object. Drag it to the correct location in the catalog. Expand the UCSD 2.5” LW Concrete on W3 x 20 GA Metal Deck and then observe where these slabs are located in the project. The 1st Floor object is the second floor, The 2nd Floor object is the 3rd Floor and the last Floor object are actually two slab objects located on the roof level. For this tutorial, only takeoff the first two floors to the catalog. Collapse the Floor group on the Selection Tree. Lineal Takeoff (LH Joists) Since there is structural steel found in both the Architectural and Steel models, a comparison needs to be made between the models to see if there is any duplication between the models. On the Arch model, hide all the families except for the Structural Framing family. Unhide the Steel model. Now Override the color of the Structural Framing in the Arch model to Orange. With only the steel visible with each model, spend a minute and walk around to see if it looks the steel is unique or a duplication of each other. After walking around the model, it appears to be duplicate steel in each model. Work from the understanding that it is duplication and that the Steel model is correct and that the architectural steel is a place holder. Therefore, we will hide the Architectural Structural Framing family. On the Selection Tree, under the MOB Arch 2014 Estimate.nwc, select the Structural Framing. Right click and select Hide. For the joist takeoff, only takeoff Jois Type 4. This takeoff consists of the two joist types below. 24LH770 use 24LH04 32LH770 use 32LH09 Find & Measure Takeoff Sometimes several tools need to be used together to perform a takeoff. In the image below, notice the pink colored items. These items are HSS members, in which the vertical members have been modeled as columns and the sloped brace has been modeled as a structural framing member called a Mechanical Kicker with no length type of properties. The other thing to notice as you drive around these objects is that some of the frames do not have the kicker modeled even though as an estimator, we believe all the frames will have the kickers. The first thing to do is to select one of the tall vertical pieces of the frame. Notice in the Selection Tree, it highlights the member that is selected. With the Property palette open, on the Element tab, Navisworks identifies the category as a Structural Column. Structural Columns do not have a Height associated with them. Now select one of the diagonal Kickers. Examine the Properties of the Kickers. There is no Length associated with them. So the complete Mechanical Screen support needs to be taken off but none of the objects have any length properties associated with them. Therefore the Measure tool needs to be used. If the Measure tool is not visible, on the View ribbon, select the Windows tool and then place a check mark in the box to the left of Measure Tools. To make it easier to measure one of the frames I’m going to select all the objects that make up the mechanical screen wall support and then hide the rest of the model. To select the objects, on the Home ribbon, use the Find Items tool with the selections shown below. To get the plus sign next to the second row, right click on the second row and select Or Condition. Press the Find All button and all the objects associated with the mechanical screen wall supports should be selected. Now on the Home ribbon select the Hide Unselected tool. On the Measure Tools palette select the point to point tool and measure the tall vertical member. When the cursor is over the end point it becomes and X. This helps ensure you are measuring the length you want. Since I’m not sure if all tall pieces are the same length, I measure several of them. I find that they are not the same length. Therefore I measure a couple of them and found the lengths to be between 10.42’ and 11.41’. I will use an average of 10.92’. To measure the shorter pieces and the kickers, use the multi point measure tool . Using this tool, measure the short vertical piece and the diagonal kicker. After measuring the points, select the ESC key on the keyboard to end the tool selection. Again, measure several of pieces to determine if there lengths varies. I measured two of the short vertical pieces and the diagonal pieces and found the length to be between 9.2’ and 10.14’. I will use and average height of 9.67’. As I count the number of kicker frames for the mechanical screen wall I count 30. As I was counting the number of frames, I notice that on the Northwest side, most of the frames are missing the diagonal support and some of the frames are missing the short vertical piece. Therefore any lengths that I would get from the model would be incorrect. However, I do want to change the color of the objects so that I can visually notice that they have been taken off. With all the information above, I’m now ready takeoff these objects. In the catalog, we previous created HSS 6 x 6 x 5/8 objects. However I’m nervous that if I use the standard item in the catalog that there is a possibility that this takeoff for the kickers could be mixed in with other potential HSS 6x6x5/8 objects located somewhere else in the model. Therefore, in the Item Catalog, duplicate the 6x6x5/8 object in the catalog and name the new item, 6x6x5/8 Kickers. On the new item, change the color to orange. Also, down in the formula area, change the weight formula to: =Length*42.3. This will take the length of the members and multiply it by the weight per foot of the HSS 6x6x5/8. Now drag the objects down to the 6x6x5/8 Kickers on the Quantification Workbook. Since the length isn’t coming in for any of the objects, I’m going to manually calculate for all the members on one row in the Quantification Workbook. On the first row for the kickers in the Length column, enter the following calculation: =30*(10.92+9.67) Exporting to Excel On the Quantification palette, select the Import/Export tool and select Export Quantities to Excel. Browse to \CM 411\projects\MOB and save the file as MOB Tutorial. Open the File after exporting the quantities. On the spreadsheet that opens, look at the various tabs. The tab that is a quick summary of the takeoff is the Groups Pivot Table tab. From this sheet, you could arrange a lookup table from an estimating DB in Excel to start pricing out the work. Taking off what isn’t Modeled Items to add Virtual takeoff Compare Tool
