demo_sample_write_up_marshall_f12
advertisement
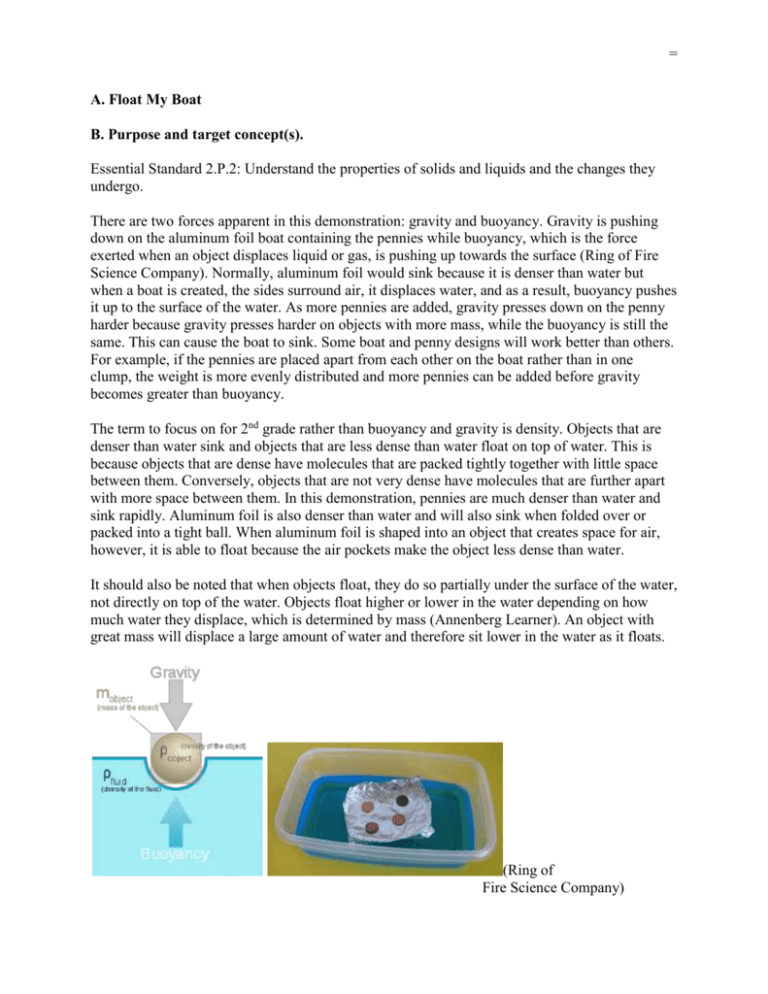
= A. Float My Boat B. Purpose and target concept(s). Essential Standard 2.P.2: Understand the properties of solids and liquids and the changes they undergo. There are two forces apparent in this demonstration: gravity and buoyancy. Gravity is pushing down on the aluminum foil boat containing the pennies while buoyancy, which is the force exerted when an object displaces liquid or gas, is pushing up towards the surface (Ring of Fire Science Company). Normally, aluminum foil would sink because it is denser than water but when a boat is created, the sides surround air, it displaces water, and as a result, buoyancy pushes it up to the surface of the water. As more pennies are added, gravity presses down on the penny harder because gravity presses harder on objects with more mass, while the buoyancy is still the same. This can cause the boat to sink. Some boat and penny designs will work better than others. For example, if the pennies are placed apart from each other on the boat rather than in one clump, the weight is more evenly distributed and more pennies can be added before gravity becomes greater than buoyancy. The term to focus on for 2nd grade rather than buoyancy and gravity is density. Objects that are denser than water sink and objects that are less dense than water float on top of water. This is because objects that are dense have molecules that are packed tightly together with little space between them. Conversely, objects that are not very dense have molecules that are further apart with more space between them. In this demonstration, pennies are much denser than water and sink rapidly. Aluminum foil is also denser than water and will also sink when folded over or packed into a tight ball. When aluminum foil is shaped into an object that creates space for air, however, it is able to float because the air pockets make the object less dense than water. It should also be noted that when objects float, they do so partially under the surface of the water, not directly on top of the water. Objects float higher or lower in the water depending on how much water they displace, which is determined by mass (Annenberg Learner). An object with great mass will displace a large amount of water and therefore sit lower in the water as it floats. (Ring of Fire Science Company) = C. Materials needed. Roll of aluminum foil Pennies (at least 6 per group) Clear bowls (1 per group of 3 or 4 students) Water (enough to cover just over half of each bowl) Medium-sized pencil eraser Paper clip Rubber band Ping pong ball D. Procedure. 1.) Optional: Tell story of Archimedes and the Golden Crown. Archimedes lived in Greece in 200 B.C. and at that time, the King of Syracuse (the ancient capitol of Sicily, which is now a self-governing region of Italy) gave a smith enough gold to forge a crown. The king was a suspicious man and when the smith was done, the king thought that he had taken some of the gold for himself and replaced it with silver in the crown. Wanting to know the truth, the king asked Archimedes if he could figure out the answer. The crown and the original amount of gold had the same weight but it wasn’t the weight that mattered as much as the stuff inside. Archimedes was smart and well known for being a scientist, mathematician, and inventor so he knew that gold is twice as dense as silver, meaning that the inside of gold is twice as packed as silver; the molecules are closer together in gold than in silver. All Archimedes had to do was figure out if the crown had the same density as gold such as the gold the king gave the smith. What Archimedes did was put both the crown and the same weight in gold into water at separate times to see how much the water would rise, or the amount of water that each displaced. 2.) Alternately have students predict whether the eraser, ping pong ball, paper clip, and rubber band will sink or float. Stop to explore why and introduce the term of density (how closely packed together the molecules are, whether the object is denser or less dense than water determines whether it sinks or floats). = 3.) Have students predict what will happen when aluminum foil is placed in water. Place unfolded piece of aluminum foil in the water (sinks). Ask what would happen if we folded the piece of aluminum foil then place folded aluminum foil in the water (sinks). Ask what we could do to make it float. Why would that work? What makes it float or sink? These questions lead to air pockets being formed in the aluminum foil make it less dense than water and float. Boats have air inside that also help them float. Build a boat. 4.) When you have an aluminum foil boat that floats, ask what would happen if you placed a penny in the boat (sinks further down but probably not to the bottom depending on the size and quality of the boat you made). Why? (The pennies make the boat denser. Also gravity and buoyancy but don’t need to introduce this with 2nd graders.) (Pop Physics) Below: Sinking ball of clay vs. floating formed clay 5.) Challenge students to make their own aluminum foil boats and see which group can make a boat that holds the most pennies. Optional: Tell them that they have been asked by a huge corporation to build a ship that will hold the most cargo possible and still make it to its destination. Have the group with the most explain to the class what they did and why. = 6.) Discuss how this relates to the real world: cargo ships, transportation and trading by water. The students were just ship engineers! E. Questions you will ask. 1. What are real-world connections to this demonstration? People who design ships have to think about what we just experimented with. They have to know how many passengers can board a ship without it sinking and/or how much cargo a ship can carry. This demonstration is a miniature version of what happens with designing ships in the real world. 2. What questions might you ask? Include sample answers. (5 required, with at least 2 requiring significant higher-order thinking) What might happen if we had a bigger container and could build a bigger boat? Would it hold more or fewer pennies? Why? (It would hold more pennies because you can spread them out further and gravity and buoyancy have a greater surface area to act on; or they might say fewer pennies because a bigger boat would be heavier) How might the results of this experiment change if we used a different material for the ship, such as clay, wood, or steel? (They would float but they would also be heavier than foil so you couldn’t put as many pennies; or they might say you could put more pennies because since they’re already heavier, penny weight won’t make as much of a difference) What can you do to make an object that is denser than water float? (Shape it into a hollow object with air pockets; shape it into the form of a boat) How is this demonstration applicable to the real world? (People who design ships have to calculate how many passengers or how much cargo a ship can hold before sinking) What is happening when the boat is sinking? (Gravity is greater than buoyancy) Why does a boat without pennies in it float? (Buoyancy is greater than gravity) What is the relationship between gravity and buoyancy in this demonstration? (They act against each other allowing the boat to either sink or float depending on which force is greater) How could your boat design affect how many pennies it can hold? (Higher sides mean it can sink further without overflowing as quickly; a longer boat means you can spread the pennies out more) F. Reference Sources. 1. What was the source of this idea? Ring of Fire Science Company. (2009-2012). Aluminum Foil Boats. <http://www.kids-funscience.com/easy-science-experiment.html>. 2. What are some sources for background information? = Annenberg Learner. (2012). Children’s Ideas About Rising and Sinking. <http://www.learner.org/courses/essential/physicalsci/session6/ideas.html>. Newton and Ask a Scientist Educational Programs. (2012). Water Displacement. <http://www.newton.dep.anl.gov/askasci/phy99/phy99x34.html>. Pop Physics. (2012). Buoyancy. <http://popphysics.com/chapter-4-fluid-mechanics/buoyancy/>. The Engineering Toolbox: Resources, Tools and Basic Information for Engineering and Design of Technical Applications! <http://www.engineeringtoolbox.com/centre-gravitybuoyancy-d_1286.html>. G. A photograph of you doing your demonstration. H. A reflection on how the demonstration went, including student responses. Be sure to explore what you learned about teaching and learning from doing the demonstration. You should use specific examples from students (comments, misunderstandings, actions). Note possible modifications. Initially, I wasn’t sure about the story because I knew I’d need to modify it to make it about density rather than buoyancy and I wasn’t sure how well it would connect to what we were doing once I modified it. In the end, I decided to tell the story. I got really into the telling of it and the students absolutely loved it! They gave me fascinated wide-eyed looks the entire time I was talking. This taught me that I should tell stories more often to introduce demonstrations and lessons. One girl was confused by the story; she didn’t understand how gold could be denser than silver and yet they both sink when placed in water. She thought that if one thing was less dense than another, the less dense object would always float and the denser object would always sink. It’s all relative to each other; it’s not simply what is denser than water but that different objects have different densities. She didn’t seem to understand my explanations and I ended up asking = the other students if they could explain it in a different way. I finally decided to continue with the demonstration to see if something else I did along the way would clear it up. She seemed to understand better by the end. If I did this again, I would have a model readily available of how this works in case students have trouble understanding my explanations. The students caught on to the aluminum foil floating in boat form extremely quickly, which I wasn’t expecting. This taught me that I should never underestimate students and should always inquire about their background knowledge. When asked what was inside a floating ping pong ball, half said “Air!” and half said “nothing.” Once we established that it was air, they knew immediately that what was inside the aluminum foil boat was air. When asked what they could do to make aluminum foil, which is denser than water, float they understood and said to make it hollow and make a boat out of it so it would have air pockets. Students were not sure how this demonstration related to the real world; I had to tell them because they couldn’t make the connection. This makes me think that I should have given them the task from the beginning of being ship builders and telling them to build the strongest ship that can hold the most cargo to sail across the ocean. What they did relate to was the Titanic. They told me detailed descriptions of why the Titanic sunk, which I related to how when it took on water, it became denser than water. In response to the question of what would happen if we could build a bigger boat and if it would hold more pennies, one group put all of their pieces of foil together to make one large boat. This boat did the best by far and needed more pennies. They ended up using erasers in order to add enough for it to sink. I wasn’t expecting them to build such strong boats; I definitely should have brought more pennies but they were able to continue with modified materials. Luckily, I had an eraser on hand from the demonstration and we all knew that it would sink, so = that gave me the idea to modify on the spot. Also having smaller groups and/or bigger containers might have been better so that the group members would each have more hands-on experience with building the boat(s). In response to how their boat design could affect how many pennies it can hold, we discussed how you could have higher sides and how one group was able to build a bigger, stronger boat when they put their aluminum foil together. We all examined that group’s design. Afterwards, I let other students share what they designed as well. We also discussed how spreading out the pennies would help rather than piling them all up. Boys especially liked this demonstration; it was hard for me to pull them away from experimenting with their boat. This makes me think that I should provide more time for them to explore on their own or give the ones who quickly succeed an extra challenge. Overall, this demonstration went well and the students were very engaged and enthusiastic. I think this was set up well with the story and continued because the students were able to try it out themselves with an extra challenge. Relating to the real world needed some work but this is definitely a demonstration that I would turn into a lesson and do again with other students. A. Where is the Wind? B. Purpose and target concept(s). Essential Standard 2.E.1: Understand the patterns of weather and factors that affect weather. Warm air rises and cool air sinks (Levine & Johnstone). In this demonstration, we witness warm air rising off of a heat source by watching it move spiraled paper. The paper moves because the warm air pushes against the bottom of the spiral as it moves upward. Warm air rises because the molecules are further apart, making it less dense than the molecules of cooler air (History for Kids). When the warm air moves upward, cooler air rushes in to take its place, which creates wind and often changes in weather (Levine & Johnstone). = (Levine & Johnstone) C. Materials needed. One piece of construction paper Optional: Pieces of paper of various weights (try notebook paper, tissue paper, and/or a plastic bag) Scissors Thread (about 100 cm, length can vary) Tack or other small sharp object for punching hole through paper Source of heat, not open flame (lamp, hot plate, radiator, etc) Clothes hanger (optional) D. Procedure. 1.) Cut paper into a spiral shape. 2.) Poke a hole through the top of the paper, push thread through and tie off. Either hold the spiraled paper by the top of the thread or hang it on a clothes hanger. 3.) Place a few inches above the chosen heat source (not a good idea to do this over open flame because you are placing paper above it and it could catch fire). 4.) Watch the paper turn around and around. 5.) Discuss why the paper is moving and what would happen if we used thinner paper, cut bigger spirals, used a warmer heat source, etc. If you chose to also cut different types of paper , have students predict what might or might not be different then place each over heat source. 6.) Discuss how this is related to the weather outside. (Changes in weather often occur because of warm air rising and cool air falling.) = E. Questions you will ask. 1. What are real-world connections to this demonstration? This is a miniature version of how wind is created outside. After doing this demonstration, students will know more about the changes in weather that they experience daily. 2. What questions might you ask? Include sample answers. (5 required, with at least 2 requiring significant higher-order thinking) Does air move? How can you tell? (Wind in trees, clouds, sometimes you can see it, etc.) How could we alter the demonstration so that the paper moves more/faster? Less/slower? (Make the heat source hotter; vary the size of the spirals to catch more or less moving air) What does this demonstration tell you about weather? (Changes in weather often occur because of warm air rising and cool air falling) What is the relationship between temperature and wind? (Warm air rises and cool air rushes in to take the place of the warm air, creating wind and severe weather) How might you construct an experiment to demonstrate that cooler air moves down? (Hold ice or something very cold above a paper spiral and see if it moves because of the cool air falling) How could you design a bigger version of this demonstration to test the movement of the wind outside? (An extremely long piece of paper; watching trees move in the wind; any number of varied outlandish and reasonable answers) How would you measure and predict the wind if you were a scientist? (Use technology such as radar and weather balloons to look at high and low pressure systems and if a lot of warm air is rising, a cold front might be coming in to replace that warm air) F. Reference Sources. = 1. What was the source of this idea? Shar Levine and Leslie Johnstone. (2006-2012). Learn Where Wind Comes From. <http://www.education.com/activity/article/where_wind_comes_from_fourth/>. 2. What are some sources for background information? History for Kids. (2012). Hot Air Rises. <http://www.historyforkids.org/scienceforkids/physics/weather/hotairrises.htm>. Shar Levine and Leslie Johnstone. (2005). Wonderful Weather. New York: Sterling Publishing. G. A photograph of you doing your demonstration. H. A reflection on how the demonstration went, including student responses. Be sure to explore what you learned about teaching and learning from doing the demonstration. You should use specific examples from students (comments, misunderstandings, actions). Note possible modifications. I did this demonstration after two others that involved molecules and the one before this dealing with density. Because of this, the students caught on to the idea of molecules very quickly and the idea of density (hot air molecules are further apart and moving faster so they rise above the less dense, cold, close together molecules) quicker in this one than the last one. It also seemed to be something they could all relate to when thinking about how they’ve seen air move outside. When I began the demonstration by asking if air moves and how they know, they immediately shouted “Wind! You can see it outside!” along with agreements about seeing it in the trees and by the clouds. They also immediately caught on to the second question about what the demonstration tells them about weather, shouting out “Storms!” which is linked to what happens when hot and cold air collide outside. The students did have trouble with my about how we could construct the experiment to demonstrate that cooler air moves down. They didn’t give any of my answers and only eventually came up with “turn the heat off?” which makes me think that the question was too = abstract and needed more support with thinking about how cool air is moving down at the same time that warm air is moving up. Also, while they seemed to grasp the real world connections easily at first, when I asked them again at the end, they seemed less sure than I thought. This makes me think that I should spend more time on it. When we talked about how we could build a bigger version of the demonstration to test the movement of wind outside, they were excited to think about it and called out “A big fire! A piece of paper!” I hadn’t thought of those answers and they weren’t particularly feasible but I accepted any ideas they had to offer. They also caught on to weather balloons and radar for technology that meteorologists use fairly well, probably because their teacher gave a lesson about them recently. Overall, this demonstration went well. Students were less enthusiastic about it than the previous one and I think I could have made it more interesting by making it more hands-on. I refrained from having them test their own pieces of paper because I didn’t want them too close to the hot plate; the boys especially were quite keen on answering with “It will catch on fire!” to any of the questions I asked. In retrospect however, I think I would let them create and test their own designs under close supervision and as long as they act like serious scientists.
