Fundamentals of pressure measurements
advertisement
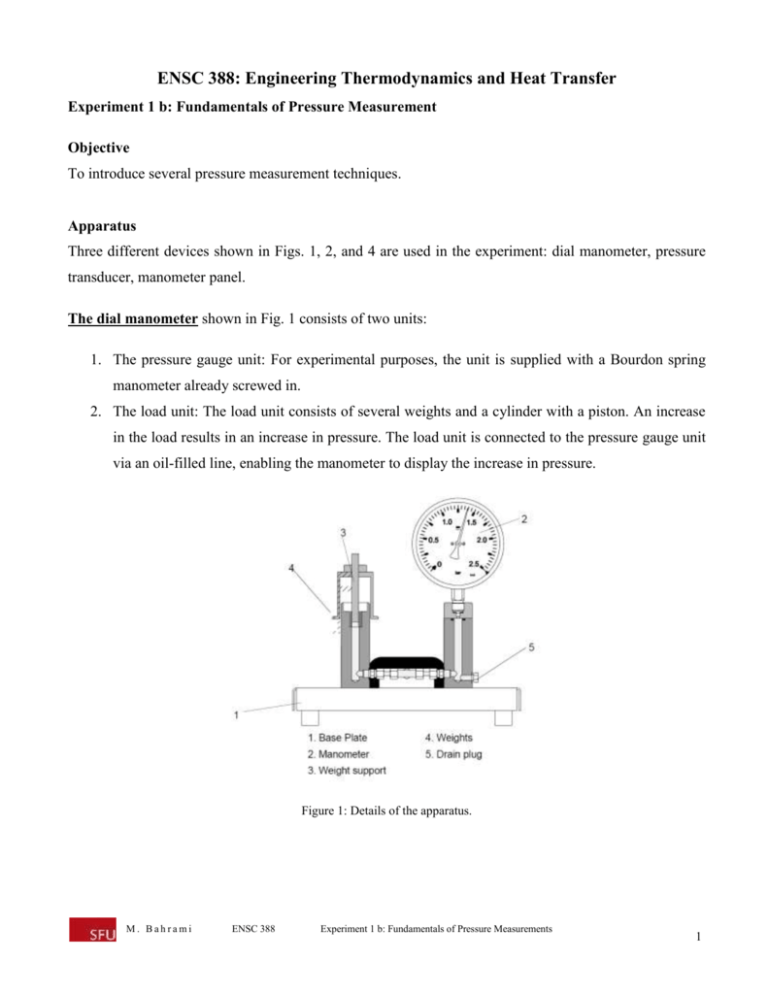
ENSC 388: Engineering Thermodynamics and Heat Transfer Experiment 1 b: Fundamentals of Pressure Measurement Objective To introduce several pressure measurement techniques. Apparatus Three different devices shown in Figs. 1, 2, and 4 are used in the experiment: dial manometer, pressure transducer, manometer panel. The dial manometer shown in Fig. 1 consists of two units: 1. The pressure gauge unit: For experimental purposes, the unit is supplied with a Bourdon spring manometer already screwed in. 2. The load unit: The load unit consists of several weights and a cylinder with a piston. An increase in the load results in an increase in pressure. The load unit is connected to the pressure gauge unit via an oil-filled line, enabling the manometer to display the increase in pressure. Figure 1: Details of the apparatus. M. Bahrami ENSC 388 Experiment 1 b: Fundamentals of Pressure Measurements 1 The pressure transducer system is similar to the dial manometer device expect the measuring part which is a pressure transducer with a digital display, see Fig. 2. The connection between the load unit and pressure measurement unit is shown in Fig. 3. 1. 2. 3. 4. 5. Table-top housing 6. Manual spindle for the compensation cylinder 7. Digital display 8. Cylinder with covering cap 9. Pressure transducer Figure 2: Details of the experimental setup. Connection cable Weights holder Compensation cylinder On/off switch A cutaway model of pressure sensor is also available. On the cutaway model the entire arrangement, can be seen. The manometer panel shown in Fig. 4 includes a U-shaped manometer, a slanted manometer, and two dial manometers. The manometer tubes have quick action connections on the ends that enable one to connect them to each other. The test pressures are generated using a plastic syringe. M. Bahrami ENSC 388 Experiment 1 b: Fundamentals of Pressure Measurements 2 1. 2. Load mechanism with piston, weight carrier 3. Pressure transducer Pipe work 4. Compensation cylinder Figure 3: Plan view of the setup. Figure 4: Manometer panel device. M. Bahrami ENSC 388 Experiment 1 b: Fundamentals of Pressure Measurements 3 Procedure To check the zero point of the dial manometer or pressure transducer, proceed as follows: Press the piston out of the cylinder using the hand wheel (Fig 5a). Remove the piston and the weight support (Fig 5b). Adjust the oil level in the open cylinder until the cylinder is filled up to the edge (Fig 5c). The tested manometer or pressure transducer should now indicate zero, as it is only subjected to ambient pressure. If the cylinder is not quite filled, despite the fact that the hand wheel has been screwed in completely, the oil should be topped up. For this purpose, unscrew the hand wheel approximately 10 - 15 mm and pour oil into the cylinder until it is totally full. (a) (b) (c) Figure 5: Steps for checking zero point of manometer. Once the zero point of the manometer or pressure transducer has been tested, the weight support is reinserted into the cylinder of the pressure gauge unit. The piston is then slowly lowered by unscrewing the counterbalance cylinder until it is freely suspended. In order to avoid static friction, set the weight support in gentle rotation. The mass of the support is 385 g. Taking into account the piston diameter of 12 mm, it is now possible to determine the increase in pressure according to the following basic equation: 𝐹 = 𝑚𝑔 , 𝑃= 𝐹 𝐴 (1) where 𝑔 is the gravitational acceleration. This produces the following results: 2 𝐹 = 𝑚 [𝑘𝑔] × 𝑔 [𝑚 ⁄𝑠 2 ] = 0.385 × 9.81 = 3.78 [𝑁] (2) 𝜋𝑑 2 𝐴= = 113.1 𝑚𝑚2 4 𝐹 3.78 𝑃= = = 0.334 𝑏𝑎𝑟 𝐴 113.1 (3) (4) Other pressure values occurring when the weight on the support is increased can be calculated in exactly the same way. First weigh the six loads and test both apparatuses for six different weights and then M. Bahrami ENSC 388 Experiment 1 b: Fundamentals of Pressure Measurements 4 compare the calculated results with the values shown by the pressure gauge. Using the results determine the accuracy of the setups. Discussion 1. Why should the pressure at the bottom of the piston be the same as the value measured by the pressure gauge? 2. What is the difference between slanted and regular U-shape manometers? 3. Can you discuss on the accuracy of different pressure sensors? Which one do you recommend? 4. Calculate the linear regression and square of the correlation coefficient (𝑅 2 ), using the formula and software (e.g. MS excel) and compare the results. What does 𝑅 2 mean? Table 1: Measured data Dial Manometer Pressure Load 1. Weight support ( )[gr] Pressure transducer pressure ( )[bar] ( )[bar] 2. ( )[gr] ( )[bar] ( )[bar] 3. ( )[gr] ( )[bar] ( )[bar] 4. ( )[gr] ( )[bar] ( )[bar] 5. ( )[gr] ( )[bar] ( )[bar] 6. ( )[gr] ( )[bar] ( )[bar] M. Bahrami ENSC 388 Experiment 1 b: Fundamentals of Pressure Measurements 5
