Grade One Music Theory Handbook
advertisement
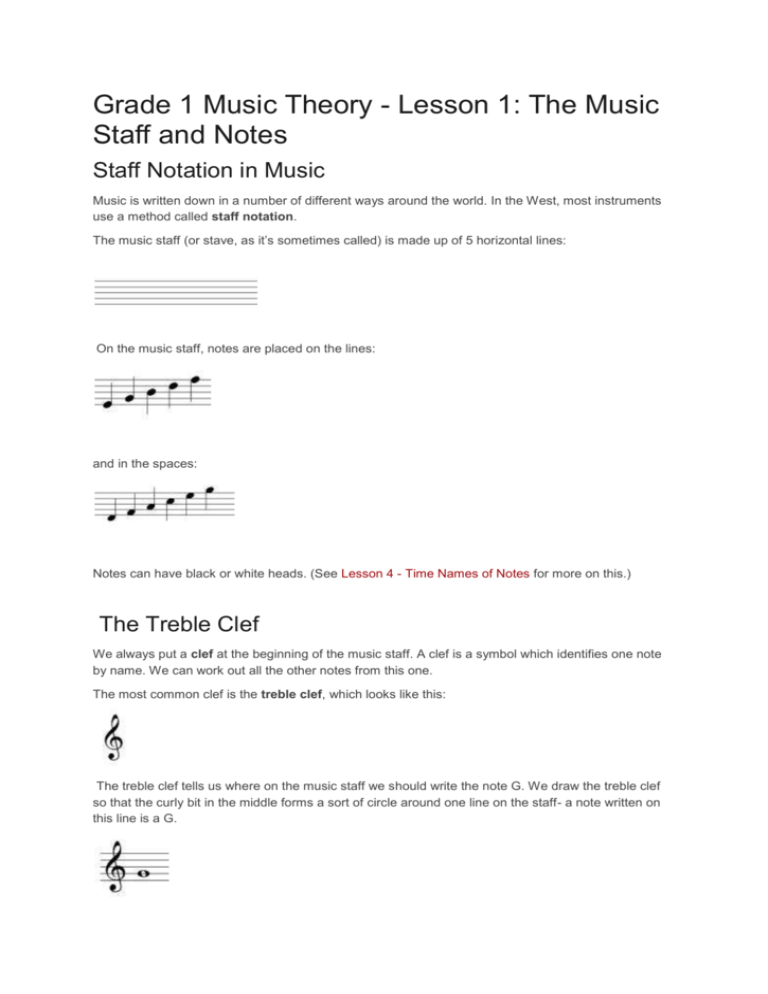
Grade 1 Music Theory - Lesson 1: The Music Staff and Notes Staff Notation in Music Music is written down in a number of different ways around the world. In the West, most instruments use a method called staff notation. The music staff (or stave, as it’s sometimes called) is made up of 5 horizontal lines: On the music staff, notes are placed on the lines: and in the spaces: Notes can have black or white heads. (See Lesson 4 - Time Names of Notes for more on this.) The Treble Clef We always put a clef at the beginning of the music staff. A clef is a symbol which identifies one note by name. We can work out all the other notes from this one. The most common clef is the treble clef, which looks like this: The treble clef tells us where on the music staff we should write the note G. We draw the treble clef so that the curly bit in the middle forms a sort of circle around one line on the staff- a note written on this line is a G. Sometimes it’s called the G clef because of this. Now we know where the note G is, we can work out all the other positions of notes on the staff. Letter Names In music theory, we use the letter names A-G (always written in capital letters) to identify notes. After G, the next note is A, (because we start the sequence again). G is on a line on the music staff, so the next note up, A, is in a space: The next note up is B, which is on a line Here are all the lines and spaces of the music staff filled up: You can try to remember the letter names of the notes on lines by learning Every Good Boy Deserves Football And you can learn the notes in the spaces by memorising D – FACE - G or you can make up your own silly sentences to help you remember! The Staff and Notes Exercises Note Names (Treble Clef) 1. Give the letter name of each of the notes marked *. The first answer is given. Writing Notes (Treble Clef) 2. Write the notes which these letters represent. (Sometimes there are two possible positions, as in the first F.) Grade One Music Theory - Lesson 2: Clefs Bass Clef We have already learned about our first clef, the treble clef. For most low-pitched music, (where most of it is lower than middle C), we use the bass clef. The bass clef looks like this: The two dots of the bass clef are placed either side of the line where we can find the note F, so it's also known as the F clef. This is the first F below middle C. Note Names We can work out the other notes just like we did with the treble clef. Here are the notes on the lines: And here are the notes in the spaces: The note above B is middle C. It's useful to be able to write middle C in both clefs. We use a small line for it to sit on, just like we did in the treble clef: Remember that in the treble clef, middle C is at the bottom of the staff: Grade One Music Theory Exercises- Lesson 2: Clefs Exercises Note Names (Bass Clef) 1. Give the letter name of each of the notes marked *. The first answer is given. Writing Notes (Bass Clef) 2. Write the notes which these letters represent. (Sometimes there are two possible positions, as in the first A.) Writing Clefs - (Treble and Bass Clef) 3. Draw the correct clef for each of these notes. Grade One Music Theory - Lesson 3: Accidentals In music theory, the term "accidentals" is used to describe some notes which have been slightly altered. Accidentals are the symbols which are placed before the note on the stave - they can be "sharps", "flats" or "naturals". In this unit we'll have a look at what accidentals are exactly and how they are used in music theory. The Octave To begin, let’s look at a piano keyboard again. The yellow note is middle C, and the green note is the next C above it. How many different notes are there between these two Cs? If we count all the black and white notes, we’ll find there are 12 different notes. (Don’t count the C twice!) This span of notes is called an "octave" in music theory. This isn’t only true for the piano – every instrument uses the same series of notes. Sharps and Flats So, we have 12 different notes, but we only use 7 letters of the alphabet. We use the words “sharp” (=higher) and “flat” (=lower) with a letter name, to cover all those “in-between” notes. Sharps and flats are two kinds of "accidentals". We can use symbols for accidentals, instead of the words sharp and flat. Sharp symbol Flat symbol Find the notes C and D on this keyboard: They are both white notes (but we've coloured the C in yellow to help you find it!). In between them, you’ll see a black note. We can say that this note is a bit higher than C, so it is “C sharp” (C#), or we can say it is a bit lower than D, so it is also “D flat” (Db). Here’s another example. Find the notes F and G. The black note in between F and G can be called F sharp (F#) or G flat (Gb). Here are all the notes between the two Cs. Click on the >Play button to hear what they sound like (requires Flash): Naturals The third type of accidental we are going to look at is called the "natural". We use the word “natural” (or the symbol ) to say that a note is neither sharp nor flat. This is very useful, because sometimes when a note has already been altered by an accidental (flat or sharp), we need to put a natural sign in to tell the player that it isn't flat or sharp any more. Flats, sharps and naturals make up the main accidentals, and they are the only accidentals you need to know for grade one music theory. Questions on Accidentals In the Grade 1 music theory exam, you are sometimes asked to identify the higher or lower note of a pair. The notes will be in the same position on the staff, but have different accidentals next to them. Remember that flats are low and sharps are high, while naturals are in the middle. Which of these two notes is lower ? Тhe first note is G natural, and the second note is G flat. Flats are lower, so the second note is lower. Which of these two notes is lower? The first note is G natural, and the second note is G sharp. Sharps are higher, so the first note is lower. Barlines and Accidentals When an accidental has been written, all the other notes which are the same pitch, (or position on the staff), are also affected by the accidental, but only until a barline is drawn. Here’s an example: 1 is natural, because we haven’t put any accidentals. 2 is flattened by the flat symbol. 3 is also flattened by the symbol from number 2. 4 is natural, because the barline cancels the effect of the flat. 5 is flattened by the accidental symbol. 6 is naturalised by the barline. Notes of the same letter name, but which occupy different positions on the staff, are not affected by each other’s accidentals. 3 is an A natural. The flat on number 2 doesn’t affect it, because it’s not the same pitch – it’s an octave higher. Grade One Music Theory Exercises - Lesson 3: Accidentals Exercises Point your mouse at the staff to reveal the answers. 1. For each pair of notes, circle the one which is higher. 2. For each pair of notes, circle the one which is lower. Barlines and Accidentals 3. Circle every A flat in this extract. 4. Circle every C sharp in this extract. Grade One Music Theory - Lesson 4: Times Names of Notes - from Semiquavers to Semibreves Click here to see this page with the note names in American English Note Shapes To show how long notes should be held for, we draw them with different shapes. Most notes are made up of a notehead and a stem (apart from semibreves, which have no stem). Crotchets The most basic and most common length of note is the crotchet, which looks like this: or this It’s a black note-head on a basic stem, (or stick). A crotchet usually represents one beat. As musicians, we can decide for ourselves exactly how long a beat should be, but a common duration for a crotchet is about one second. Here are 4 crotchet Ds. Quavers Notes which are twice as fast as crotchets are called quavers. They look like this: or this Notice that although the quaver has a black note-head like the crotchet, it also has a small tail on the right side of its stem. Here are 8 quavers, F sharps and Gs. Minims Minims are twice as long as crotchets, or if you prefer, minims last for 2 beats. Minims look like this: or this Notice that minims look like crotchets, but their heads are white, not black. Here is a minim B and a minim A, in the bass clef: Semibreves Semibreves are twice as long as minims, or if you prefer, semibreves last for 4 beats. Semibreves look like this: Because semibreves don’t have stems, there’s only one way to draw them. Here is a semibreve D in the bass clef: Semiquavers Semiquavers are twice as fast as quavers, or 4 times faster than crotchets. Four semiquavers take up the same amount of time as 1 crotchet. So, a semiquaver is equal to a quarter (fourth) of a beat. A semiquaver looks like this: or this We can join together two or more semiquavers like this: Semiquavers look like quavers, but they have two tails where quavers have one. Here are some semiquavers in action: why are Semibreves called Semibreves? There is another note, called a breve, which is worth two semibreves. Breves aren't used very much these days, so you don't need to know about them for your grade one music theory exam. A long time ago, breves and semibreves were quite short notes. Over time, they have become longer and longer, and so today we think of semibreves as very long notes, but it wasn't always the case! Grade One Music Theory Exercises - Lesson 4: Note Names Exercises Point your mouse at the staff to reveal the answers. *You can use either the British or the American terms in all the music theory exercises on this page. Time Names 1. Give the time name of each note marked with a star (e.g. "minim" or "half note"*). The first one has been done for you. 2. Put these notes in order of length, starting with the longest. Note Names and Time Names 3. Give the note name and time name of each of the following notes. 4. Give the note name and time name of each of the following notes. Answer: 4. Give the note name and time name of each of the following notes. Grade One Music Theory - Lesson 5: Time Names of the Rests (UK Version) Click here to see this page with the note names in American English Rest Shapes In music theory, rests are symbols which tell you to stop playing, and how long to stop for. Rests come in different shapes depending on how long they last for, just like notes do. Rests take the same names as the notes of the same length. Crotchets 1 beat = crotchet rest. The crotchet rest is a kind of squiggle which isn’t easy to draw nicely. If you find it difficult, you might prefer to use another version, which looks like this. Quavers 1/2 beat = quaver rest. The quaver rest looks a bit like a number 7, with a circle at its tip. If you look again at the “easy” crotchet rest, you’ll notice that it is, in fact, a back-to-front quaver rest. Semiquavers 1/4 beat = semiquaver rest. The semiquaver rest looks a lot like the quaver rest, but it’s got 2 tails, just like the semiquaver note has. Minims 2 beats = minim rest. The minim rest is a small, coloured-in block. The minim rest sits on the middle line of the staff. Semibreves 4 beats = semibreve rest. The semibreve rest is the same size block as the minim rest, but its position is different - it hangs off the second line from the top. If you find it hard to remember the positions of the 2 and 4 beat rests, remember that that 4 is a higher number than 2, so a 4-beat rest is higher up the staff than a 2 beat rest. Semibreve rests are also used as “whole bar” rests. This means that the whole bar should be silent, even if the bar doesn’t contain exactly 4 beats. Grade One Music Theory Exercises - Lesson 5: Rests Exercises Point your mouse at the staff to reveal the answers. Notes and Rests 1. Next to each note, write a rest that has the same time value. Adding Rests 2. Add the rests together, to make a new rest. Grade One Music Theory - Lesson 6: Dotted Notes What are Dotted Notes? In music theory, all notes and rests can have their lengths increased if we add one or more dots. For Grade 1 music theory, you only need to understand what happens when we add one dot. Notes with dots are called dotted notes. Dots are always placed on the right side of the note head. A dot makes a note (or rest) longer by 50%. Or, in other words, a dotted note is equal to itself plus half of itself. Crotchet/Quarter note= 1 beat Dotted crotchet/quarter note= 1 + 1/2 beat = 1 and a half beats Minim/Half note= 2 beats Dotted minim/half note= 2 + 1 = 3 beats Quaver/Eighth note= 1/2 beat Dotted quaver/eighth note= 1/2 + 1/4 = three quarters of a beat If you find it difficult to think in numbers, try something more refreshing, like an orange! Point your cursor at the fruit to see what it represents. One whole orange is like one whole beat, or a crotchet/quarter note. It's the same size as ... ...two half oranges (quavers/eighth notes) or even four quarter oranges (semiquavers/sixteenth notes). If you add a dot to a note, it's like adding a smaller bit of orange to the bit you've already got. One whole orange plus half an orange would be called a "dotted whole orange"! One half orange plus one quarter orange would be a "dotted half orange"! Grade One Music Theory Exercises - Lesson 6: Dotted Notes Exercises Point your mouse at the staff to reveal the answers. Dotted Notes Sums 1. Write one dotted note which is equal in length to the notes given. More Dotted Notes Sums 2. Write one note (dotted or undotted) which is equal in length to the notes given. Grade One Music Theory - Lesson 7: Beaming Notes (UK Version) Click here to see this page with the note names in American English Beaming We have already learnt that in music theory, notes which are smaller than one beat - quavers and semiquavers - have tails. To make music easier to read, we normally group these small notes together in complete beats. To do this, we join the tails together, making them into a straight line. We call this line a "beam"- these are beamed notes. Making Beamed Notes Notes with one tail (quavers and dotted quavers) have one beam. Semiquavers have two tails so they have two beams, which are drawn quite close together. Here are some examples of beamed quaver notes. Quavers can be beamed to semiquavers like this: We can also join dotted quavers to semiquavers with beams, like this: Notice that the lower semiquaver beam is quite short. This is a cut-off beam. Cut-off Beams We find cut-off beams in music theory when a single semiquaver is joined to a quaver. Cut-off beams are quite short - they should be about as wide as the note-head. They can point in either direction, depending on which side of the quaver they are on. Here's another example of beamed notes which have cut-off beams: Grouping Beamed Notes We use beams to group notes together in whole beats. So, semiquaver notes are beamed together in fours: We also usually group quavers in fours, making two beats: Beaming and Rests We can include rests inside a group of beamed notes. Rests themselves are never beamed - we simply insert them between the notes. We can change their horizontal position on the stave if we need to, to make the music clearer. The semiquaver rest has been moved downwards a little bit so that it doesn't get mixed up with the beamed notes. Angling Beams Sometimes we need to beam together notes which are quite far apart on the stave. How should these two notes be beamed? Keep in your mind the fact that beaming exists to help us read music quickly. Beaming should follow the general direction of the music, from left to right. If the music is getting higher, the beam should point upwards; if it's getting lower it should be downwards. If the pitch of the beamed notes is the same, the beam should not slant at all. In our example, the music is getting higher, so the beam has to slant upwards. Stem Direction - Beaming Two Notes Now we have to choose whether to make the stems point up or down: Which one looks better to you? To work out which way to draw your stems when beaming two notes, first you need to work out which note is furthest from the middle line. In our example above, the bottom D is further away from the centre line than the top D is. The note which is furthest away from the middle line tells us which way we should draw our stems. The bottom D has its stem pointing upwards, so that's the direction we should use with our beaming: is the right answer! If we had to beam the following - we would draw our stems the same way round. Here, the bottom D is still further away, so we follow this D's stem direction: However, if we change the notes to Fs, you will notice that we have to change to stems down, because the top F is further from the middle line than the bottom F: so in this case the beamed notes have their stems the other way round. Stem Direction - Three or More Notes Beamed Together When beaming together groups of three or more notes, we need to look at all the notes in the group and see how many are above the middle line and how many are below it. If there are more notes above the middle line, stems will point downwards. If there are more notes below the middle line, stems will point upwards. Here's an example: There are three notes above the middle line, so the stems point downwards. If there is an equal number of notes above and below the middle line, use the note which is furthest away from the middle line as your guide. The furthest note from the middle line is the F, so we use stems up. Sometimes you might find that you have to break the rules in order for your music to look ok when writing beamed notes. Don't worry if that's the case - these are really guidelines rather than music theory rules. Use the rules of beaming where you can but don't be afraid to try something different if it makes the music clearer! Grade One Music Theory - Lesson 8: Tied Notes Ties In music theory, a tie is a small, curved line which connects two notes of the same pitch . The time values of tied notes are added together - you only play the note once. A tie looks exactly like a slur - but a slur connects two notes of a different pitch and tells the player to play the two notes smoothly. Be careful not to confuse ties and slurs! The first F is a tied note, the second F is slurred: Some Examples of Tied Notes A minim (half note) and a quaver (eighth note) tied together, making a tied note of 2 and a half beats. Two crotchets (quarter notes) tied together across a barline. We hold the tied note for 2 beats. Positioning Ties Ties are usually written on the opposite side of a musical note to its stem. In the examples that we just looked at, the A's have their stems up, so the tie is placed underneath the notes. The Fs are stems down, so the tie is drawn above the notes. Ties and Barlines Ties can cross barlines. Sometimes a tied note is needed at the end of a line or a page and another tied note is needed at the beginning of the next. When this happens, we draw half the tie at the end of the first line, and the other half at the beginning of the next line, like this: The C at the end of this line has the first half of the tie... and the C at the beginning of the next line has the other half of the tie. Ties and Accidentals An accidental placed on the first of two tied notes also applies to the second tied note, even if the two notes are separated by a barline. The second note is also F sharp. Sometimes you might see an accidental in brackets on the second note. This is called a "courtesy" accidental - it's only there to make it clear what the note is supposed to be. This often happens when a tie is broken over two lines. Ties and Beams We don't normally put both ties and beams onto notes. We usually break the beam over two tied notes. This is the wrong way to do it: We need to break the beam over the two middle notes, like this: Grade One Music Theory Exercises - Lesson 8: Tied Notes Exercises Point your mouse at the staff to reveal the answers. For each pair of notes, say if there is a tie or a slur. Good Ties Correct the mistakes Correction Grade One Music Theory - Lesson 9: Time Signatures (UK Version) Time Signatures In music theory, a time signature is a symbol which we write at the beginning of a piece of music to show how many beats there are in one bar. Here's a time signature: Grade One Music Theory Requirements In Grade 1 music theory you need to know three time signatures: The Bottom Number The bottom number in a time signature tells you the type of beat we need to count in each bar. The number 4 represents a crotchet beat. So, in Grade One music theory we only need to think about counting crotchets. The Top Number The top number tells us how many beats we need to count in each complete bar. So, means we should count two crotchet beats in each complete bar means we should count three crotchet beats, and means we should count four crotchet beats. Barlines We draw vertical barlines through the stave to divide the music up into complete bars. (Sometimes the first and last bars of a piece can be incomplete, but all the bars in between must be complete ones). Here's an example in 2/4: The values of the notes in each bar always add up to two crotchet beats. Here's an example in 3/4. This time the first bar is incomplete: The values of the notes in each bar add up to three crotchets, except in the first and last bars which are incomplete. Working out the Time Signature In the Grade 1 music theory exam, you might have to work out the time signature of a short piece. How do we do that? First, pencil the value (length) of each note underneath it, in the same way as you saw in the previous two examples. Then carefully add the values together. You should get the same total in each bar. If you didn't, then you've made a mistake so check your working out! Don't forget that in the Grade One music theory exam, you only need to know 2/4, 3/4 and 4/4, so the right answer must be one of these three. You'll never be presented with a tune that changes time signature in the middle of the piece in the Grade One music theory exam (but you'll have to do that in later grades!) Try this practice question. Hover your mouse over the music to see the working out and the correct answer: Adding Missing Barlines In your music theory exam, you might have to add the missing barlines to a short tune with a given time signature. How do we do that? Let's work out where to put the barlines in the following melody: First, look at the time signature. How many beats do you need to count? (Don't forget, the top number on the time signature tells us how many to count.) In this melody, the time signature is 3/4, so we need to count three crotchets in every bar. You'll always get the first barline drawn for you, as an example. It's a good idea to pencil the note values in as you do this exercise too - it's easier to work out where you've made a mistake and to double check your answers if you've done so. Let's pencil in those note values: Start adding together the note values until you reach the number you need - remember it will always be 2, 3 or 4 crotchets in the Grade One music theory exam. Then draw a barline, (use a ruler for neatness*). Then start counting again. Repeat the process until you get to the end of the melody. Your last bar should also have the full number of beats (in the Grade One music theory exam that is, but not always in real life!) Double check your answer - go back and count each bar again. If one of your bars has a different number of beats to the others, you have made a mistake! Make sure that your lines are totally vertical (not leaning to one side or the other), that they don't poke up higher or lower than the staff, and that they are placed about one note-head's width away from the note on the right. Look at the first barline that you were given as an example, and use it as a guideline. Click here for a complete time signature chart (includes all time signatures - not just those on the grade 1 syllabus!) Grade One Music Theory Exercises - Lesson 9: Time Signatures Exercises Point your mouse at the time signatures and staff to reveal the answers. Time Signature Meanings 1.Give the meaning of the 3 in 3/4 2. True or false? The time signature 4/4 means that there are four crotchet (quarter note) beats in a bar. Adding a Time Signature Add the time signature to each of these three tunes. 1. 2. 3. Adding Barlines Add the missing barlines to these three tunes. The first barline is given in each. 1. 2. 3. Grade One Music Theory - Lesson 10: Tones and Semitones n the "C major" scale, both the first and the last notes are Cs- but how do we know what the inbetween notes are? On the piano, a C major scale uses all the white notes (so it doesn't have any sharps or flats), but on other instruments, we don't have white notes, so how do we know which notes to use? In fact, what we need to know is the distance between each of the notes in the scale. The distance between any two notes of the scale which are next to each other will be either a tone or a semitone; but what are tones and semitones? Semitones Let's use the piano keyboard to look at some examples of semitones. If two notes are as close as possible on the piano keyboard, we call the distance between them a semitone. Find E and F on the piano keyboard. The distance between E and F is a semitone; it's not possible to squeeze another note in between them, because there is nothing between them on the piano keyboard. Now find A and B flat. The distance between A and B flat is also a semitone. Tones If there is one note between the two notes we are looking at, the distance between those two notes is called a tone. A tone is the same as two semitones. Find G and A on the keyboard. G-A is a tone. We can squeeze a G sharp/A flat between them. E-F sharp is a tone. F natural sits between them. Tones and Semitones in the Major Scale Let's look at that major scale again, and see what the pattern of tones and semitones is (T for tones and S for semitones): The pattern is T-T-S-T-T-T-S. In fact, all major scales follow the same pattern of tones and semitones, so try to remember it! T-T-S-T-T-T-S Grade One Music Theory Exercises - Lesson 10: Tones & Semitones Exercises Point your mouse at the staff or light bulb to reveal the answers. Tones and Semitones Describe each pair of notes as either a tone or a semitone. 1. 2. Tones and Semitones in Major Scales How many semitones are there in one octave of a major scale? What is the pattern of tones and semitones in ascending major scales? Grade One Music Theory - Lesson 11: Major Scales The Major Scale In Grade One music theory, you need to know about four major scales: C, G, D and F major. In music theory exams, scales are written using semibreves (whole notes). C Major Scale We've already learnt that C major doesn't have any sharps and flats (because it uses only the white notes on the piano keyboard). We've also learnt that allmajor scales are built with the same pattern: T-T-S-T-T-T-S (T=Tone and S=Semitone). G Major Scale Let's look at G major next. We'll construct the scale using the T-T-S-T-T-T-S pattern that we've just learnt. We'll start by putting the first G on the stave. We're using the treble clef, but it works just the same way in the bass clef. The next note we need, as you can see from the pattern above, is a tone higher than G. The note which is a tone higher than G is A, (because we can squeeze a G sharp/A flat between them). So A is our next note: The third note is, again, a tone up. From A, the next tone up is B, (we can squeeze A sharp/B flat in between them). Next we meet our first semitone - C. (There is nothing we can squeeze in between B and C). Hopefully by now you've got the idea, so here are the rest of the notes of the G major scale: G major has one sharp - F sharp. You might be wondering why we choose F sharp and not G flat, since they are the same note on the piano. When we write a scale, we use each letter of the alphabet once only, except for the first and last notes which must have the same letter. G major must start and end onG, so we've already used up that letter. We haven't used F though, so we can use that, and make F sharp. D Major Scale Let's look at D major next: The scale of D major has two sharps - F sharp and C sharp. F Major Scale The last scale we need to look at for the grade one music theory exam is F major: The F major scale doesn't have any sharps, but it has one flat - B flat. Remember, we can't use A sharp instead of B flat, because we've already got an A in the scale. Ascending and Descending Scales Scales can be written going up or going down. Scales which go up are called "ascending", and scales which go down are "descending". When we write a descending scale, the pattern of tones and semitones is reversed, so instead of being T-T-S-T-T-T-S, it is S-T-T-T-S-T-T. Here's an example of the F major descending scale, using the bass clef. Degrees of the Scale In music theory, the first and last notes in any scale are called the "tonic". The other notes can be referred to by number. In C major, the second note in the scale is D, so we can say that D is the 2nd degree of the scale of C major. We always use the ascending scale to work out the degrees of a scale. Every scale has seven degrees, because there are seven different notes. The distance of eight notes, from low C to top C for example, is called an "octave". Here's a summary of the degrees of the scales of C, D, G and F major: Tonic (1st) 2nd 3rd 4th 5th 6th 7th Tonic (Octave) E F G A B C C Major C D G Major G A B C D E F# G D Major D E F# G A B C# D F Major F G A Bb C D E F
