View/Open
advertisement
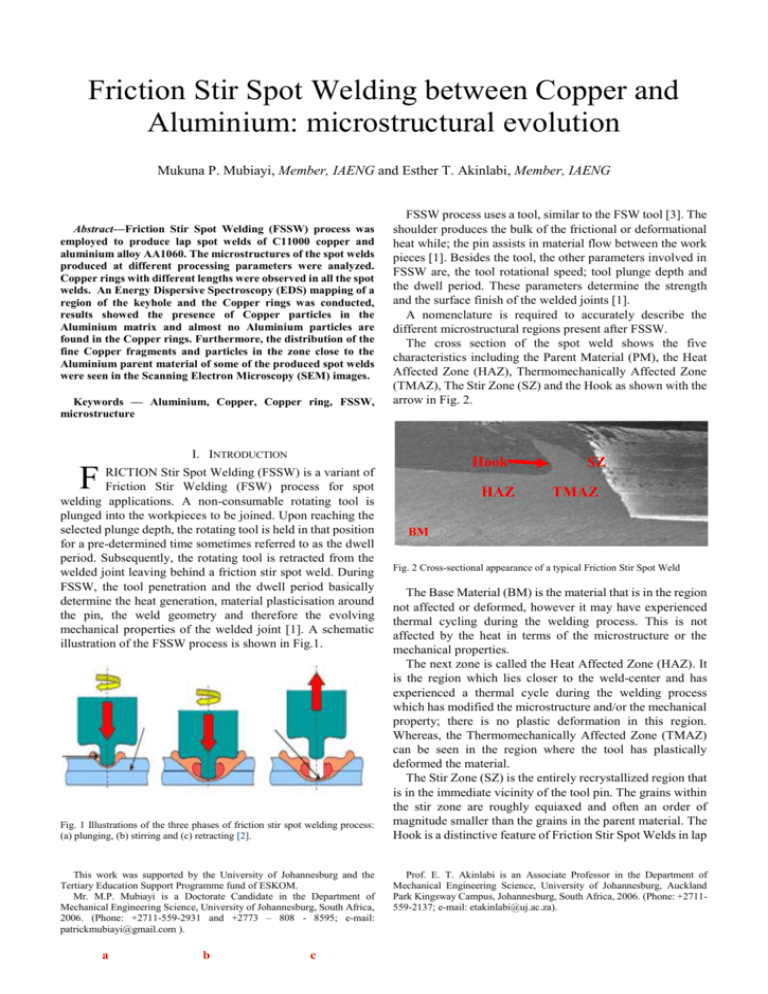
Friction Stir Spot Welding between Copper and Aluminium: microstructural evolution Mukuna P. Mubiayi, Member, IAENG and Esther T. Akinlabi, Member, IAENG Abstract—Friction Stir Spot Welding (FSSW) process was employed to produce lap spot welds of C11000 copper and aluminium alloy AA1060. The microstructures of the spot welds produced at different processing parameters were analyzed. Copper rings with different lengths were observed in all the spot welds. An Energy Dispersive Spectroscopy (EDS) mapping of a region of the keyhole and the Copper rings was conducted, results showed the presence of Copper particles in the Aluminium matrix and almost no Aluminium particles are found in the Copper rings. Furthermore, the distribution of the fine Copper fragments and particles in the zone close to the Aluminium parent material of some of the produced spot welds were seen in the Scanning Electron Microscopy (SEM) images. Keywords — Aluminium, Copper, Copper ring, FSSW, microstructure FSSW process uses a tool, similar to the FSW tool [3]. The shoulder produces the bulk of the frictional or deformational heat while; the pin assists in material flow between the work pieces [1]. Besides the tool, the other parameters involved in FSSW are, the tool rotational speed; tool plunge depth and the dwell period. These parameters determine the strength and the surface finish of the welded joints [1]. A nomenclature is required to accurately describe the different microstructural regions present after FSSW. The cross section of the spot weld shows the five characteristics including the Parent Material (PM), the Heat Affected Zone (HAZ), Thermomechanically Affected Zone (TMAZ), The Stir Zone (SZ) and the Hook as shown with the arrow in Fig. 2. I. INTRODUCTION F RICTION Stir Spot Welding (FSSW) is a variant of Friction Stir Welding (FSW) process for spot welding applications. A non-consumable rotating tool is plunged into the workpieces to be joined. Upon reaching the selected plunge depth, the rotating tool is held in that position for a pre-determined time sometimes referred to as the dwell period. Subsequently, the rotating tool is retracted from the welded joint leaving behind a friction stir spot weld. During FSSW, the tool penetration and the dwell period basically determine the heat generation, material plasticisation around the pin, the weld geometry and therefore the evolving mechanical properties of the welded joint [1]. A schematic illustration of the FSSW process is shown in Fig.1. Fig. 1 Illustrations of the three phases of friction stir spot welding process: (a) plunging, (b) stirring and (c) retracting [2]. This work was supported by the University of Johannesburg and the Tertiary Education Support Programme fund of ESKOM. Mr. M.P. Mubiayi is a Doctorate Candidate in the Department of Mechanical Engineering Science, University of Johannesburg, South Africa, 2006. (Phone: +2711-559-2931 and +2773 – 808 - 8595; e-mail: patrickmubiayi@gmail.com ). a b c Hook HAZ SZ TMAZ BM Fig. 2 Cross-sectional appearance of a typical Friction Stir Spot Weld The Base Material (BM) is the material that is in the region not affected or deformed, however it may have experienced thermal cycling during the welding process. This is not affected by the heat in terms of the microstructure or the mechanical properties. The next zone is called the Heat Affected Zone (HAZ). It is the region which lies closer to the weld-center and has experienced a thermal cycle during the welding process which has modified the microstructure and/or the mechanical property; there is no plastic deformation in this region. Whereas, the Thermomechanically Affected Zone (TMAZ) can be seen in the region where the tool has plastically deformed the material. The Stir Zone (SZ) is the entirely recrystallized region that is in the immediate vicinity of the tool pin. The grains within the stir zone are roughly equiaxed and often an order of magnitude smaller than the grains in the parent material. The Hook is a distinctive feature of Friction Stir Spot Welds in lap Prof. E. T. Akinlabi is an Associate Professor in the Department of Mechanical Engineering Science, University of Johannesburg, Auckland Park Kingsway Campus, Johannesburg, South Africa, 2006. (Phone: +2711559-2137; e-mail: etakinlabi@uj.ac.za). configuration where there is a formation of a geometrical defect originating at the interface of the two welded sheets [4]. There are several papers published on Friction Stir Welding (FSW) between Aluminium and Copper [5-10]. Only few papers reporting on Friction Stir Spot Welding (FSSW) between Aluminium and Copper are available [1113]. This paper reports on the evolving microstructure of FSSW between AA1060 and C11000 using different tool geometries and process parameters which to the best of our knowledge have never been published before. II. EXPERIMENTAL PROCEDURE In this study, AA 1060 Aluminium Alloy and C11000 copper were used for the experiments. The dimensions of the test coupon for each plate were 600 x 120 x 3 mm3. The weld configuration used in this study is lap joint. The sheets were friction spot welded in a 30 mm overlap configuration. FSSW process was conducted at rotational speeds of 800 and 1200 rpm, the tool shoulder plunge depths were 0.5 and 1 mm using a constant dwell time of 10 seconds. The spot welds were produced using an MTS PDS I-Stir at the eNtsa of Nelson Mandela Metropolitan University (NMMU), Port Elizabeth, South Africa as shown in Fig 3 .The welding tools had 15 mm-diameter shoulder, 5 mm-diameter pin and 4 mm pin length. The tool material is H13 tool steel hardened to 5052 HRC. Two different tool features were used to produce the spot welds, Flat Pin and Flat Shoulder (FPS) and Conical Pin and Concave Shoulder (CCS). The surface morphology of the spot welds were analysed using Scanning Electron Microscopy. A TESCAN instrument equipped with Vega TC software Vega TC, was used. Secondary Electron (SE) micrographs were produced. The SEM was coupled with an Energy Dispersive Spectrometer (Oxford instrument XMax). A summary of the design of experiments is shown in Tab.1. Tab.1 A summary of the design of experiments Shoulder plunge depth(mm) Tool rotational speed(rpm) Shoulder diameter (mm) 0.5 800 15 0.5 1200 15 1 800 15 1 1200 15 0.5 800 15 0.5 1200 15 1 800 15 1 1200 15 Tool geometry Flat pin and Flat shoulder (FPS) Conical pin and concave shoulder (CCS) III. RESULTS AND DISCUSSION Friction Stir Spot Welding (FSSW) process was successfully used to join C11000 to AA1060. The macrographs of the spot welds produced using a conical/ concave shoulder and flat pin/ shoulder tools at 800 rpm (0.5 mm shoulder plunge depth) (a) and 1200 rpm (1 mm shoulder plunge depth) (b) are shown in Fig 4 and 5 respectively. a Tool holder b Tool Fig. 4 Micrographs of the cross sections of Friction Stir Spot Welds produced by using a flat pin and shoulder tool (a) CCS_800_0.5, (b) CCS_1200_1) a Workpiece Clamps Fig.3 Experimental set-up for the Friction Stir Spot Welding (FSSW) conducted at the Nelson Mandela Metropolitan University (NMMU) b Fig. 5 Micrographs of the cross sections of Friction Stir Spot Welds produced by using a flat pin and shoulder tool (a) FPS_800_0.5, (b) FPS_1200_1 c 1200 b 1000 Copper ring size (µm) We observed the presence of copper rings [12] with different lengths in all the spot welds. The copper rings length of the spot welds produced using flat pin and shoulder at 1200 rpm and 1 mm shoulder plunge depth is depicted in Fig.6. The formation of the Copper rings which consist of the copper parent material extruded in the Aluminium pieces was observed. This suggests that while the Copper material was moving and diffusing into the Aluminium, the Aluminium was not diffusing or being pushed into the Copper ring [12]. There was also a reduction in the workpieces thicknesses in all the produced spot welds. a 800 d 600 400 200 0 Fig. 7 The copper ring lengths obtained using a flat pin and concave shoulder tool at different process parameters, a (FPS_800_0.5), b (FPS_800_1), c (FPS_1200_0.5) and d (FPS_1200_1) b Copper ring size(µm) 1200 Fig . 6 Copper ring length of the spot weld produced at 1200 rpm, 1.0 mm shoulder plunge depth using flat pin and shoulder tool The penetration length of the Copper into Aluminium was also studied. The formed copper rings were measured and results are shown in Fig.7 and Fig. 8 for the flat pin / shoulder and the conical pin and concave shoulder respectively. It was observed that the Copper ring length increase with the increase of the shoulder plunge depth expect for the spot welds produced at1200 rpm using a flat pin and shoulder where a decrease was observed. The copper ring lengths of the welds produced at 1200 rpm using a conical pin and concave shoulder also has a slight different in the copper ring length. This shows that welds produced at high rotational speed exhibit either a decrease or a slight increment in the copper ring length. 1000 a c d 800 600 400 200 0 Fig. 7 The copper ring lengths obtained using a conical pin and concave shoulder tool at different process parameters, a (CCS_800_0.5), b (CCS_800-1), c (CCS_1200_0.5). d (CCS_1200_1) The EDS mapping of a region of the keyhole and the copper ring area was conducted. Fig. 8 shows the EDS mapping of the spot welds produced at 800 rpm and 0.5 mm shoulder plunge depth using a flat pin /shoulder. On the other hand, Fig. 9 depicts the EDS mapping of the spot weld produced at 800 rpm and 0.5 mm shoulder plunge depth using a conical pin and concave shoulder. The distribution of Copper (red) and Aluminium (black) can be seen in Fig. 8 and Fig. 9. We observed that there is a presence of copper particles and fragments in the Aluminium matrix whereas there is almost no presence of Aluminium particle in the Copper matrix. Aluminium matrix. The presence of the Copper particles in the Aluminium matrix is attributed to the stir action of the tool pin that worn out Copper pieces from the Copper parent material, breaking them up and dispersing them into the Aluminium parent material. Furthermore, the dispersion of the fine Copper fragments and particles was seen in the zone close to the Aluminium parent material as shown in Fig.10 (a), (b) and Fig.11 (a), (b). Interlayers of aluminium and copper was also observed in the stir zone as shown in Fig. 11(b) which is an indication of a good dissimilar joint. a Fig. 8 Mapping of spot weld produced using a flat pin and shoulder tool at 800 rpm and 0.5 mm shoulder plunge depth, Cu (red), Aluminium (black) b Fig. 9 Mapping of spot weld produced using a conical pin and concave shoulder tool at 800 rpm and 0.5 mm shoulder plunge depth, Cu (red), Aluminium (black) The morphology of the micrographs showing different features of the spot welds produced in the current research study are hereby discussed. Fig.10 (a) and (b) present the microstructure of the Stir Zone (SZ) of the spot welds produced using 800 and 1200 rpm at 0.5 mm shoulder plunge depth. The tool used was a flat pin and shoulder. It was observed that a good material mixing showing a distribution of Cu particles and fragments with irregular shapes and various sizes was seen in the spot welds produced using a rotational speed of 800 rpm whereas at rotational speed of 1200 rpm, large Copper fragments were present. On the other hand, the microstructures shown in Fig.11 (a) and (b) depict the spot welds produced using a conical pin and concave tool. The rotational speeds are 800 rpm and 1200 rpm for Fig.11 (a) and Fig.11 (b) respectively. It was observed that there was a good mixing in both welds with Cu particles present in the Fig. 10 Microstructure of the Stir Zone (SZ) of FPS_1200.0.5 (b) FPS_800_0.5(a) and acknowledge the eNtsa of NMMU for the gesture accorded us to use their FSW platform. a REFERENCES [1] [2] [3] [4] [5] b [6] [7] [8] [9] [10] Fig.11 Microstructure of the Stir Zone (SZ) of CCS_800_0.5 (a) and CCS_1200_0.5(b) [11] IV. CONCLUSION [12] Friction Stir Spot Welding (FSSW) between 3 mm C11000 Copper and Aluminium Alloy AA1060 was conducted using two different tool geometries with 15 mm shoulder diameter. Two rotational speeds of 800 and 1200 rpm were used. 0.5 mm and 1 mm shoulder plunge depths were also utilized. The microstructure of the spot welds produced at different processing parameters was studied. The results obtained can be summarized in the following ways: - A Copper ring was present in all the spot welds and the length increases with the shoulder plunge depth while the spot welds produced at 1200 rpm for the two tool geometries exhibited a decrease and a slight increment in the length of the copper ring using a flat pin/flat shoulder and conical pin/ concave shoulder respectively. - The mapping of a region of the keyhole and Copper ring of the spot weld showed different microstructures with copper particles and fragments in the Aluminium matrix. - A good material mixing was achieved in most of the spot welds produced. ACKNOWLEDGMENT The financial support of the University of Johannesburg and the Tertiary Education Support Programme fund of ESKOM are acknowledged. The authors will also like to [13] Harsha Badarinarayan, ‘Fundamentals of friction stir spot welding’, PhD thesis, Missouri University of Science And Technology, United State, 2009. Hovanski Y, Santella ML, Grant GJ. ‘Friction stir spot welding of hotstamped boron steel’. Scripta Materialia 2007;57, pp 873–876. Timothy J M., ‘Friction Stir Welding of Commercially available Superplastic Aluminium’, PhD thesis, Department of Engineering and Design, Brunel University, Brunel, 2008. Badarinarayan, H., Q. Yang, and S. Zhu ‘Effect of tool geometry on static strength of friction stir spot-welded aluminum alloy’, International Journal of Machine Tools and Manufacture, 2009. 49(2): p.p 142-148. Jiahu Ouyang, Eswar Yarrapareddy, Radovan Kovacevic, “Microstructural evolution in the friction stir welded 6061 aluminum alloy (T6-temper condition) to copper” Journal of Materials Processing Technology, 2006, 172, pp 110–122. A. Abdollah-Zadeh, T. Saeid, B. Sazgari , “Microstructural and mechanical properties of friction stir welded aluminum/copper lap joints” Journal of Alloys and Compounds, 2008, 460, pp. 535–538. Esther T. Akinlabi, Randall D. Reddy, Stephen A. Akinlabi, “Microstructural Characterizations of Dissimilar Friction Stir Welds” Proceedings of the World Congress on Engineering (WCE), 2012, ISBN: 978-988-19252-2-0, III, pp. 4 – 6 I. Galvao, R. M. Leal, A. Loureiro and D. M. Rodrigues, “Material flow in heterogeneous friction stir welding of aluminium and copper thin sheets” Science and Technology of Welding and Joining, 2010, 15, No 8, pp. 654- 660. LI Xia-wei, ZHANG Da-tong, QIU Cheng, ZHANG Wen “Microstructure and mechanical properties of dissimilar pure copper/1350 aluminum alloy butt joints by friction stir welding” Trans. Nonferrous Met. Soc. China 22, 2012, pp. 1298-1306. M. Guerra, C. Schmidt, J.C. McClure, L.E. Murr, A.C. Nunes, “Flow patterns during friction stir welding” Materials Characterization , 2003, 49 , pp. 95– 101. Ugur Özdemir, Sami Sayer, Çinar Yeni, Bornova-Izmir, ‘Effect of Pin Penetration Depth on the Mechanical Properties of Friction Stir Spot Welded Aluminum and Copper’ Materials Testing IN Joining Technology, 54(2012) 4, pp. 233-239. Heideman R., Johnson C., Kou S., ‘Metallurgical analysis of Al/Cu friction stir spot welding’ Science and Technology of Welding and Joining Vol. 15 , No 7 (2010), pp. 597-604. M. Shiraly, M. Shamanian, M.R. Toroghinejad, and M. Ahmadi Jazani ‘Effect of Tool Rotation Rate on Microstructure and Mechanical Behavior of Friction Stir Spot-Welded Al/Cu Composite’ Journal of Materials Engineering and Performance, Volume 23(2) February 2014, pp 413-420
