Direct Admit Patient
advertisement
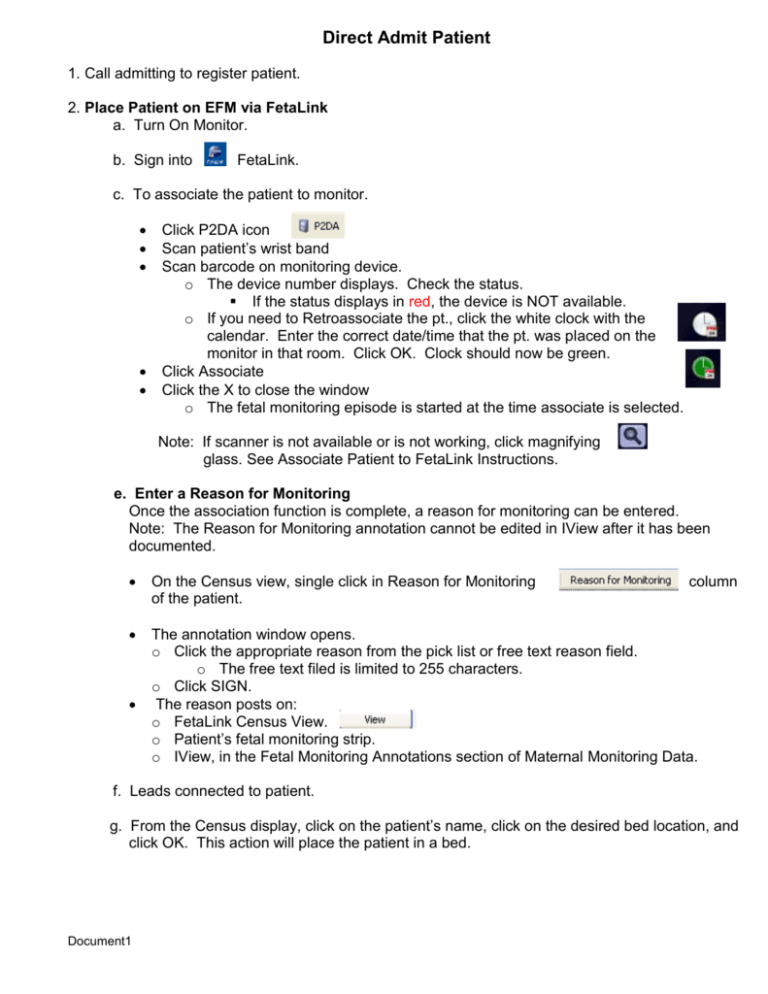
Direct Admit Patient 1. Call admitting to register patient. 2. Place Patient on EFM via FetaLink a. Turn On Monitor. b. Sign into FetaLink. c. To associate the patient to monitor. Click P2DA icon Scan patient’s wrist band Scan barcode on monitoring device. o The device number displays. Check the status. If the status displays in red, the device is NOT available. o If you need to Retroassociate the pt., click the white clock with the calendar. Enter the correct date/time that the pt. was placed on the monitor in that room. Click OK. Clock should now be green. Click Associate Click the X to close the window o The fetal monitoring episode is started at the time associate is selected. Note: If scanner is not available or is not working, click magnifying glass. See Associate Patient to FetaLink Instructions. e. Enter a Reason for Monitoring Once the association function is complete, a reason for monitoring can be entered. Note: The Reason for Monitoring annotation cannot be edited in IView after it has been documented. On the Census view, single click in Reason for Monitoring of the patient. The annotation window opens. o Click the appropriate reason from the pick list or free text reason field. o The free text filed is limited to 255 characters. o Click SIGN. The reason posts on: o FetaLink Census View. o Patient’s fetal monitoring strip. o IView, in the Fetal Monitoring Annotations section of Maternal Monitoring Data. column f. Leads connected to patient. g. From the Census display, click on the patient’s name, click on the desired bed location, and click OK. This action will place the patient in a bed. Document1 h. Click in the box next to the device on the Census View, then click the View button to launch the fetal monitoring strip view or double click in location column next to patient’s name. The monitor strip displays. 1. RN logs into PowerChart Maternity and Opens to Tracking Shell If your patient has not yet been assigned a bed, she will not be on the tracking shell. Click Patient List to access her record. 2. Patient is assigned to an inpatient bed and is available from the Tracking Shell. Change status for the patient on the tracking shell. 3. Open the patient’s chart to Orders a. Patient is in LDRP room. b. Provider enters Admission Labor and Delivery PowerPlan. If given as a verbal order, use POE VORB/TORB communication type. 4. Go to Orders to enter appropriate IPOC. a. Click b. Type IPOC and change filter to Contains. c. Select desired IPOC. Most common used for laboring patient Coping Comfort Measure d. Click Initiate, Orders for Signature, and Sign. 5. Click Pregnancy Summary to see if the Pregnancy has been Added. Add the Pregnancy if it has not yet been added. To Add the Pregnancy: From the Overview section click the upside down triangle, click Add Pregnancy. Fill in the Onset Date. The Onset Date should be LMP if known or the approximate number of months pregnant ago if unsure of LMP. The date entered here should be either the LMP or use 9 months back. Keep defaulted Confirmed date as today. Note: This does NOT set the EDD. It just places a bookmark in the system to look for data related to the pregnancy time frame. Document1 6. Click Note: Only add if current pregnancy has not yet been added. Enter o Method of EDD o Enter date of method. Enter LMP if known or Unknown. If Ultrasound is entered, you must also enter the gestational age at the time of the ultrasound. Do not enter Final or Initial. Leave blank. o Click OK 7. IView Charting a. Go to IView-OB Pregnancy and OB Systems Assessment Bands. Click FHR Monitoring section to see if the Baby A dynamic group has been added for this patient’s pregnancy. If not done, click the Add Dynamic Group icon to create Baby A and SIGN. o o NOTE: It’s imperative that the Dynamic Group Baby A entry is SIGNED immediately upon being created to prevent multiple Baby A labels from being created and charted on accidently. The Dynamic Group for Baby A is added only one time for the current pregnancy. This dynamic group will cross all encounters within the pregnancy. “Maternal Monitoring Data” will say “Baby or Fetus A” if Baby A has been created. If not, add the dynamic group for Baby A and Sign. b. Document the following sections for all admitted patients. OB Pregnancy Band OB Visit Assessment POC Urinalysis OB Systems Assessment Band Assessment Summary Document1 c. OB Pregnancy Band a. Double click time header to activate charting. Click light blue sections to display on the flowsheet for charting. No Baby A entered yet for this patient. Click icon to add Baby A label and SIGN. Maternal Monitoring pulls in strip annotations. The RN must activate the column in IView to pull in maternal pulse and BP. d. IView Customization If you do not find a section you need to chart, consider clicking customize view icon to customize the view. Bereavement and Pre-eclampsia require the RN to customize the view. 1. Ad Hoc-Chart Admission Profile a. From the patient’s chart, click Ad Hoc, click OB Maternity folder. Complete the Admission Profile. For patients who have completed their MPS appointment the Admission Profile still needs to be reviewed. Click each row on the navigator to pull forward data from the MPS appointment. b. Complete documentation Patients who completed their MPS appointment will have information pulled into this document. The icon indicates prior data has been pulled forward to this document. Document1 Completion of this documentation will remove the Red + from the To Do column of the Tracking shell. Change time to reflect actual time with patient. Click each page to review and complete documentation. Red dot indicates required fields. Indicates prior charting has been pulled forward. Document1
