Year X unit overview * Australian Curriculum: Mathematics
advertisement
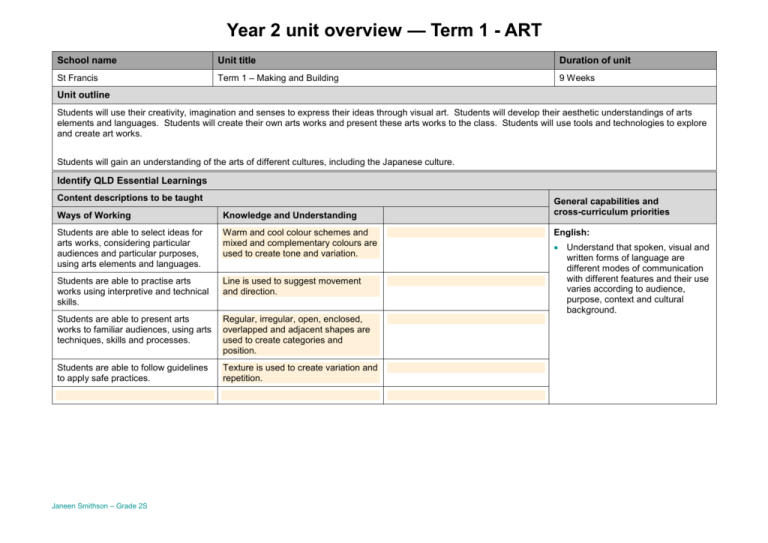
Year 2 unit overview — Term 1 - ART School name Unit title Duration of unit St Francis Term 1 – Making and Building 9 Weeks Unit outline Students will use their creativity, imagination and senses to express their ideas through visual art. Students will develop their aesthetic understandings of arts elements and languages. Students will create their own arts works and present these arts works to the class. Students will use tools and technologies to explore and create art works. Students will gain an understanding of the arts of different cultures, including the Japanese culture. Identify QLD Essential Learnings Content descriptions to be taught Ways of Working Knowledge and Understanding Students are able to select ideas for arts works, considering particular audiences and particular purposes, using arts elements and languages. Warm and cool colour schemes and mixed and complementary colours are used to create tone and variation. Students are able to practise arts works using interpretive and technical skills. Line is used to suggest movement and direction. Students are able to present arts works to familiar audiences, using arts techniques, skills and processes. Regular, irregular, open, enclosed, overlapped and adjacent shapes are used to create categories and position. Students are able to follow guidelines to apply safe practices. Texture is used to create variation and repetition. Janeen Smithson – Grade 2S General capabilities and cross-curriculum priorities English: Understand that spoken, visual and written forms of language are different modes of communication with different features and their use varies according to audience, purpose, context and cultural background. Assessment Describe the assessment Assessment date Summative Assessments: Week 6 Creating of Japanese Kites Formative Assessments: - Students will be observed throughout the unit in completing each weekly art task to determine their ability to follow instructions, use imagination to select arts ideas, use a number of colours (including mixed colours) and their ability to draw in straight lines. Week 1 Ongoing throughout term Lesson All About Me – Hand Prints/Self Portrait Get students to use their hands and feel their own face. Get them to look at where their eyes are on their face. Feel their ears and see where the ears are on their head. Nose etc. Tell students that they are going to draw themselves. Give each student a piece of plain A4 paper to draw their own self portrait. Tell them when drawing to leave some room around the edge of the paper as we are going to put a border on it. Once the image is drawn they may use pencils to colour. Set up different paint colours and place on the painting table. Select 4 students at a time to come to the painting table and put one hand in the paint and place it firmly on a sheet of white paper. Get students attention. Tell students that I will be going to each desk and giving some coloured cardboard strips. Tell students that they will need to cut these strips into zig zags to create a border. Demonstrate how to do this. Show an 2 | JANEEN SMITHSON – Class 2S example of a finished portrait for emphasis. Using glue students will glue the cardboard around the edges of their picture to create the portrait. 2 Drawing a Building Show a picture of a modern day building that students will now draw (currently displayed on the wall of the room). Give each student an A3 sheet of paper. Tell students they will need the A3 paper, a ruler, pencil and rubber on their desk and nothing else. Walk students through each step of the drawing getting them to copy what is being drawn on the board. Do each line a step at a time so that everyone’s picture should look identical at the end. Step 1: Get students to draw 2 lines at the bottom of the paper Step 2: Get students to draw 1 rectangle. Step 3: Get students to draw a second rectangle next to the first rectangle Step 4: Get students to draw a third rectangle next to the second rectangle. Step 5: Go back to the first rectangle and put 8 little rectangles inside it. Step 6: Go back to the second rectangle and put 16 little rectangles inside it. Step 7: Go back to the third rectangle and put 5 little rectangles inside it. Step 8: Draw a tree next to each building Step 9: Draw the lines for the road Add the finishing touches. 3 Finish drawing of building. Students may now colour their building using coloured pencils only (not texters). Once building complete students work will be displayed. Janeen Smithson – Grade 2S 4 2D Shape Castle Hold up some shapes and get students to identify what the shapes are. Join to shapes together (ie. the square with the triangle on top). Ask students, “what does this look like?” (a house). Explain that shapes can be joined together to make objects. Show students a picture of castle that is created using 2D Shapes. Inform students that today they are going to create a building using 2D shapes. Give each student an A4 sheet of white paper. Get them to draw a building only using 2D shapes. Once they have finished they may use crayons only to colour in the building. Once the building is coloured students will cut out the building. Give each student another piece of A4 paper and some coloured paper. Students will cut the coloured paper into scrap pieces and paste it onto the white paper to create a background effect. Demonstrate how to cut the paper and paste it on to the white paper. Also show students an example of the finished product. Once this is complete students will paste their building onto the background. 5 Japanese Folding Fan Show some images of the Japanese folding fan. Discuss how the images on the fan often contain pictures of the Japanese landscapes. Inform students we are going to make a Japanese folding fan. Give each student an A4 sheet of white paper that has already been folded in half with an arch drawn on it. Get students to cut along the arch line. Get students to then draw a picture of Japanese landscape. This may be a picture of Mount Fuji etc. Display some images on the whiteboard to assist imagination. Let students use texters to colour the images Demonstrate to students how to fold the fan. Get students to then fold the fan. Give each student 3 popsicle sticks. Demonstrate that the popsicle sticks will flare out from the handle. Get students 4 | JANEEN SMITHSON – Class 2S to place the popsicle sticks in place. Place black masking tape around the bottom of the handle to hold in place. 6 Create Japanese Carp Kites Need: - Construction Paper Tissue Paper (Different Colours) Crepe Streamers Scissors Glue Hole Puncher http://www.thecraftyclassroom.com/CraftJapanCarpKite.html Prior to lesson cut a variety of fish scales from tissue paper. Show students images of carp kites and explain that these kites are very popular in Japan. Give each student a coloured piece of A4 paper that has a line 1/3 of the way down. Get students to use a black texter and put 2 circles for eyes above the line. Demonstrate to students how to glue the fish scales on. Give each student some of the fish scales and get them to glue on. Give each student 4 strips of crepe paper. Demonstrate how the crepe paper will be glued to the bottom of the paper. Then get students to hold the paper so it joins together and staple together. Put 2 hold punch at the top of the kite and place string through. Janeen Smithson – Grade 2S 7 Mixing Colours – Jelly Bean Jar Students will be given a worksheet which requires them to identify what happens when colours are mixed together. This activity will be conducted as a whole class. Some paint will be placed on the table. Students will be called to mix 2 colours together and show the class what the outcome is. Discuss colours used in buildings today. Explain they are not alwasys Students will then be told they will be using these colours to create a jelly bean jar. Demonstrate to students how to create this. Students will be given a piece of white paper, a piece of red cardboard and some tin foil. 4 students at a time will be called to the paint table to paint the jelly beans. The remaining students firstly, answer the worksheet and then cut out the outline of the jar and cut tin foil to create a lid. Demonstrate how to do this. To paint the jelly beans students will put a dab of paint on the white paper and drag the paint into the shape of a jelly bean. Some colours will mix together and give a great effect. Once the paint is dry it will be glued to the cardboard jar cut out. 8 Easter Bunny Mask Give students:A paper plate with some bunny ears cut from cardboard attached. Pink crepe paper Cotton balls 4 brown/black pipe cleaners 1 pink ball for the nose 2 pink pipe cleaners 2 googly eyes 6 | JANEEN SMITHSON – Class 2S Show students a finished Easter bunny mask and tell students we will be making these. First, give students some pink crepe paper. Get them to cut the crepe paper into small pieces and glue onto the middle of the ears leaving a white border. Second, get students to put a pink square of crepe paper where the eyes should go. Third, get students to glue the googly eyes onto the pink crepe paper for the eyes. Fourth, get students to stick the pink nose on the mask Get students to make a mouth using the pipe cleaners and stick on to the mask Fifth, get students to stick the cotton balls all over the mask Sixth, get students to place the black pipe cleaners on the mask for whiskers. Tidy up 9 Create Easter Basket http://www.crayola.com/free-coloring-pages/print/make-an-easter-basket-coloring-page/ Give student the Easter basket cut out. Get them to cut along the lines. Get them to colour and decorate the cut out, using glitter etc. Fold the basket and glue together. Put paper inside the basket and make Easter eggs to go inside the basket. Janeen Smithson – Grade 2S
