Wax Contouring - Fresh Men Dentists
Libyan International Medical University
Wax Contouring,Processing, finishing, Polishing, lab remount
of trial dentures.
F E S T O O N I N G
What is Waxing – up of the Complete Denture?
Waxing up or Festooning is the process of carving the denture base to simulate the contour of natural tissues that are being replaced by the denture.
Why do we call it Festooning?
Festooning is the waxing up of a Complete Denture Base so that the root eminences are simulated.
Objectives of Waxing -up
1.
To produce a pleasing natural appearance
2.
To aid in the retention and the stability of the denture
Requirements
1.
Should duplicate the covered soft tissue as accurately as possible
2.
The borders, both labial and buccal should fill the vestibule
3.
The palatal portion must be a minimum of 2 mm thick.
4.
The contour of the denture flanges should be compatible with the drape of the cheeks and lips.
5.
The labial portion of the maxillary denture base must not be thick.
6.
The contour of the lingual flanges should be compatible with the tongue.
Common errors during Wax -up
1.
Gingival portion-
• Introducing unnaturally over-contoured gingival regions which are not aesthetically pleasing and difficult to keep clean.
2.
Interdental papilla-
• Non-existent or too small, This creates spaces between teeth that can trap food.
• Too large papilla that looks like inflamed tissues.
3.
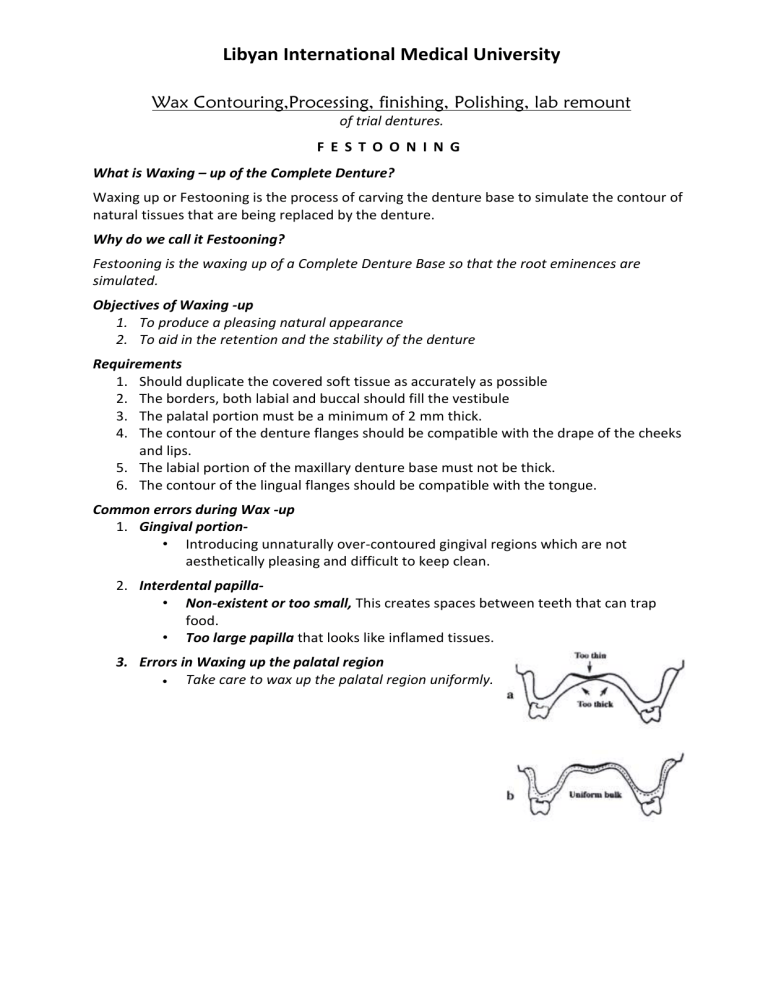
Errors in Waxing up the palatal region
Take care to wax up the palatal region uniformly.
Libyan International Medical University
Correct contouring of the vestibule
TOO THIN CORRECT
Proper contouring allows the cheeks and the tongue to adapt comfortably to the new denture
and helps them aid denture stability.
TOO THICK
Procedure for wax contouring
1.
The casts are removed from the articulator.
2.
Contour wax carefully, to prevent movement of teeth.
3.
Avoid a bulky wax-up. The additional bulk of acrylic resin may contribute to porosity and dimensional processing error.
4.
A strip of base plate wax is added from the gingival 1 /
3 rd of the teeth to the peripheral border of the trial denture.
5.
The palatal surface of the maxillary denture is covered with a layer of base plate wax if the trial base is a temporary one and it is thinner than 2mm.
6.
After the wax has cooled, carve the interdental papillae to resemble the natural papillae.
7.
Develop the margin by carving at a 45 degree angle to the neck of the tooth.
8.
Wax the lingual flange of the mandibular denture thickly enough to fill all depressions and to slope down from the necks of the teeth inward toward the tongue. The slope of the flange should be free from undercut and very slightly concave at or near the lower border.
9.
After the wax has been contoured smooth it by flaming and then polish it with wet cotton.
What is Stippling?
Stippling is the simulation of the orange peel appearance of the healthy gingiva by using a stiff brush.
It is done on the facial surface of the denture.
Libyan International Medical University
Processing the Complete Dentures
Heat Cure Acrylic Resin
(Compression Moulding Technique)
Processing comprises of several steps –
1.
Flasking (investing the denture)
2.
Wax Elimination(de-waxing)
3.
Packing and Curing (processing the acrylic)
4.
Deflasking (retrieving the denture)
5.
Finishing and Polishing of the denture.
1.
Flasking (investing the denture)
What is flasking and why do Flasking?
In the festooned wax denture the denture base and wax must be replced by heat cure resin to make a denture. This is done by (flasking) investing the waxed trial denture into a dental flask.
The wax is eliminated to make a mold into which the heat cure denture base resin is inserted and cured.
After the denture is cured the denture is retrieved and finished and polished.
How is flasking done?
Flasking is done using Dental Flask. Type III Dental Stone is used because it is stronger.
Parts of a Dental Flask
The Dental Flask has four parts
1.
A base with
2.
The middle member or body
3.
The top lid
Libyan International Medical University
Flasking is best done in three pours-
1.
In the first one the cast is secured to the base with stone. No undercuts should exist on this surface
2.
Now the upper half of the flask is attached and the second pour is made upto the occlussal surfaces of the teeth.
3.
The final pour is then made to slightly overfill the flask so that a little excess oozes out on locking the lid of the flask.
In the first pour the cast is secured to the base of the flask with stone.
No undercuts should exist on the surface.
In the second pour the upper half of the flask is put in place and stone is poured up to the occlusal surface of the teeth.
The final pour should fill the mould with slight excess oozing out to lock the lid of the flask to the ring.
2.
Wax Elimination(de-waxing)
Libyan International Medical University
After flasking has been completed the flasks are placed in a Hanau’s press and the dental stone is allowed to set. Once the dental stone is set, then the flasks are placed into a dewaxing unit
(100 C) for 5 minutes to soften the wax. Then the flasks are removed from the dewaxing unit, carefully opened and the temporary record base and any remaining wax may be removed using hot water.
Care must be taken NOT to allow displacement of any tooth.
The flask is then allowed to drain.
Once the flask is dry, and cooled down any displaced teeth must be cemented back in its original place. Once the cement has set then the separating media may be applied on all the surface of the investing Dental stone and the master cast surface.
The separating media usually applied is Sodium Alginate, and it is also called Tin-Foil Substitute.
The tin foil substitute must NOT be applied on the teeth, only around it.
3.
Packing and Curing (processing the acrylic)
Acrylic resin as denture base material:
1. Heat cure acyrlic resin :
It is the most widely used denture base material as it has the following advantages.
• Non toxic, non irritant if properly manipulated.
• Insoluble and inert in the oral fluids.
• Good aesthetics and colour stability is good.
• Easily processed with simple equipment.
• Easy to repair.
Main steps in Processing
1.
Polymer and monomer are mixed
2.
The mixture is then left covered for 2-3 minutes and the mixing jar is covered with a lid to prevent evaporation of the monomer.
3.
When the material reaches dough stage it is packed.
4.
A piece of wet cellophane is placed over the resin before the flask is assembled. This allows the flask to be reopened for inspection and add or remove resin without having the cast adhere to the tissue surface of the uncured resin. – This is called TRIAL
CLOSURE.
5.
The lower half of the flask is placed in position on the upper half and pressed by hand then placed in bench press and closed slowly to give the acrylic resin plenty of time to flow.
6.
The flask is removed from the press, opened carefully; the excess acrylic resin is trimmed with a shape carver or scalpel.
(All excess material –Flash – must be removed, and the metal edges of the two halves of the flask must be in complete contact before final closure)
Libyan International Medical University
7.
The press is secured with positive pressure to ensure that the metal edges of the flask are in complete contact. The flasks is transferred to a Hanau press closed and then be allowed to stand for 30-60 minutes before curing- This is called Bench Curing
What is Trial Closure?
A temporary closure of the flask after packing to aid removal of excess acrylic (Flash) is called
Trial Closure.
Why do we do trial closure?
Trial closure is important as the presence of excess material between to two halves of the flask causes incomplete closure of the flask – thereby increasing the potential for a change in the
Vertical Dimension.
Also excess material present means a potential increase in processing errors.
How do we do Trial Closure?
After packing the dental flask with acrylic, a polyethylene/ polystyrene sheet is placed between the two halves of the flask and closed. The flask is then transferred to a bench press for trial closure.
The pressure is raised slowly (so that the acrylic can flow and the flash obtained) until around 3000 psi.
The flask is then removed from the press, opened, excess flash removed, a new polystyrene sheet placed and the process repeated till there is no more appreciable flash.
Then the polystyrene sheet is removed and the flask is closed for curing.
Hydraulic Bench Press
Once trial closure has been completed the flask is closed for curing
without the polystyrene sheet. The flask is then transferred to a
Hanau Press to maintain closure and pressure during the curing cycle. when a mixture of the two is subjected to heat.
Hanau Press
Curing of Acrylic Resin:
The polymerization or curing of the acrylic resin is the conversion of the monomer to polymer
• The amount of heat must be controlled while processing acrylic resin, as the reaction is exothermic and becomes very rapid at temperature between 60°C and 70°C.
• Once polymerization has begun the temperature of resin may be considerably higher than the temperature of the water bath.
• For this reason, the temperature of water should be maintained at, or below 70°C for
at least 1.5 hours so that the exothermic heat can be conducted away from the resin into the investing material.
• The boiling point for the monomer is 100°C if the heat is not controlled, the exothermic reaction will cause the monomer in the thick sections of the denture to boil during curing process and results in areas of porosity.
Curing Cycles
Most denture resin are cured by one of two cycles :
Libyan International Medical University
1.
Long Cycle (Slow processing) 9 hours at a constant 70°C.
2.
Short Cycle (Rapid processing) 70°C for 1.5 hours then boil for 30 minutes this may induce, greater dimensional changes in the dentures than the slow cure method.
Care must be taken in observing the Initial immersing temperature as otherwise porosity
may result in the acrylic resin.
4.
Deflasking (retrieving the denture)
1.
After the dentures are cured, the flasks must cool to room temperature before they are removed from the processing press.
2.
They must cool slowly as rapid cooling induces dimensional changes in the denture base.
3.
This slow cooling down to room temperature is called Bench Cooling.
4.
When they have cooled they are removed by loosening the clamp screw.
5.
We may use mechanical units or manually retrieve the denture from the flask.
6.
Care must be taken to avoid fracture while deflasking.
5.
Finishing and Polishing of the denture.
If the impression was correctly boxed and the trial denture was carefully waxed, the outline of the denture can be determined easily.
If the trial denture was carefully contoured during the final waxing into the form desired in the finished denture, little finishing will be necessary.
Too much trimming to reduce bulk generates excessive heating of the processed denture base.
Excess heat which will cause unnecessary denture base warpage.
So proper waxing up is an important step.
Finishing the Complete Denture
Perfecting the final form of the denture is called ‘Finishing the denture’.
The areas of attention during finishing are:
1.
Any flash of acrylic resin at the denture border.
2.
Any dental stone on the surface of the denture.
3.
Any acrylic nodule on the surface of the denture base.
Polishing the Complete Denture:
• Polishing of denture consists of making a denture smooth and glossy without changing its contour.
• The polishing of dentures consists of making the denture surface which is in contact with lips cheek and tongue (polished surfaces) smooth and glossy to avoid abrasion of the delicate mucous membrane in this areas
• Using a series of progressively finer abrasives, a special wheel and brush should be used with each of the polishing agents.
• The fine scratches left by the pumice should be removed with a rag wheel and Tripoli.
• Finally, very light pressure must be used for polishing the denture with wet whitening and a rag wheel.
• The completed denture should have a high gloss, compatible contour, and a natural appearance. It is easier to keep a glossy surface clean.
Libyan International Medical University
Trimmers Finishing Stones Polishing brushes
Processing Errors
1. Porosity:
Porous denture is difficult to clean, esthetically objectionable and weak.
Causes :
• Thick denture bases heated too rapidly.
• Lack of dough in the mold at the time of final closure.
• Lack of adequate pressure during polymerization.
• Packing the resin in a sticky rather than doughy stage.
2. Tooth movements:
Teeth may change its position during processing.
Causes.
• The use of plaster instead of stone in investing the trial denture.
• Incomplete closure of the flask.
• Excessive and rapid pressure during trail closure.
• Over packing of the mould with resin material before final closure.
3.
Denture base and teeth breakage during deflasking:
Causes :
• use of exessive force used to tap denture out of the flask.
4. Fractured or cracked teeth:
Causes :
• Packing the dough in the rubbery stage making the material too stiff.
• Excessive and rapid application of pressure during trial packing.
• Setting the teeth directly on the stone cast.
5.Crazing of acrylic resin base or acrylic teeth:
Crazing of resin consists of the formation of small cracks which may vary in size from microscopic dimension to the visible size, it indicates beginning of fracture.
Causes :
• Stresses induced by the contraction of the resin around the tooth by rapid cooling.
• The use of solvents to remove wax from the mold before packing.
6. Bleaching of acrylic resin:
Causes :
• Contamination of the acrylic resin with some acrylic solvents.
• Under cured acrylic resin due to incorrect time and temperature of curing.
Libyan International Medical University
• Incorporation of the tin foil substitute with the acrylic resin.
7.
Color streaks in the resin material
Causes :
• Improper mixing of the monomer and polymer.
• Contamination of the resin mix with dirty hands or instrument.
• Adding resin material in layers during trial packing.
8.
Sandy appearance of the acrylic resin:
Causes :
• Too much delay in curing after packing (more than 1/2 hour).
• Evaporation of the monomer.
• Insufficient monomer in the mix.
9.
Stone adhere to the surface of the denture
Causes :
• Insufficient separating medium on the mold before packing.
• The application of separating medium contaminated with stone
• Incomplete elimination of wax during washing out thus rendering separating medium ineffective.
10.
Space between the teeth and resin base :
Causes :
• Delayed curing, leaving the flask without curing for a long time.
• The application of separating medium on the teeth.
Laboratory Remounting
What is laboratory remounting?
Laboratory remounting is the procedure used to correct any occlussal deficiency, prior to placing in the patient’s mouth.
Flasking, packing and curing induce errors in the cured dentures. The setting expansion of the stone used to invest the dentures, slight movement of the teeth due to pressure during packing, and dimensional changes in the denture base resin during processing cause these errors. These processing errors usually very small in magnitude are removed before the dentures are delivered to the dentist.
The stone casts are repositioned on the mounting plaster which is in turn attached to the articulator on closing the articulator when the incisal pin does not touch the incisal guide table, the occlusal vertical dimension has been altered and must be re-established.
The interceptive occlusal contacts are found by tapping the teeth together on articulating paper. If the cusp is high in both centric and eccentric positions, it must be reduced.
If the cusp is high in centric position only, the fossa is deepened The vertical dimension is reestablished when the incisal pin again touches the incisal guide table.

