Lesson Plan - TSDCurriculum
advertisement
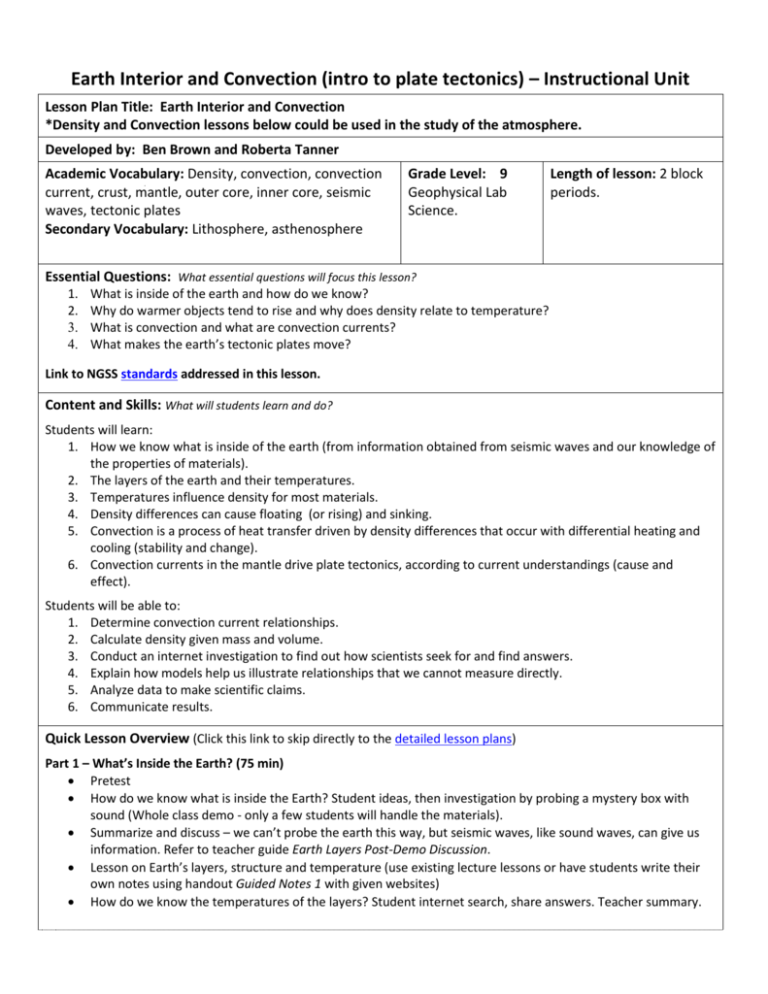
Earth Interior and Convection (intro to plate tectonics) – Instructional Unit Lesson Plan Title: Earth Interior and Convection *Density and Convection lessons below could be used in the study of the atmosphere. Developed by: Ben Brown and Roberta Tanner Academic Vocabulary: Density, convection, convection current, crust, mantle, outer core, inner core, seismic waves, tectonic plates Secondary Vocabulary: Lithosphere, asthenosphere Grade Level: 9 Geophysical Lab Science. Length of lesson: 2 block periods. Essential Questions: What essential questions will focus this lesson? 1. 2. 3. 4. What is inside of the earth and how do we know? Why do warmer objects tend to rise and why does density relate to temperature? What is convection and what are convection currents? What makes the earth’s tectonic plates move? Link to NGSS standards addressed in this lesson. Content and Skills: What will students learn and do? Students will learn: 1. How we know what is inside of the earth (from information obtained from seismic waves and our knowledge of the properties of materials). 2. The layers of the earth and their temperatures. 3. Temperatures influence density for most materials. 4. Density differences can cause floating (or rising) and sinking. 5. Convection is a process of heat transfer driven by density differences that occur with differential heating and cooling (stability and change). 6. Convection currents in the mantle drive plate tectonics, according to current understandings (cause and effect). Students will be able to: 1. Determine convection current relationships. 2. Calculate density given mass and volume. 3. Conduct an internet investigation to find out how scientists seek for and find answers. 4. Explain how models help us illustrate relationships that we cannot measure directly. 5. Analyze data to make scientific claims. 6. Communicate results. Quick Lesson Overview (Click this link to skip directly to the detailed lesson plans) Part 1 – What’s Inside the Earth? (75 min) Pretest How do we know what is inside the Earth? Student ideas, then investigation by probing a mystery box with sound (Whole class demo - only a few students will handle the materials). Summarize and discuss – we can’t probe the earth this way, but seismic waves, like sound waves, can give us information. Refer to teacher guide Earth Layers Post-Demo Discussion. Lesson on Earth’s layers, structure and temperature (use existing lecture lessons or have students write their own notes using handout Guided Notes 1 with given websites) How do we know the temperatures of the layers? Student internet search, share answers. Teacher summary. Part 2 – Density demos and mini-lab. What is wrong with saying “Heat rises and cold sinks”? Student’s prepare balloons for mini-lab later Demo 1: Cold and Hot Water Balloons in Warm Water Demo 2: Cold Oil and Hot Water – does heat rise and cold sink? Demo 3: PhET density simulation – what determines density? Mini-lab: Students do Balloon Density Lab Demo 4: PhET “Balloons and Buoyancy” at phet.colorado.edu Takeaway points from these lessons Part 3 – Why do the Plates Move? iPad App whole class demo – Earth Viewer by Bio Interactive – project movement of the plates from present to past. Transition from Earth Layers and Temperatures to “What makes the plates move?” Listen to student ideas, then introduce Convection Currents Lab as a way to help us understand what happens. Convection Currents Lab – goal is for students to connect differential heating/cooling with density differences that cause movement. Summarize Earth’s mantle convection currents. Guided Notes 2 with given websites can be used rather than having the teacher summarize. Materials: For Part 1 “What’s Inside the Earth?” A “what’s inside sound demo” box (see Building the Earth Layers Mystery Box). Made from poster board, textbooks, a foam sheet about the size and thickness of the textbook, tape. A speaker 2” diameter or less and a source of sound – iPad with “Tone Generator” app by Michael Heinz works Stethoscope (obtain from health assistant or biology department) Rubbing alcohol and material for cleaning earpieces of stethoscope between students Optional – Long, thin, knitting needle, size 2-3 for probing the box Teacher guide Earth Layers Post-Demo Discussion For Part 2 “Density Demos and Discussion” A document camera will show the demos best if the class is large. 7” diameter balloons – one per group plus 2 for teacher demo A Sharpie (permanent marker) – one per group Ice water bath large enough for each pair of students to cool a 5” diameter balloons – perhaps a cooler or plastic bag lined recycle bin with lid A clear container for hot water from the faucet, at least 4” deep and 5” across. Two small balloons filled with water, one hot, one cold. 7” diameter balloons work. Do not inflate with water, just fill the small space of the non-inflated balloon. Eliminate as much of the air as possible. (These will be less than 2” long and 1” diameter. ) About ¼ cup room temperature oil Clear jar or container of room temperature water (pint size). About ¼ cup “freezer-cold” oil. Clear jar of hot water (pint size). Large spoon for scooping cold oil out of its container and onto the hot water. Thermometer. PhET simulation at phet.colorado.edu play with simsphysicsdensity (alphabetical order) run now (or download) projected on a screen (be sure the computer can run Java). Phet simulation “Balloons and Buoyancy” at phet.colorado.edu play with simsphysicsballoons and buoyancyrun now (or download), projected on a screen (also needs Java). For Part 2 “Balloon Density Lab” (mini-lab) Two textbooks per group for measuring balloon diameter Sheet of notebook paper for marking balloon diameter – one per group Rulers or meter sticks – one per group Handout: Balloon Density Lab – one per student Paper towel Calculator For Part 3 “Why do the Plates Move” classroom demo iPad with projector and Earth Viewer app by Bio Interactive (free). For Part 3 “Convection Lab” iPads with Passport Airlinks, Pasco General Science couplers, and Pasco temperature probes (or other temperature probes that measure to 0.1 degree) A clear, rectangular, hard plastic bin approximately 12” x 6” and at least 3 inches deep Food coloring in droplet bottles or pipettes Styrofoam cups (5 per lab group) 4 cardboard shims per group (to prop the support cups just a bit higher than the water cups) Dashes of cinnamon - because of the dangers of the “cinnamon challenge” it is recommended that cinnamon be strictly controlled by the teacher. Hot water and ice water – enough for one Styrofoam cup per group Access to room temperature water – groups will empty and fill their plastic bins several times If desired, eye protection for each student when handling hot water. Lesson Part 1 What’s Inside the Earth (75 min total including ticket out the door) Engage – 15 min Pre-test Teacher asks: What is inside the Earth? How do we know? (The second is the more important question.) Class brainstorming – students tell what they think. Explore – 15 min Whole class activity – What can sound tell us about what is inside the box? Overview: a tone is played at various heights on one side of the box while the student listens with the stethoscope on the other side of the box at the same height as the tone. Move both the tone and the stethoscope up and down to listen to the sound through different vertical layers inside the box. Details - Activate the iPad app “Tone Generator” to play a sound at about 800 Hz at maximum volume. o Set up the “what’s inside” sound demo box (see Building the Earth Layers Mystery Box). Place the iPad speaker on one side of the box (speaker toward box) and a student with the stethoscope directly across from the speaker. o Earpieces of the stethoscope must be firmly in the student’s ears to block the sound coming through the air. o Student listens and describes the volume differences as both the speaker and the stethoscope are moved together from a point low on the box (books inside –but don’t tell students) toward the top of the box (foam inside). Repeat with several students. Discuss - What can we infer about what is in the box from our observations? Maybe they will conclude that there are at least 2 different layers. Optional - Have a small hole in the top of the box and allow a student to probe the depths with a long, thin knitting needle and explain what they feel. They should be able to push through the foam, but will not be able to push through the books (make sure they don’t push too hard and tear the books!) Does this confirm or refute our inferences that we made with sound? Summarize - We can’t probe the earth with a knitting needle, but what might tell us what is inside? Use teacher guide to Earth Layers Post-Demo Discussion. Explain – 20 min Notes on Earth’s layers, structure and temperature. Use teacher’s own existing lecture lessons or have students write their own notes using handout Guided Notes 1 with given websites. The handout tells students to write notes from the website in their notebooks. There is no room to write notes on the handout. (iPad friendly) http://www.colorado.edu/physics/phys2900/homepages/Marianne.Hogan/inside.html and http://volcano.oregonstate.edu/vwdocs/vwlessons/lessons/Earths_layers/Earths_layers4.html Extend – 20 min - Internet search Teacher asks: How do we know the temperatures of the layers? o Give students 10 minutes to search the internet for answers. One iPad per student or pair of students, but have pairs discuss what they find and keep one list between them. Let them know that some websites will be too technical – if so, move on. o Let students try to find useful sites, but here are a few if they are really stuck: http://www.colorado.edu/physics/phys2900/homepages/Marianne.Hogan/inside.html and from Scientific American http://www.scientificamerican.com/article.cfm?id=why-is-the-earths-core-so Summary of how we know the temperatures of the layers o Whole class – teacher asks pairs for one thing they found out. Project a list of student answers. Do not write down silly answers. If answers begin to get repetitive, it is time to summarize. o Cross off answers that are obviously wrong or confusing, and explain terms that the class might not know like “extrapolation” and “infer”. o Summarize (See teacher guide Info on Earth Temps for a summary of answers students might give, for more detailed explanations, and an extensive list of sites. One article from scientific American states “How do we know the temperature? The answer is that we really don't - at least not with great certainty or precision.” A great concept for high school students to understand, but emphasize that although we don’t know exactly, we do know a great deal! Evaluate – 5 min Have students summarize the day’s learning before they leave, or ticket out the door – write 3 things you learned today about the Earth’s interior. In a block period, students can write this while they do the engage activity below. Part 2 Density Demos and Minilab (55 min) Density demos and minilab plans are also written on the document “Teacher Density Demos”. Use student handout “Balloon Density” for the mini-lab. Be sure Java is loaded on your projected machine and that the PhET simulations work on your machine (phet.colorado.edu without www, choose Density, and Balloons and Buoyancy) Engage – 5 min Student task - preparation for mini-lab later Each group blow up 1 balloon (to a diameter of about 5” or 13 cm), tie it off, write an identifying name on it with a Sharpie, and place it in ice bath for use later. (If there is not enough time to finish the demos and mini-lab today, do this step the next day) Explore – 10 min total Demo 1: Cold and Hot Water Balloons in Warm Water Explain that one small balloon is filled with cold water and the other is filled with hot water. Put both into the warm water bath in a clear dish. The cold balloon will sink and the warm will float. o Ask students: What do you observe? o Ask: Why does this happen? Solicit several different answers. The most likely answer will be “heat rises and cold sinks”. In response, write this on the board as a hypothesis and suggest another experiment to test it. Demo 2: Cold Oil and Hot Water – Does heat rise and cold sink? Start with a super-quick demo showing that room temperature oil floats on water. Explain that you have some very cold oil and very hot water and remind the class that you are testing the hypothesis on the board. o Measure and display the temperature of each. o Ask: If our hypothesis is correct, which material should float on the other? Spoon the cold oil onto the top of the hot water (it will float). o Ask: Shall we change our hypothesis based on this demo and the balloon demo? o Possible conclusions: Same material, warm rises, cold sinks (you can demonstrate that this is not true with an ice cube in room temperature water); this does not always happen – density is what really matters. o Bring up the term density (if students don’t) as a lead in to the PhET density demo. Explain – 10 to 15 min Demo 3: PhET density simulation - whole class – What is density really? What determines density? Purpose: Demonstrate that density is related to both mass AND volume and that density relative to surroundings determines what rises and what sinks. Start by reviewing the density formula D = m/V (write on board). In this demo, mass is in kg and volume is in L. Ask questions listed below (maybe survey class with thumbs up/down) then show each demo. Start with the 2kg block of wood on the simulation. Questions to accompany Demo 3 1. Is a heavier block of wood more dense than a lighter block of wood? Move mass slider right. Block still floats. Why? (Volume increases as mass increases – unless you change to a different type of wood, you can’t make a heavier block without also making it larger). 2. Select “My block” from the menu. This allows you to change weight without changing volume. Will the block continue to float as it gets more massive? Move mass slider to the right. Block sinks as it gets more massive. The mass of the block changed, but something else changed, too – what? (density) Ask students to connect what they see to the formula on the board. Have several students explain. Point out that density changes as the mass slider moves (bottom of the upper left menu). Might want to go back to wood and show that density remained constant as mass and volume changed together. 3. Menu on the top right, select “Same Mass”. Have students predict which will float and which will sink. Drop the blocks in one at a time. Optional – determine volume of each and calculate density. Why does blue block float under the surface? 4. Repeat the above for “Same Volume”. (You don’t need to lift the blocks back up, they go up by themselves.) 5. Repeat the above for “Same Density”. Before dropping the blocks in, ask why they have different sizes for the given mass – why is the 1 kg red block the smallest, and so on. Interesting to some students perhaps – with same density they all float at the same level. 6. Optional check for understanding: Click “Mystery” and “Show Table”. Have students predict which block is water (yellow). Have students determine the material of blocks A (gold) or E (diamond). What can we conclude? Heat rises and cold sinks is incorrect. Instead, something more dense than the surroundings sinks, and something less dense than the surroundings rises. Extend – 15 min lab + 10 min demo/summary = 25 min total Mini-lab: Balloon Density Lab Measure the density of hot and cold balloons Lab Question: What does temperature have to do with density? Before starting the lab: o Write lab question on the board. o Teacher demonstrates how to measure the diameter of a balloon in cm using 2 books. Put balloon on paper, book on each side of balloon, and mark position of inside of book on the paper as close to the book as possible. o Emphasize that the books must be parallel and square to the desk. Emphasize not to squeeze the balloon. Handout – Balloon Density Instructions. Students follow instructions on lab. See materials list above. Conclusions: The volume increases but the density of the air in the balloon decreases as the balloon warms up. The warm balloon should be more buoyant than the cold balloon, not because of its temperature, but because of its density. Demo 4: PhET “Balloons and Buoyancy” at phet.colorado.edu – whole class demo. Purpose: Demonstrate that warm gas molecules are farther apart (less dense) and cold gas molecules are closer together (more dense). Pump the handle about 3x to put air molecules into the box. Remove the lid of the box (slide it to the left). Observe density of the molecules. Add heat by holding the heat control slider to “Add” until the balloon starts to rise out of the box. Observe the density and distribution of the molecules and the position of the balloon. Let go of the heat slider (it returns to 0) and add about 3 more pumps of air. Remove heat (add ice). Note and discuss density and distribution of the molecules and the position of the balloon. Repeat the process as needed. Take-away points from today’s density lessons It is incorrect to say heat rises and cold sinks. Most materials expand when heated, so often hot materials are less dense than cooler materials. To expand means molecules move faster and spread father apart – fewer molecules in a given volume. Materials that are less dense have less mass per unit volume. Gravity has a stronger pull on the more dense material so it moves down while pushing the less dense material up. Part 3 Why do the Plates Move? – 80 min Engage – 5 min Demo tectonic plate movement on projector using iPad app from Bio Interactive called Earth Viewer (free). o Push slider (on left side of image) all the way to the top to and orient the globe to show N and S America in the present. o Slowly slide the slider down to show movement of the continents through time. One possibility is to focus on the movement of Los Angeles as you go back in time. o Discuss and/or ask students what they know about what they see (most will know the “what” of plate tectonics, but this lesson will focus on the “why”) Explore – Convection Currents Lab – 40 min Lab Introduction o Teacher: What makes the tectonic plates move? (possible student answers: heat, volcanoes, earthquakes, earthquake waves, and plate tectonics or continental drift, which are names for what is happening, but we want to know what causes them to move). Teacher: To understand this better, we will do a lab called Convection Currents and explore what happens to water when it is exposed to different temperature sources. Lab – Convection Currents (see handout Convection Currents). o Important safety issue – sprinkle the cinnamon yourself or limit the amount given to each group to less than ¼ teaspoon because of the dangers of the “cinnamon challenge”. o Desired Lab Goals/Outcomes – Students should conclude Mantle material (not just heat) rises when there is a heat source under it. Rising stuff spreads out when it hits a boundary As rising material cools, it begins to sink. Material sinks (and stays there) when there is a cold body under it. Hot material has a lower density than the same material when cold. Final conclusion (students may need guidance). Mantle materials rise because they expand when heated, so their densities are lower than the cooler materials around them. As the mantle materials reach the boundary at the crust, they spread and carry the plates with them. After moving away from the hot regions, the mantle materials cool and sink. Lab groups share drawings and conclusions with the class. Teacher summarizes lab findings and connections. Use “Post-Lab Discussion Guide” for suggested goals, connections, and demos. Explain – 20 min Teacher–led note taking OR students write own notes with guidance. o Teacher led: Power Point “Density and Mantle Convection” with “Teacher PPT notes compiled” o Student directed: write own notes using handout Guided Notes 1 with given websites. The handout tells students to write notes from the website in their notebooks. There is no room to write notes on the handout. (iPad friendly) http://www.spaceflight.esa.int/impress/text/education/Heat%20Transfer/Convection_01.html and http://www.colorado.edu/physics/phys2900/homepages/Marianne.Hogan/inside.html Evaluate – 15 min Posttest After this lesson students are prepared to continue with existing lessons on Plate Tectonics, such as the Plate Tectonics simulation owned by the Thompson School District. Grading Rubric Far Below Standard Approaching Standard Meeting Standard Exceeding Standard Students vaguely describe earth’s layers and temperature gradients, but cannot explain why we know. Students cannot calculate density without help, and continue to confuse it with weight and/or volume. Students believe that something other than density will determine whether a material will float or sink. Students incorrectly draw convection currents and cannot explain why they form or how they relate to mantle convection. Students describe earth’s interior and explain that scientists use experiments to seek answers. Students calculate density given the formula but do not explain it as a ratio and may confuse it with mass and volume. Students state that density changes with temperature but attribute floating and sinking to temperature rather than density. Students can draw convection currents but cannot explain why they form or do not identify mantle convection as a driver of plate tectonics. Students describe earth’s interior and explain that scientists use models and remote information to find seek answers. the structure and temperatures. Students calculate density and explain it as a ratio, but may still confuse it with mass and volume. They relate density to changes in temperature, but may think floating and sinking are determined by either density or temperature. Students can model convection currents, explain why they form, and identify mantle convection as a driver of plate tectonics. Students describe earth’s interior and describe the type of data, experiments, or models scientists use to seek answers. Students calculate density and differentiate between density, mass, and volume. They relate density to temperature differences in a given material, and explain why floating or sinking is determined by density, not temperature. Students can draw and explain the mechanism of convection currents, explain why they form and identify convection currents as a driver of plate tectonics and other phenomenon. NGSS Standard(s): What standards will provide the focus for this unit? Primary Standards: Disciplinary Core Ideas HS-ESS2-3. Develop a model based on evidence of Earth’s interior to describe the cycling of matter by thermal convection. [Clarification Statement: Emphasis is on both a one-dimensional model of Earth, with radial layers determined by density, and a threedimensional model, which is controlled by mantle convection and the resulting plate tectonics. Examples of evidence include maps of Earth’s three-dimensional structure obtained from seismic waves, records of the rate of change of Earth’s magnetic field (as constraints on convection in the outer core), and identification of the composition of Earth’s layers from high-pressure laboratory experiments.] HS-ESS2-1. Develop a model to illustrate how Earth’s internal and surface processes operate at different spatial and temporal scales to form continental and ocean-floor features. [Clarification Statement: Emphasis is on how the appearance of land features (such as mountains, valleys, and plateaus) and sea-floor features (such as trenches, ridges, and seamounts) are a result of both constructive forces (such as volcanism, tectonic uplift, and orogeny) and destructive mechanisms (such as weathering, mass wasting, and coastal erosion).] [Assessment Boundary: Assessment does not include memorization of the details of the formation of specific geographic features of Earth’s surface.] Science and Engineering Practices Developing and Using Models Develop a model based on evidence to illustrate the relationships between systems or between components of a system. Use a model to provide mechanistic accounts of phenomena. Analyzing and Interpreting Data Analyze data using tools, technologies, and/or models (e.g., computational, mathematical) in order to make valid and reliable scientific claims or determine an optimal design solution. Cross-cutting Concepts Cause and Effect Cause and effect relationships can be suggested and predicted for complex natural and human designed systems by examining what is known about smaller scale mechanisms within the system. Systems can be designed to cause a desired effect. Stability and Change Much of science deals with constructing explanations of how things change and how they remain stable. Change and rates of change can be quantified and modeled over very short or very long periods of time. Some system changes are irreversible.
