Captions - Information Technology Home
advertisement
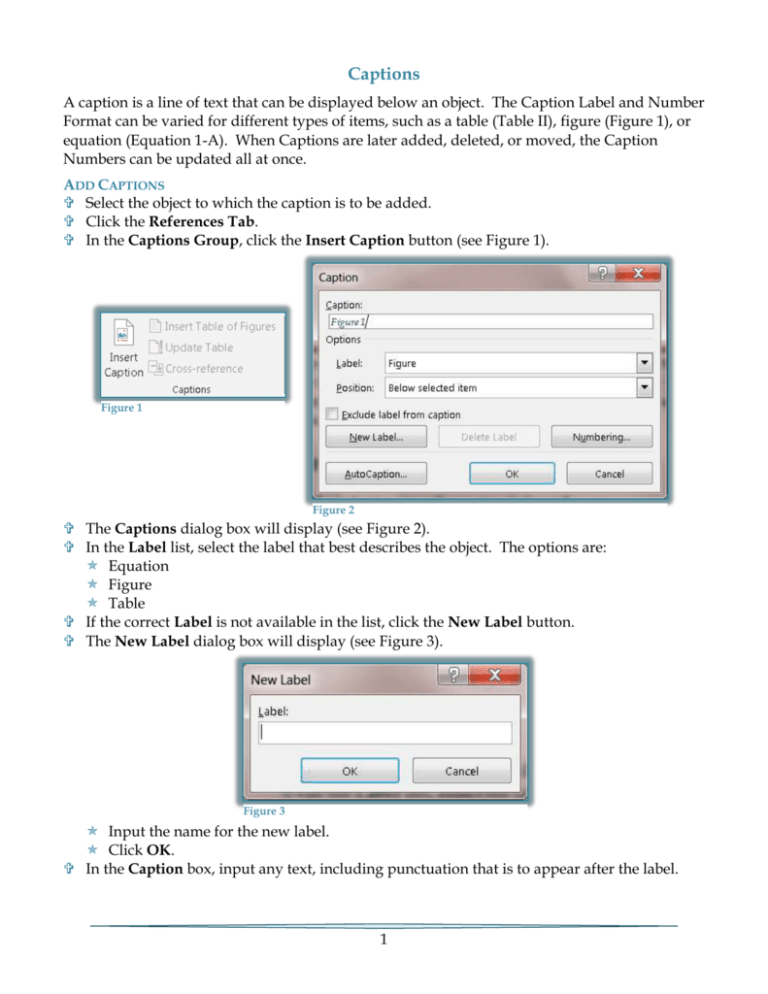
Captions A caption is a line of text that can be displayed below an object. The Caption Label and Number Format can be varied for different types of items, such as a table (Table II), figure (Figure 1), or equation (Equation 1-A). When Captions are later added, deleted, or moved, the Caption Numbers can be updated all at once. ADD CAPTIONS Select the object to which the caption is to be added. Click the References Tab. In the Captions Group, click the Insert Caption button (see Figure 1). Figure 1 Figure 2 The Captions dialog box will display (see Figure 2). In the Label list, select the label that best describes the object. The options are: Equation Figure Table If the correct Label is not available in the list, click the New Label button. The New Label dialog box will display (see Figure 3). Figure 3 Input the name for the new label. Click OK. In the Caption box, input any text, including punctuation that is to appear after the label. 1 Click the Position list and select from: Above selected item. Below selected item. To change the number format for the Label, click the Numbering button. The Caption Numbering dialog box will display (see Figure 4). Figure 4 Click the Format button to select a format from the list. Click OK to return to the Captions dialog box. The new Number Format will appear in the Caption box. After all the selections have been chosen, click OK to insert the caption. ADD CAPTION TO FLOATING OBJECT In order to wrap text around the object and caption or to move the object and caption together, both the object and caption must be inserted into a Text Box. Click the Insert Tab. In the Text Group, click Text Box (see Figure 5). Click Draw Textbox. Draw the Text Box over the object. Figure 5 Figure 6 Click the Drawing Tools Format Tab. In the Shape Styles Group, click Shape Fill (see Figure 6). Click No Fill. Under the Drawing Tools Format Tab, click Wrap Text in the Arrange Group (see Figure 7). Select the Wrap Text option that was used for the object, such as Square. In the Arrange Group, click Send Behind Text. The wording may be different for this command in some Word programs. 2 You may have to click the list arrow for either Send to Back or Send Backward to locate this option. Figure 8 Figure 7 Select the object. Click the Home Tab. Do one of the following: In the Clipboard Group, click the Cut button (see Figure 8). Press CTRL + X on the keyboard. Click in the text box. Do one of the following: In the Clipboard Group, click the Paste button (see Figure 8). Press CTRL + V on the keyboard. Select the object. Click the References Tab. In the Captions Group, click Insert Caption. Follow the instructions in the previous section to insert the caption. DELETE A CAPTION Select the Caption that is to be deleted. Press the Delete key on the keyboard. CHANGE LABEL OF SINGLE CAPTION Select the Caption that is to be changed. Press Delete on the keyboard to remove the caption. Press Enter. Insert a new Caption that uses the desired label. CHANGE LABELS IN ALL CAPTIONS OF SAME TYPE Select the number of a Caption that has the label that is to be changed. For example to change all instances of Figure to Table, select 1 in the caption of Figure 1. Click the References Tab. In the Captions Group, click Insert Caption. In the Label box, click the desired label. or Click New Label. Click OK to change all the Captions of that type. CREATE TABLE BASED ON CAPTIONS Place the cursor in the document where the Table of Figures is to be inserted. This is usually on a separate page after the Table of Contents. Click the References Tab. In the Captions Group, click Insert Table of Figures (see Figure 9). 3 Figure 9 The Table of Figures dialog box will display (see Figure 10). Figure 10 Select the label that is to be used in the Caption Label list under General. To include all label types in the Table of Figures: Click Options. Click the Style check box. Click Caption in the list. To select a format for the table, click the Formats list arrow. Click one of the options in the list. A preview of the format will display in the Print Preview and Web Preview boxes. To change the Tab leader for the table, click the Tab leader list arrow and select the appropriate leader. When all the options have been chosen, click OK to insert the Table of Figures. 4

