JETT Skill Sheet
advertisement

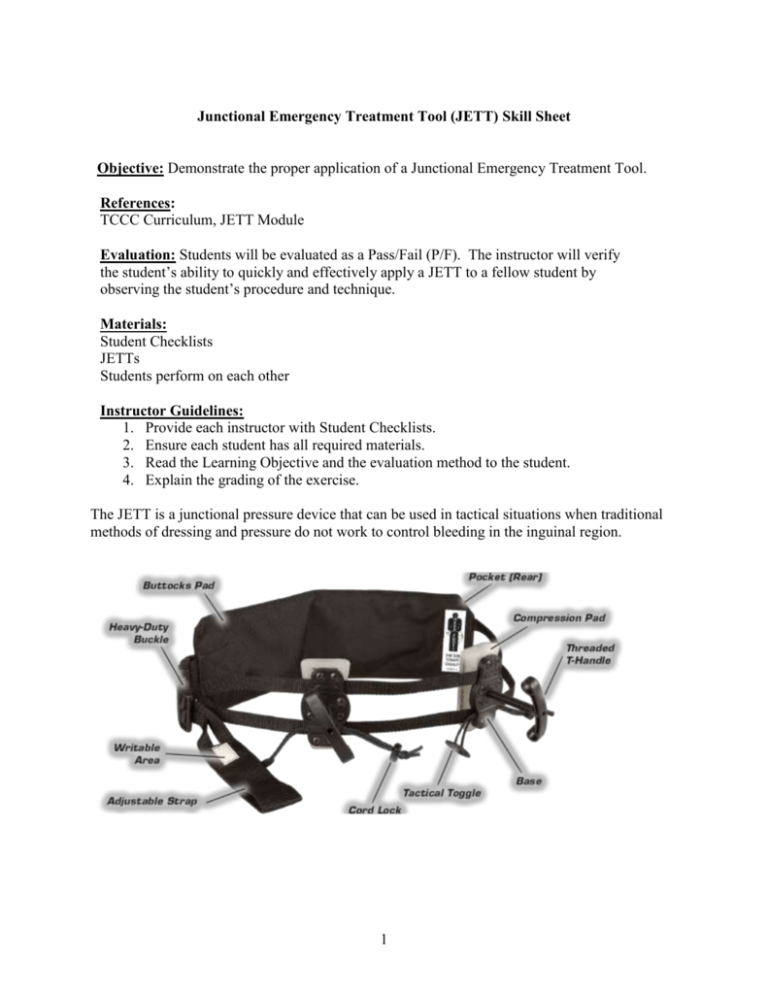
Junctional Emergency Treatment Tool (JETT) Skill Sheet Objective: Demonstrate the proper application of a Junctional Emergency Treatment Tool. References: TCCC Curriculum, JETT Module Evaluation: Students will be evaluated as a Pass/Fail (P/F). The instructor will verify the student’s ability to quickly and effectively apply a JETT to a fellow student by observing the student’s procedure and technique. Materials: Student Checklists JETTs Students perform on each other Instructor Guidelines: 1. Provide each instructor with Student Checklists. 2. Ensure each student has all required materials. 3. Read the Learning Objective and the evaluation method to the student. 4. Explain the grading of the exercise. The JETT is a junctional pressure device that can be used in tactical situations when traditional methods of dressing and pressure do not work to control bleeding in the inguinal region. 1 The JETT includes two individually adjustable compression pads in a single tool, allowing for occlusion of blood flow to either lower limb, or simultaneous occlusion to both, with an easily applied, pre-assembled, ready-to-use belt device. STEP 1: PATIENT ASSESSMENT 1.1 Determine that the injury is not amenable to treatment with a standard tourniquet (i.e.: high in the thigh and/or groin region). Pressure pads should be placed just below the inguinal ligament. 1.2 Determine if a bilateral or unilateral application is required. STEP 2: PATIENT PREPARATION 2.1 Remove any gear, items in pockets, or debris that might interfere with the placement of the JETT or cause additional trauma. 2 STEP 3: DEVICE DEPLOYMENT 3.1 Unroll the device in preparation for application. 3.2 Placement of the JETT 3.2.A Slide the belt with “This Side Toward Casualty” facing up under the body at the lower back. 3 3.2.B Locate the Superior Iliac Crest and Pubic Bone connected by the Inguinal Ligament. 3.2.C Lifting the hips, position the belt under the buttocks so that the buttocks pad is centered behind the casualty and the pressure pads are immediately below (inferior to) the Inguinal Ligaments. 4 3.3: PLACEMENT of PRESSURE PADS 3.3.A Palpate to determine the location of the Inguinal Ligaments. 3.3.B Angle the pressure pads parallel to the Inguinal Ligament (approximately 30°) pointing midline toward the feet, making sure that both pads are correctly positioned. 3.3.C Ensure the casualty’s genitals are clear of the area where the pads will be positioned. 3.4 Buckle the belt, then firmly tighten by pulling the loop handle while stabilizing the belt with your other hand on top of the belt on the casualty (remove ALL slack). 5 3.5 Reassess the pad placement to ensure that they are still in the correct location below the inguinal ligament. 3.6 With one hand on the base plate, grip the threaded T-handle and rotate it clockwise to tighten. For this practical exercise, stop when the pressure pads are firmly in contact with the casualty. 6 3.7 Increase pressure until bright red bleeding stops (hemostasis is achieved) and, if the extremity is intact, check to confirm that distal pulses have been occluded. For this practical exercise, the student will only verbalize this step. 3.8 Insert the toggle into the opening on the threaded T-handle (pulling the handle in clockwise rotation) and cinch it tight at the base plate in order to secure the device. 3.9 Repeat with the other threaded T-handle for bilateral injuries. 3.10 Note time of application in the Writeable Area (and on the TCCC Card). STEP 4: MONITOR 4.1 Assess frequently (every 5 minutes) to ensure that bleeding is still controlled (or based on your medical protocols). 4.2 Assess after any movement to ensure that pressure pads are in correct location and that pressure was not reduced during movement (hemostasis is maintained). 4.3 Device should only be removed under physician supervision (or based on your medical protocols). 4.4 Device application should not exceed 4 hours. 7 Warnings: • Do not leave applied for longer than 4 hours • Inguinal use only Cautions: • For use by trained personnel • Tighten until hemostasis is achieved • Reassess casualty condition after movement or every 5 minutes (or based on your medical protocols) • Caution: Federal law restricts this device to sale by or on the order of a physician 8 Student Checklist Control Bleeding Using a Junctional Emergency Treatment Tool Task Determined that the injury was not amenable to treatment with a standard limb tourniquet. Determined if a bilateral or unilateral application was needed. Removed items from pockets that may interfere with JETT application. Properly placed the JETT so that pressure pads were correctly located just below the inguinal ligaments. Correctly tightened the belt to remove all slack before tightening the T-handle(s). Verbalized tightening the T-handle(s) until distal bleeding stopped. Correctly secured the T-handle(s) after tightening them. Completed 1st 2nd 3rd P / F P / F P / F P / F P / F P / F P / F P / F P / F P / F P / F P / F P / F P / F P / F P / F P / F P / F P / F P / F P / F Critical Criteria: _____ Did not correctly position the JETT. _____ Did not verbalize applying sufficient pressure to stop distal bleeding. _____ Did not secure the T-handle(s). 9 Evaluator's Comments: Student Name: Date: Evaluator: Pass: 10 Fail:


