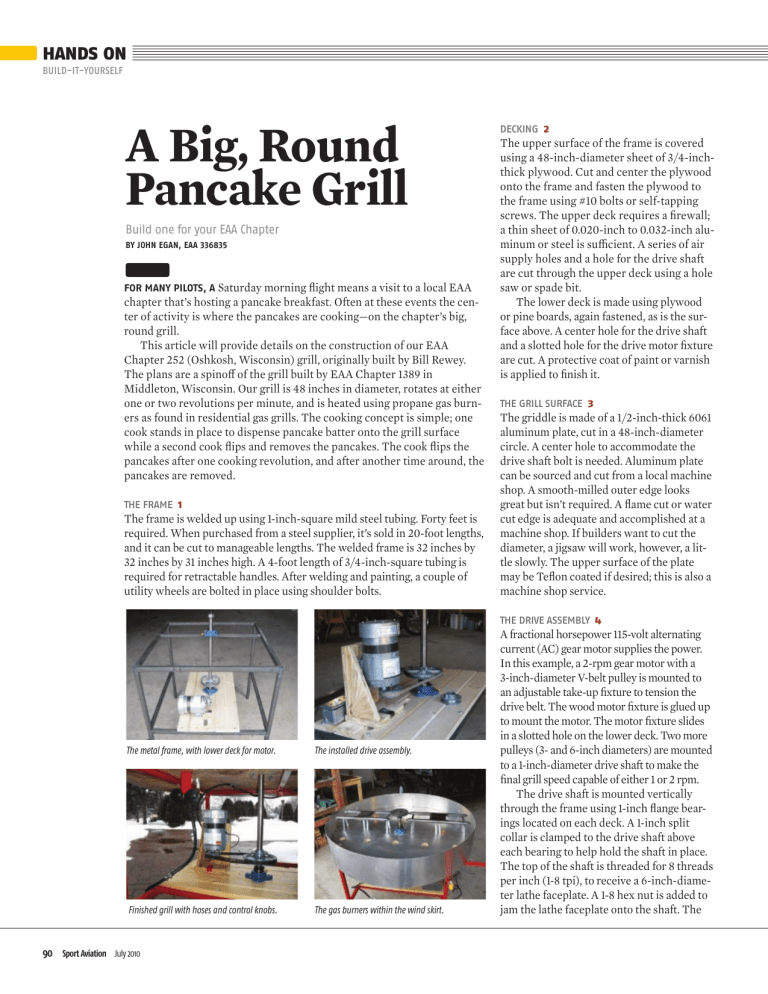
HANDS ON BUILD-IT-YOURSELF A Big, Round Pancake Grill Build one for your EAA Chapter BY JOHN EGAN, EAA 336835 FOR MANY PILOTS, A Saturday morning flight means a visit to a local EAA chapter that’s hosting a pancake breakfast. Often at these events the center of activity is where the pancakes are cooking—on the chapter’s big, round grill. This article will provide details on the construction of our EAA Chapter 252 (Oshkosh, Wisconsin) grill, originally built by Bill Rewey. The plans are a spinoff of the grill built by EAA Chapter 1389 in Middleton, Wisconsin. Our grill is 48 inches in diameter, rotates at either one or two revolutions per minute, and is heated using propane gas burners as found in residential gas grills. The cooking concept is simple; one cook stands in place to dispense pancake batter onto the grill surface while a second cook flips and removes the pancakes. The cook flips the pancakes after one cooking revolution, and after another time around, the pancakes are removed. THE FRAME 1 The frame is welded up using 1-inch-square mild steel tubing. Forty feet is required. When purchased from a steel supplier, it’s sold in 20-foot lengths, and it can be cut to manageable lengths. The welded frame is 32 inches by 32 inches by 31 inches high. A 4-foot length of 3/4-inch-square tubing is required for retractable handles. After welding and painting, a couple of utility wheels are bolted in place using shoulder bolts. DECKING 2 The upper surface of the frame is covered using a 48-inch-diameter sheet of 3/4-inchthick plywood. Cut and center the plywood onto the frame and fasten the plywood to the frame using #10 bolts or self-tapping screws. The upper deck requires a firewall; a thin sheet of 0.020-inch to 0.032-inch aluminum or steel is sufficient. A series of air supply holes and a hole for the drive shaft are cut through the upper deck using a hole saw or spade bit. The lower deck is made using plywood or pine boards, again fastened, as is the surface above. A center hole for the drive shaft and a slotted hole for the drive motor fixture are cut. A protective coat of paint or varnish is applied to finish it. THE GRILL SURFACE 3 The griddle is made of a 1/2-inch-thick 6061 aluminum plate, cut in a 48-inch-diameter circle. A center hole to accommodate the drive shaft bolt is needed. Aluminum plate can be sourced and cut from a local machine shop. A smooth-milled outer edge looks great but isn’t required. A flame cut or water cut edge is adequate and accomplished at a machine shop. If builders want to cut the diameter, a jigsaw will work, however, a little slowly. The upper surface of the plate may be Teflon coated if desired; this is also a machine shop service. THE DRIVE ASSEMBLY 4 The metal frame, with lower deck for motor. The installed drive assembly. Finished grill with hoses and control knobs. The gas burners within the wind skirt. 90 Sport Aviation July 2010 A fractional horsepower 115-volt alternating current (AC) gear motor supplies the power. In this example, a 2-rpm gear motor with a 3-inch-diameter V-belt pulley is mounted to an adjustable take-up fixture to tension the drive belt. The wood motor fixture is glued up to mount the motor. The motor fixture slides in a slotted hole on the lower deck. Two more pulleys (3- and 6-inch diameters) are mounted to a 1-inch-diameter drive shaft to make the final grill speed capable of either 1 or 2 rpm. The drive shaft is mounted vertically through the frame using 1-inch flange bearings located on each deck. A 1-inch split collar is clamped to the drive shaft above each bearing to help hold the shaft in place. The top of the shaft is threaded for 8 threads per inch (1-8 tpi), to receive a 6-inch-diameter lathe faceplate. A 1-8 hex nut is added to jam the lathe faceplate onto the shaft. The shaft and plate assembly require a means to hold the griddle onto it. Here a 1/2-inch hole is drilled and tapped (1/2-13 tpi) into the top of the shaft, and a 1/2-inch bolt clamps the griddle to the shaft. It’s important to make the griddle top easily removable for vehicle transport. THE FACEPLATE AND SHAFT 5 A lathe faceplate is a round plate with threaded holes in it used to attach wood blocks to the rotating spindle of a wood lathe. The plate has specific holes for attaching wood blocks to the plate using screws. Lathe plates of various sizes are available at local or online woodworking supply houses. For this purpose, the 6-inch-diameter plate requires an added drive pin mounted on the disk. Ream and tap one of the existing screw holes in the plate. Screw in a matching size bolt to the end of its threads and cut off the head of the bolt, leaving only about a 3/8 inch of bolt shank protruding through the top surface of the plate. A matching clearance hole is drilled in the griddle top for the pin to set in. The concept here is to hold the griddle top to the shaft and faceplate assembly using the center hole and a 1/2-inch bolt, while the adjacent pin (cut-off bolt) attached to the faceplate protrudes into the griddle, positively driving the griddle. 3 7 1 GAS BURNERS 6 In this example, two double burners are selected, each being fed by a 20-pound propane tank. Sold as replacement parts for residential gas grills, the burners and controls are sourced from a home improvement store. Mount the gas controls under the upper deck. Drill holes for the burners’ foil gas lines and mount the burners to the top of the upper deck. Four-and-a-half-inch-high brackets are fabricated to hold the burners in place as shown. Using two double burners, the cooks have a good opportunity to control the flame and heat through four control knobs. Refer to the instructional information contained in the burner kit to set up the proper flame. THE WIND SKIRT 7 A skirt is required around the outer limits of the griddle to retain the heat and to help control the flame. The skirt is 8 inches high and made from 0.020- to 0.032-inchthick aluminum sheet with the top edge rolled over. Attach the skirt to the outer edge of the upper deck using small L-brackets and hardware. 5 6 2 4 RETRACTABLE HANDLES A set of retractable handles slides out from the frame to move the grill around like a wheelbarrow. For each handle, weld two 1-inch-long pieces of 1-inch-square tubing, in line, onto the outside and center upper cross members. Cut a piece of 3/4-inch by 3/4-inch-square tubing, 24-inch long, and slide it inside the sleeves. Drill a 1/4inch hole through the small tubing, between the two ILLUSTRATION BY GARY COX We have found that having a separate gas tank for each burner prevents the regulator from icing up. www.eaa.org 91 HANDS ON BUILD-IT-YOURSELF Complete Kits and Sub-Kits Available! Visit: www.SonexAircraft.com or call: 920.231.8297 Designer Bill Rewey with his pancake grill. sleeves, and press in a 1/4-inch-diameter by 1-1/4-inch-long roll pin. Locate the pin so when you push and pull the handles in and out, the pin stops the handles in the correct positions. Space the two handles comfortably apart. ELECTRICAL FAA-PMA Manufacturer of Quality Aircraft Parts 888.750.5244 www.mcfarlaneaviation.com/EAA The electric gear motor is powered with household current. Use a toggle switch and switch box suitable for this purpose, and add an electrical cord with a plug. Dual Controls for 912/914 Rotax Engines Clean installation without a clunky splitter box! Choke Controls • Turn-to-lock and non-locking styles • Many knob options Throttle Controls • Panel mount with friction lock and quadrant styles • Convenient mounting hardware and cable stops Push-to-Unlock and Turn-to-Lock Controls Heavy duty for strength and long life • Many knob and length options • Custom marking available New! Flight Control Cables and Engine Controls Custom made to your requirements • Same high quality as our FAA-PMA products • Quick turn-around Cowl Saver™ BafÀe Seal Material Reduce Airframe Vibration and Stop Cowl Damage Free sample! You can feel the difference! 10 times less friction View demo: www.mcfarlaneaviation.com/cowlsaver McFarlane Aviation Products 696 East 1700 Road, Baldwin City, Kansas 66006 Ph: 785.594.2741 Fax: 785.594.3922 sales@mcfarlaneaviation.com 92 Sport Aviation July 2010 MATERIALS For a materials list and potential suppliers, visit www.SportAviation.org. Using two sets of residential gas grill burners is an easy way to devise a reliable heat source; however, a talented team may develop an equally sound method at less expense. Our grill cost our Chapter just over $1,100 to build. The most expensive item is the aluminum plate for the grill surface, at $400. A grill is a great project that will provide your chapter with the opportunity to make pancakes and create a point of discussion for those visiting your event. Look for pancake breakfasts by logging on to EAA’s Aviation Calendar of Events (www. EAA.org/calendar). Fly or drive to a breakfast near you, and when you do, make sure to take a look at the grill in use and consider how your chapter may build one of your own. Old-Fashioned Pancakes (from AllRecipes.com) 1 1/2 cups all-purpose flour 3 1/2 teaspoons baking powder 1 teaspoon salt • 1 1/4 cups milk 1 tablespoon white sugar • 1 egg 3 tablespoons butter, melted In a large bowl, sift together flour, baking powder, salt and sugar. Make a well in the center and pour in the milk, egg and melted butter; mix until smooth. Heat a lightly oiled griddle or frying pan over medium high heat. Pour or scoop the batter onto the griddle, using about 1/4 cup for each pancake. Brown on both sides and serve hot. PHOTOGRAPHY BY RYANJLANE@ISTOCKPHOTO.COM


