----
BW TECHNOLOGIES
RRJ Transmitter with Sensor
4-20 mA Combustible Gas Monitor
Instruction Sheet
Introduction
The Rig Rat Junior (RRJ) gas monitor (“the monitor”) warns of hazardous
gas at levels above a factory set alarm setpoint. The monitor is a 3-wire,
4-20 mA transmitter with sensor. The monitor is factory calibrated and
tested.
Standard RRJ Transmitter with sensor kit includes:
•
RRJ 0-100% LEL monitor
Calibration plug
Instruction sheet
•
•
Table 1. Order Numbers
Model
Description
Max Operating Life
RRJ-RW1
RRJ transmitter with LEL sensor
2 years
RRJ-RW1-K
RRJ transmitter with LEL sensor
and pigtail assembly
2 years
Table 2. International Symbols
Symbol
n
Meaning
Approved to both U.S. and Canadian Standards by the
Canadian Standards Association
ATEX
Conforms to European ATEX Directives
IECEx
International Electrotechnical Commission Scheme for
Certification to Standards for Electrical Equipment for
Explosive Atmospheres
X
Conforms to European Union Directives
Certified to CAN/CSA C22.2 No. 152 and ANSI.ISA S12.13 Part 1 when
connected to a controller that has zero span adjustment and is
certified to the combustible gas performance standards.
D1423/3
iERP: 117813
© 2005 BW Technologies Ltd. All rights reserved. Printed in Canada.
All product names are trademarks of their respective companies.
----
a Safety Information - Read First
Users of the monitor require a full understanding of the installation,
operating, and maintenance instructions; otherwise protection
provided by the monitor may be impaired. Read and understand the
instruction sheet completely before operating or servicing.
⇒ Install according to local electrical regulations and codes.
⇒ Installation should be performed by qualified personnel.
⇒ Do not activate the monitor after the date on the package.
⇒ Make sure the sensor screen is free of dirt and debris.
⇒ Make sure the sensor screen is not covered.
⇒ Do not expose the monitor to electrical shock and/or continuous
mechanical shock.
⇒ Do not expose the sensor to high-pressure water spray.
⇒ Do not install in atmospheres containing ketones, alcohols, or
acids.
⇒ Calibrate the system before first-time use and then on a regular
schedule, depending on use and sensor exposure to poisons and
contaminants.
⇒ It is recommended that a “bump test” be performed before each
day’s use to verify proper instrument operation. Calibrate if the
readings are not within the specified limits.
⇒ It is recommended that the combustible sensor be checked with a
known concentration of calibration gas after any known exposure
to catalyst contaminants/poisons (sulfur compounds, silicon
vapors, halogenated compounds, etc.).
⇒ The combustible sensor is factory calibrated to 50% LEL
methane. If monitoring a different combustible gas in the % LEL
range, calibrate the sensor using the appropriate gas. High offscale % LEL or % v/v methane readings may indicate an explosive
concentration.
⇒ Protect the combustible sensor from exposure to lead
compounds, silicones, and chlorinated hydrocarbons. Although
certain organic vapors (such as leaded gasoline and halogenated
hydrocarbons) may temporarily inhibit sensor performance, in
most cases, the sensor will recover after calibration.
⇒ Any rapid up-scaling reading followed by a declining or erratic
reading may indicate a gas concentration beyond upper scale
limit, which may be hazardous.
⇒ Do not test the combustible sensor’s response with a butane
cigarette lighter; doing so will damage the sensor.
⇒ Do not use the monitor if it is damaged. Before use, inspect the
monitor. Look for cracks, missing metals, or plastics. If the monitor is
damaged, contact BW Technologies immediately.
⇒ The warranty will be voided if the customer or any unauthorized
service personnel attempt to repair the unit.
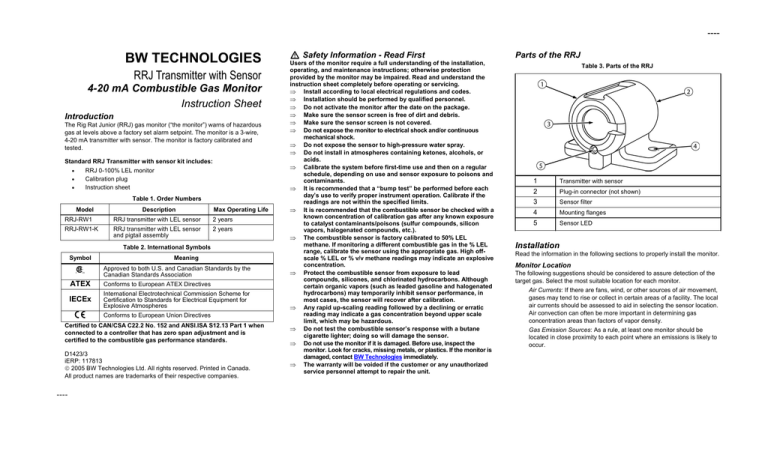
Parts of the RRJ
Table 3. Parts of the RRJ
1
Transmitter with sensor
2
Plug-in connector (not shown)
3
Sensor filter
4
Mounting flanges
5
Sensor LED
Installation
Read the information in the following sections to properly install the monitor.
Monitor Location
The following suggestions should be considered to assure detection of the
target gas. Select the most suitable location for each monitor.
Air Currents: If there are fans, wind, or other sources of air movement,
gases may tend to rise or collect in certain areas of a facility. The local
air currents should be assessed to aid in selecting the sensor location.
Air convection can often be more important in determining gas
concentration areas than factors of vapor density.
Gas Emission Sources: As a rule, at least one monitor should be
located in close proximity to each point where an emissions is likely to
occur.
---Mounting the Monitor
The monitor is equipped with two predrilled mounting flanges. Simply fix
where desired.
a Caution
The sensor should face sideways or down to prevent the
accumulation of dirt, debris, water, or snow on the sensor
filter, thereby preventing the flow of ambient air to the
sensor.
Shielded Cable: Use shielded cable only to avoid radio frequency
interference (RFI) or electromagnetic interference (EMI). The shield
(including Mylar) must be grounded at the controller.
Note
Wire to Controller
1. RRJ-4000 controllers: Install the compression fitting on the
controller (supplied), if applicable. Remove the outer casing of the
shield (including the wires within the shield) to expose the
connected wires (minimum five inches of exposure).
2.
Connect the pin F wire to the +V controller connection.
4.
Connect the pin C wire to the 4-20 mA return signal connector.
5.
Connect the pin A wire to the 4-20 mA return connector.
Plug into Monitor
1. Plug cable into monitor and secure outer weatherproof ring to
prevent moisture invasion.
Figure 2. Transmitter Plug
BW Technologies’ manufactured cables are shielded.
4-20 mA Loop
Cable Routing: Separate cables are required for each monitor.
Power Supply: Power is supplied by the controller.
Recommend: BW recommends regulating the power supply if using any
other controller.
a Caution
Supply voltage to be 24 V nominal. Fluctuations not to
exceed 28 Vdc or go below 10 Vdc. Applicable for any
3-wire, 4-20 mA transmitter that can operate down to 10
volts.
Strip 5/16 inch of insulation on to pin A, C, and F.
3.
Note
If the monitor is always mated to the same channel on the controller, the
controller LCD only requires calibration the first time the monitor head is
installed.
Cable bend allowances should not exceed 65 degrees.
2.
Calibrate the controller display and test with gas (refer to the
Calibrate the Controller section).
Customer-Supplied Cable Installation
•
Note
RRJ-4000 controller and CR-4000 controller resistance is 120 ohms.
a Caution
Connect the Monitor to the Controller
Use 3-wire, 18-22 AWG shielded copper wire cable. Cable
should be shielded to prevent RF line interference.
There are three ways that you can connect the monitor to a controller.
1.
Using BW’s RRJ sensor cable;
2.
Using your own sensor cable;
3.
Using a pigtail connector (if cable is not needed).
Part No. RRJ-FW1-K
The distance the 4-20 mA signal can travel is dependent on several factors,
including cable gauge. Maximum loop resistance is 650 ohms less the
controller resistance.
The following table assumes a constant 12 V power supply at 68°F (20°C)
for RRJ-4000 and 24 V power supply at 68°F (20°C) for CR-4000.
Table 4. Maximum Transmission Distance
Note
RRJ-4000 Controller
Do not turn on the controller power until all wiring is complete.
CR-4000 Controller
BW Plug-In Monitor Manufactured Cable Kits
•
Part No. RRJ-SC###-K
Conductor Size
Max. Length
Conductor Size
SQ mm
AWG
Feet
Meters
SQ mm
AWG
Feet
Meters
The rugged artic black shielded cable kit comes complete with molded plugin connectors and a controller compression fitting. The maximum cable
length is 1,000 ft. (305 m). To install, complete the following steps and refer
to the following two figures.
0.64
22
1,300
395
0.64
22
6,600
2,010
0.75
20
2,100
640
0.75
20
10,500
3,200
1.00
18
3,300
1,005
1.00
18
16,700
5,090
Figure 1. Controller Wiring
Max. Length
---Pigtail Assembly
Wire to Controller
When the transmitter wiring connection is made to the applicable controller,
connect the dc supply to the monitor (refer to Figure 1. Controller Wiring).
Part No. RRJ-PT1-K2
1.
If a cable is not needed for installation, use a pigtail connector and
refer to Figure 3. Field Transmitter Wiring with Customer Cable.
a CAUTION
Polarity must be observed. If the return and supply voltage
wires are reversed, the monitor will not work.
Follow the instructions in the controller manual and connect as shown in the
diagram.
•
RRJ-4000 Controller: Power (+12 V) to +V
Ground to G
Return signal line to 4-20 mA
•
CR-4000 Controller:
Power (+24 V) to +V
Ground to G
•
Other controllers:
Figure 3. Field Transmitter Wiring with Customer Cable
Return signal line to 4-20 mA
Check the power range specifications in the
controller manual.
Note
CR-4000 power supply is +24 volts.
Wire Field Connector and Connect to Monitor
Plug-in field wiring connectors (one supplied with each monitor)
1.
Feed wire through hose as shown in the diagram.
2.
Solder as follows: 4-20 mA return signal line to pin C
GND to pin A
+12 volt power line to pin F
3.
Reassemble field connector. Ensure cable clamp is securely
fastened to prevent moisture invasion.
4.
Plug connector into the monitor and secure outer weatherproof ring
to prevent moisture invasion.
Figure 4. Pigtail Assembly
Note
Note
If the monitor is always mated to the same channel on the controller, the
controller LCD only requires calibration the first time the transmitter head is
installed.
If the monitor is always mated to the same channel on the controller, the
controller LCD only requires calibration the first time the transmitter head is
installed.
Cable bend allowances should not exceed 65 degrees.
Cable bend allowances should not exceed 65 degrees.
5.
Calibrate the controller display and test with gas (refer to the
Calibrate the Controller section).
The following table assumes a constant 24 volt power supply at 68°F (20°C)
with copper wire and a controller resistance of 250 ohms. The signal range
from the controller/PLC, etc, to the monitor takes into account the return
loop. The distance shown is from the controller to the monitor.
2.
Calibrate the controller display and test with gas.
I.S. Barriers
Table 5. Cable Length
Conductor Size
Distance
22 AWG
0.64 mm
6,709 ft.
2,045 m
20 AWG
0.75 mm
10,670 ft.
3,253 m
18 AWG
1.0 mm
22,810 ft.
5,167 m
Figure 5. Installation of Barriers
---Note
Installation must comply with the Canadian Electrical Code (CEC) and the
National Electrical Code (NEC).
I.S. barrier is required for Class I, Div I and Zone I
I.S. barrier is not required for Class I, Div 2, or Zone 2
Requires a 10 V input minimum
Table 6. Entity Parameters
Group
A/B
30
113
0
0
Vmax (V)
Imax (mA)
Ci (µF)
Li (µH)
Use MTL 5042 Barrier
Table 7. Limiting Energy
I.S. Barrier
Open circuit voltage, VOC
Short circuit current, Isc
Allowed capacitances, Ca
Allowed inductances, La
≤
≤
≥
≥
RRJ
Vmax, maximum current allowed
Imax, maximum current allowed
Ci, internal capacitance +Ccable, cable
capacitance
Li, internal inductance +Lcabel, cable
inductance
Note
Power Up
Self-Test
Apply power. The monitor sets the operational life clock and then performs
the full function sensor integrity self-test.
Automatic Self-Test
If the monitor passes the self-test, the sensor will stabilize in less than 30
seconds. Upon a successful self-test, the red status LED lights and the
transmitter sends a 4-20 mA current output to the controller equivalent to
the %LEL level measured by the monitor. Instructions describing what to do
in the event of a self-test failure appear in the section Self-Test Fail.
Table 8. Sensor LED Status
LED Status
On
Output to
Controller
Power on
4-20 mA
24 mA
Fast flashes
(once every 0.5 seconds)
Fault: Self-test fail
2 mA
Slow flashes
(once every 2 seconds)
Life-ending warning
4-20 mA
Life-ended
2 mA
Power off
0 mA
Operational Life
The operational life of the RRJ monitor is 2 years in normal operation. The
life counter is activated when power is applied and runs continuously while
the monitor is operating. If the power is interrupted or turned off, the counter
stops and resumes counting once power is restored. The counter does not
reset, and continues counting from the point where it stopped.
Life-Ended Warning
When only 1 month of the instrument life is remaining, the LED flashes
slowly to advise the unit soon requires replacement.
Life-Ended Alarm
The life-ended alarm occurs when the monitor’s useful life has ended. The
monitor sends a 2 mA signal to the controller and the LED is shut off. The
monitor is now disabled. Replace the monitor.
Connect the Controller (PLC etc.) and Power
Supply
To ensure proper operation, test with gas. Apply a known concentration of
quality test gas to the sensor for 2 minutes to allow the sensor response to
stabilize. The control system should read the same as the %LEL of the gas
being applied. If it does not, calibrate the controller.
Attach wire to the controller and power as described in the controller
manual.
If the sensor fails the test, the LED flashes quickly and the monitor sends a
2 mA signal to the controller. If the monitor fails the self-test, replace the
monitor and return the unit to BW Technologies.
Follow the procedures and recommendations in the controller manual.
4 mA = 0% LEL (zero); 20 mA = 100% LEL (full scale)
Shields and any unused wires should be tied to the controller ground as
outlined in the National Electrical Code (NEC) practices.
A high risk gas alarm will take precedence, therefore the self-test will not be
performed in the event of a high or high/high gas alarm.
Calibrate the Controller
Ca and La include capacitance and inductance.
Ensure that all connections are made and the monitor is complete with
cable connectors correctly in place before applying power. Follow the
procedures and recommendations in the control systems manual to
complete the installation.
Note
Self-Test Fail
Advise
Over range alarm
Off
The sensor is tested automatically every 24 hours while in operation and
every time power is applied.
a Caution
Allow a ±3% tolerance in some cases due to sensor
repeatability.
The monitor is now ready for use.
Operation
The RRJ monitor is factory calibrated. No further calibration is required.
---Maintenance
Specifications
Visually inspect the sensor and test with gas on a regular schedule to
ensure that the sensor is not damaged or plugged. If the sensor screen is
dirty, remove the screen to wash or replace it.
Supply voltage
The inner sensor screen, if dirty, may be cleaned with a soft brush using
warm, clean water.
In the event that the screen still appears plugged with dirt or particulate,
expose the sensor to a combustible test gas. Verify the response to the gas
to ensure that the sensor is functioning. Replace a plugged or damaged
sensor screen.
Table 10. System Design
Power
consumption
10 to 28 Vdc supplied by controller
RRJ-4000
70 mA @ 12 Vdc maximum
50 mA @ 12 Vdc nominal
CR-4000
55 mA @ 24 Vdc maximum
35 mA @ 24 Vdc nominal
Loop resistance
650 ohms maximum
Output current
Normal operation: 4-20 mA
Fault: 2 mA signal
Sensor expired: 2 mA signal
Over range: 24 mA signal (max)
Cable
3-wire, 18 to 22 AWG
This equipment has been tested and found to comply with the limits for a
Class B digital device, pursuant to Part 15 of the FCC Rules and ICES-003
Canadian EMI requirements. These limits are designed to provide
reasonable protection against harmful interference in a residential
installation. This equipment generates, uses, and can radiate radio
frequency energy and, if not installed and used in accordance with the
instructions, may cause harmful interference to radio communications.
However, there is no guarantee that interference will not occur in a
particular installation. If this equipment does cause harmful interference to
radio or television reception, which can be determined by turning the
equipment off and on, the user is encouraged to try to correct the
interference by one or more of the following measures:
•
Reorient or relocate the receiving antenna.
•
Increase the separation between the equipment and receiver.
•
Connect the equipment into an outlet on a circuit different from that
to which the receiver is connected.
•
Consult the dealer or an experienced radio/TV technician for help.
Table 11. General Specifications
Figure 6. Replaceable Sensor Screen
Replacement Parts and Accessories
Table 9. Replacement Parts and Accessories
Model No.
Description
Qty
RRJ-FW1-K
Field wiring transmitter connector
1
RRJ-FW2-K
Military-style connector for RRJ
transmitters
1
RRJ-PT1-K2
Pigtail connector for RRJ transmitter
1
RRJ-SC010-K
RRJ sensor cables with compression
fitting
10 ft./3 m
RRJ-SC(###)-K
RRJ sensor cables 20 to 1,000 ft. (6.1 to
305 m) – order in 10 ft./3 m increments
per ft.
RRJ-FIL-K5
Sensor screen replacements
Kit of 5
M2493
Calibration plug
1
D1423
Instruction sheet
1
Operating temperature
Operating humidity
Calibration
-40°C to +50°C (-40°F to +122°F)
0 to 99% relative humidity (non-condensing)
Not required
Monitor
4-20 mA combustible gas transmitter
Maximum operating life
2 years
Measuring range
Visual alarm
Self-test
Monitor type
Sensor type
Sensor screen
Physical
0-100% LEL
Red light emitting diode (LED)
Daily full function sensor self-test
Zero-maintenance disposable
Catalytic sensor
Field replaceable
Rugged polyurethane encapsulated sensor
head
6.73 x 5.84 x 8.25 cm (2.65 x 2.3 x 3.25 in.)
175 g (6.2 oz)
2 years
n Class 1, Div. 1, Gr. A, B, C, D T6
CAN/CSA C22.2 No. 152
ANSI/ISA S12.13 Part 1
Size (dxwxh)
Weight
Warranty
Approvals
Contacting BW Technologies
To contact BW Technologies call:
USA: 1-888-749-8878
Europe: +44 (0) 1869 233004
Canada: 1-800-663-4164
Other countries: +1-403-248-9226
Email us at info@bwtnet.com, or
Visit BW Technologies’ web site at: www.gasmonitors.com
Canada
BW Technologies LP
2840 - 2 Avenue SE
Calgary, Alberta
Canada T2A 7X9
USA
BW America
3279 West Pioneer Parkway
Arlington, Texas
USA 76013
Europe
BW Europe
101 Heyford Park
Upper Heyford, Oxfordshire
UK OX25 5HA
---Warranty
LIMITED WARRANTY & LIMITATION OF LIABILITY
BW Technologies LP (BW) warrants this product to be free from defects in material and
workmanship under normal use and service for a period of two years, beginning on the
date of activation. This Warranty is valid only if the detector is activated by the date on
the package. This warranty extends only to the sale of new and unused products to the
original buyer. BW’s warranty obligation is limited, at BW’s option, to refund of the
purchase price, repair, or replacement of a defective product that is returned to a BW
authorized service center within the warranty period. In no event shall BW’s liability
hereunder exceed the purchase price actually paid by the buyer for the Product.
This warranty does not include:
a) fuses, disposable batteries or the routine replacement of parts due to the normal
wear and tear of the product arising from use;
b) any product which in BW’s opinion, has been misused, altered, neglected or
damaged by accident or abnormal conditions of operation, handling or use;
c) any damage or defects attributable to repair of the product by any person other
than an authorized dealer, or the installation of unapproved parts on the product;
or
The obligations set forth in this warranty are conditional on:
a) proper storage, installation, calibration, use, maintenance and compliance with
the product manual instructions and any other applicable recommendations of
BW;
b) the buyer promptly notifying BW of any defect and, if required, promptly making
the product available for correction. No goods shall be returned to BW until
receipt by the buyer of shipping instructions from BW; and
c) the right of BW to require that the buyer provide proof of purchase such as the
original invoice, bill of sale or packing slip to establish that the product is within
the warranty period.
THE BUYER AGREES THAT THIS WARRANTY IS THE BUYER’S SOLE AND EXCLUSIVE
REMEDY AND IS IN LIEU OF ALL OTHER WARRANTIES, EXPRESS OR IMPLIED,
INCLUDING BUT NOT LIMITED TO ANY IMPLIED WARRANTY OF MERCHANTABILITY
OR FITNESS FOR A PARTICULAR PURPOSE. BW SHALL NOT BE LIABLE FOR ANY
SPECIAL, INDIRECT, INCIDENTAL OR CONSEQUENTIAL DAMAGES OR LOSSES,
INCLUDING LOSS OF DATA, WHETHER ARISING FROM BREACH OF WARRANTY OR
BASED ON CONTRACT, TORT OR RELIANCE OR ANY OTHER THEORY.
Since some countries or states do not allow limitation of the term of an implied
warranty, or exclusion or limitation of incidental or consequential damages, the
limitations and exclusions of this warranty may not apply to every buyer. If any
provision of this warranty is held invalid or unenforceable by a court of competent
jurisdiction, such holding will not affect the validity or enforceability of any other
provision.


