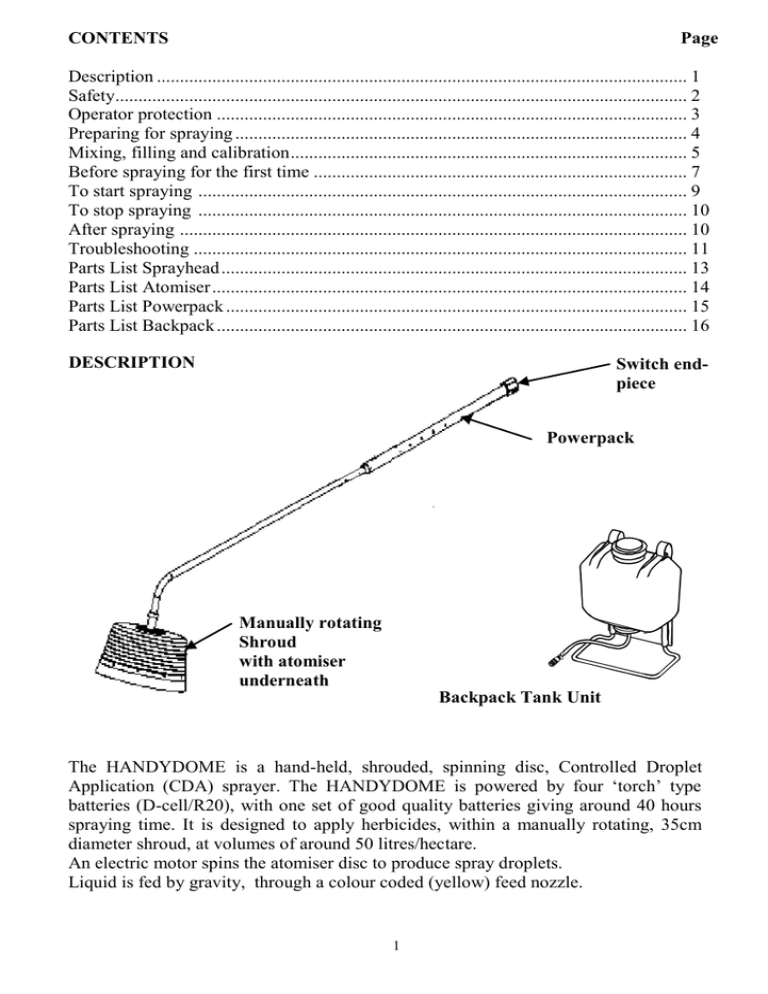
The HANDYDOME is a hand-held, shrouded, spinning disc
advertisement

CONTENTS Page Description ................................................................................................................... 1 Safety............................................................................................................................ 2 Operator protection ...................................................................................................... 3 Preparing for spraying .................................................................................................. 4 Mixing, filling and calibration ...................................................................................... 5 Before spraying for the first time ................................................................................. 7 To start spraying .......................................................................................................... 9 To stop spraying .......................................................................................................... 10 After spraying .............................................................................................................. 10 Troubleshooting ........................................................................................................... 11 Parts List Sprayhead ..................................................................................................... 13 Parts List Atomiser ....................................................................................................... 14 Parts List Powerpack .................................................................................................... 15 Parts List Backpack ...................................................................................................... 16 DESCRIPTION Switch endpiece Powerpack Manually rotating Shroud with atomiser underneath Backpack Tank Unit The HANDYDOME is a hand-held, shrouded, spinning disc, Controlled Droplet Application (CDA) sprayer. The HANDYDOME is powered by four ‘torch’ type batteries (D-cell/R20), with one set of good quality batteries giving around 40 hours spraying time. It is designed to apply herbicides, within a manually rotating, 35cm diameter shroud, at volumes of around 50 litres/hectare. An electric motor spins the atomiser disc to produce spray droplets. Liquid is fed by gravity, through a colour coded (yellow) feed nozzle. 1 Description continued. The HANDYDOME can be used to apply herbicides around and right up to trees, shrubs, buildings, fence lines, borders and pathways as well as for treatment between crop rows. The un-laden weight of the machine, complete with 10 litre backpack, is 6.2 kg. By covering the spray with a soft rotating dome to prevent the risk of spray drift, the HANDYDOME fully protects any adjacent crop as well as the environment at large. SAFETY Using agrochemicals is a hazardous process. Operators should comply with all relevant legislation and/or regulations governing the use of agrochemicals and should use appropriate personal protective equipment (see 'OPERATOR PROTECTION'). Never use the HANDYDOME in potentially explosive atmospheres or spray flammable liquid through it. Always read the product label carefully to determine:approved applications maximum dose rates maximum number of treatments operator protection required necessary environmental protection measures N.B. ‘Dose rate’ refers to the amount of chemical product applied per hectare. Never eat, drink, or smoke when working with agrochemicals. After using agrochemicals or handling equipment wash your hands thoroughly. Keep people (especially children) and animals out of areas being sprayed. Always store agrochemicals safely to protect people and animals, and to safeguard the environment (take special care to avoid water pollution). See spraying sections for guidelines on safe use of the HANDYDOME in operation. 2 OPERATOR PROTECTION Always wear the protective clothing items listed on the product label for mixing and filling. The minimum protective clothing required for spraying with the HANDYDOME is: rubber gloves and boots boots/shoes and long trousers eye protection long sleeved shirt Note: a) Acoustic information: the sound pressure level at the operator's ear does not exceed 70 dB(A). b) Vibration: the weighted RMS acceleration value at the hands when using this machine does not exceed 2.5 m/sec2. 3 PREPARING FOR SPRAYING The sprayer is delivered as 3 sub-assembled units; (a) The HANDYDOME sprayhead and handle unit. (b) The Powerpack unit incorporating the switch. (c) The backpack tank unit. To Assemble the HANDYDOME Sprayer (3) Fit the HANDYDOME sprayhead and handle unit to the Powerpack by first pushing the electrical plug on the powerpack (1) into the socket on the sprayhead and handle unit (2). Then depress the white button (3) on the sprayhead and handle unit whilst pushing it into the Powerpack until the button locates in the hole provided (4). Remove the switch end piece as follows; by unscrewing the Screw Switch Plug Insert four batteries (D-cell/R20), flat end (negative) first, replace the switch end piece. 4 (4) (2) (1) MIXING, FILLING AND CALIBRATION Mixing and filling is generally the most hazardous process in the spraying operation. Always follow the label instructions. Always use a filter (fitted in the backpack tank unit) and use a funnel if filling a container with a small neck. Only mix enough spray for the area to be treated thereby avoiding the need for disposal of unused spray mix. Always wear gloves when handling agrochemicals and equipment. Always use the correct equipment when mixing and measuring. Always clean all equipment after use. Always wash off any skin contamination With the HANDYDOME herbicides are normally applied at around 50 litres total spray volume per hectare. These are lower volumes than recommended for high volume application with knapsack sprayers. Use the minimum dose rate recommended on the label for the intended treatment and add water to make up to the volume required for application with the HANDYDOME. 5 Do not use herbicide concentrations greater than the maximum recommended on the label (unless specific training or recommendations have been given) if the label: a) b) c) specifically prohibits use of 'Reduced Volumes' i.e. increased concentrations; has a statutory requirement for use of personal protective equipment when using the diluted product at high volumes (N.B. this will appear in the statutory box on the label); or carries one of the following hazard ratings: 'very toxic', 'toxic' or 'corrosive' . Micron do not generally recommend using spray mixes more than ten times the maximum concentration recommended for high volume application with knapsack sprayers. The safest product and lowest dose rate appropriate for the treatment should be used at all times. To prepare the spray mix select the dose rate of product to be applied per hectare (from the product label) and mix in a suitable container e.g. the backpack tank unit. Half fill the backpack tank with clean water and check for leaks. Measure out the exact amount of product and add to the backpack tank. 6 Wipe the backpack tank with a dry cloth. Fill the backpack tank with water and replace the lid . Mix well by gently shaking the backpack tank. Place the backpack tank on the operator's back and connect to the HANDYDOME Never use leaking equipment. Take care to avoid spillage of the spray mix. BEFORE SPRAYING FOR THE FIRST TIME. Check by hand that the atomiser disc spins freely. Before spraying for the first time use water to check the spray pattern produced and familiarise yourself with the sprayer. Put some clean water in the backpack tank unit and add a small amount of detergent (2 to 3 drops). With the sprayer in the correct position (see TO START SPRAYING), check for leaks. Turn the switch end piece clockwise to the ON position to start atomiser motor, now turn on the flow by turning the liquid ON/OFF valve (see Description). Spray on one spot, preferably on clean dry concrete, for about 30 seconds with the spray head held just above and at an angle of five degrees to the ground. A wet ring approx 35 centimetres diameter should appear on the ground. Practice using the sprayer by walking along a few meters. Touch the leading edge of the small fringe fitted to the shroud lightly on the ground and the shroud will be seen to rotate. It is important to rotate the shroud at all possible times in order for the inbuilt Weedswiper to take effect. 7 Handydome flow restrictors The details of the 3 restrictors are as below; Important note. The table below is based on water only. Item Number of Rings Size Flow Rates (approximate) 8401 1 Ring 0.65 mm 44 mls/min 25.14 L/ha 8402 2 Rings 1.00 mm 68 mls/min 38.86 L/ha 8403 3 Rings 1.15 mm 108 mls/min 61.71 L/ha Important note. The above table is based on a forward speed of 3 kph and the formula used is; Nozzle flow rate (L/min) = (Application rate (L/ha treated) x Walking speed (kph) x Sprayed width (metres)) divided by 600 You will note from the attached pictures the restrictors are supplied as part of the outlet side hose connector of the in-line liquid feed on/off tap. The actual flow rate should be checked holding the HANDYDOME in the spraying position (see 'TO START SPRAYING'). Remove the feed nozzle from the atomiser and allow the liquid to flow into a suitable container . The yellow feed nozzle is used only to direct the flow into the atomiser disc. 8 TO START SPRAYING Before spraying for the first time check the operation of the sprayer using water and a little detergent only. (see 'BEFORE SPRAYING FOR THE FIRST TIME, page 7) Switch ON the sprayer by turning the switch end piece clockwise to the ON position. Listen to the motor to check that it is spinning, then turn ON the liquid flow by turning the liquid ON/OFF valve. Start walking immediately spray liquid is emitted. When spraying, the spray head should be held as close to the ground or the top of the weed canopy as possible with the shroud at an angle of approx. 5 degrees to the horizontal. The leading edge of the fringe fitted to the shroud should be touching the ground or the top of the weed canopy. The shroud will be seen to rotate. It is important to rotate the shroud as much as possible in order for the inbuilt Weedswiper to take effect. At the end of spraying switch OFF the switch end piece. 9 AFTER SPRAYING 1. Dispose of any surplus spray mix according to the product approval. Store products safely, locked up and out of the reach of children. 2. It is essential to clean the sprayer and backpack tank thoroughly using water and detergent after use. Never immerse the spray head in water or under a tap, since this will destroy the electric motor. A water and detergent mix should be put in the backpack tank , swilled around, and disposed of according to local regulations. The sprayer and backpack tank should be wiped down externally using a cloth. 3. Periodically remove and clean the atomiser disc. 4. After working with agrochemicals, or handling spraying equipment, always thoroughly wash hands and exposed skin. All protective clothing should be washed separately from other clothing and stored. Contaminated gloves should be washed inside and out. 10 TROUBLESHOOTING A) Atomiser disc spins but does not spray or sprays irregularly. Check: the metering/ calibration nozzle. If the metering/calibration nozzle is blocked remove and soak in soapy water. NB. Never blow through the nozzle with your mouth. the yellow feed nozzle. If the yellow feed nozzle is blocked remove and soak in soapy water. NB. Never blow through the nozzle with your mouth. the atomiser disc is clean and undamaged. Clean or replace if necessary. the liquid ON/OFF valve for blockage. Clean if necessary. B) Atomiser disc fails to spin or spins unevenly. Check that the batteries and balance weight are fitted correctly. the condition of the batteries. Replace if necessary. that electrical terminals and contact points are clean and that electrical wires are not broken or corroded. the motor for corrosion or obvious signs of wear. Replace if necessary. the atomiser disc is fitted correctly. 11 HANDYDOME SPRAYHEAD AND HANDLE UNIT, PARTS LIST ITEM QTY PART No DESCRIPTION 1 1 4647 SCREW NO.6 x 3/8 SELF TAPPING F/H 2 1 5086 PUSH BUTTON 3 1 5101 SPRING PUSH BUTTON 4 1 6887 CONNECTOR TUBE/BATT CASE MODIFIED 5 1 7261 Support Tube 6 1 7073 SCREW M5 x 6 CH/HD SLOT 7 2 3472 Screw No.6 x 1/4" 8 2 4747 CLIP P 9 1 4368/1100 WIRE 1.0SQ x 1100mm 10 1 4134/1100 WIRE 1.0SQ x 1100mm 11 2 5103 PIN CONNECTOR 12 2 6886 RECEPTACLE 1/4" M 13 1 5085 ELECTRIC SOCKET 14 1 4993/2000 15 2 6028 CLIP HOSE 9.1 WIRE 16 1 7260 ALUMINIUM TUBE DIA 25x1.5mm 17 4 6832 GRUB SCREW M6 x 6 18 1 6834 THRUST RING - TOP 19 1 8308 SLEEVE 20 1 8306 COLLAR 21 1 8307 WASHER 22 1 6854A 23 2 6884 SCREW M3 X 25 CH 24 2 6388 RECEPTACLE 1/4" F 25 2 5976 NUT M3 NYLOC 26 1 - 27 1 ZU 023 28 1 6650 29 1 6835A 30 1 7298 31 1 6670/60 32 1 7676 TUBE 6mm ID x 9mm OD BODY, DOME ATOMISER. See page 14 for parts list. ELBOW CUT BUSH FLANGED ARM, MOUNTING INSERT, ROUND TUBE 6 x 4mm FEED NOZZLE YELLOW 12 HANDYDOME SPRAYHEAD AND HANDLE UNIT, DIAGRAM 13 ATOMISER, PARTS LIST AND DIAGRAM MICRON ASSEMBLY ITEM No. QTY PART NUMBER DESCRIPTION 1 1 6696 MOTOR HOUSING 2 2 4457 SPRING 3 1 5320 MOTOR 4 1 5398 O RING , BS 012 VITON 5 4 5399 SCREW, S/T, No.6 X 3/8” 6 1 5403 O RING, BS 012, VITON 7 1 5373 ATOMISER DISC 8 1 5372 ATOMISER DISC FIXING SCREW 9 1 5407 WASHER 10 1 6695 MOTOR FRONT PLATE 11 2 6717 COVER, TERMINAL 12 1 3512/23 TUBE, NYLON , 1/8” ODX23cm LONG 13 1 4134/24 WIRE, 1 sq mmx24cm LONG, BLACK 14 1 4368/24 WIRE, 1 sq mmx24cm LONG, RED 15 2 5045 EYELET 14 POWERPACK PARTS LIST AND DIAGRAM ITEM No. QTY. PART NO. DESCRIPTION 1 1 4134/38 WIRE, 1sq mm x 38cm LONG, BLACK 2 2 4368/40 WIRE , 1sq mm x 40cm LONG, RED 3 1 4646 SCREW NO.6 X 3/8 S/T 4 1 4907 WING NUT M5 5 1 4915 SCREW M5 x 16 6 1 5095 PLUG, ROUNDED HALF 7 1 5096 PLUG, FLAT HALF 8 2 5104 SOCKET CONNECTOR 9 2 5109 SCREW, PT,M3 X 6 PAN HD. 10 1 5363 BATTERY SPRING 11 1 5375 CENTRE CONNECTOR 12 1 5399 SCREW S/T No. 3 X 3/8” 13 1 5466 STRAP RETAINING CLAMP 14 3 5575 RING TERMINAL 15 1 6904 LABEL HANDYDOME 16 1 7264 BATTERY CASE 17 1 7465 SWITCH SLEEVE 18 1 7464 SWITCH PLUG 19 1 7495 SWITCH CONNECTOR 20 1 5107C 21 1 5780 VALVE CLAMP 22 1 5956 SCREW M5 x 12 POZI STRAP ASSEMBLY 20 17 15 19 18 14 3 12 10 16 1 22 6 21 4 13 8 2 9 7 5 15 11 14 12 10L BACKPACK TANK UNIT, PARTS LIST AND DIAGRAM. ITEM QTY PART NO. 1 1 5207 2 1 5208A 3 2 4 DESCRIPTION ITEM QTY PART NO. DESCRIPTION BACKPACK, 10 LITRE 10 1 5779 UNION NUT CAP 11 1 8401 HOSE CONNECTOR 6 mm WITH RESTRICTOR 0.65 mm (1 ring) 4915 SCREW M5 x16mm 12 1 8402 HOSE CONNECTOR 6 mm WITH RESTRICTOR 1.00 mm (2 rings) 2 5863 SCREW M5 x 50 13 1 8403 HOSE CONNECTOR 6 mm WITH RESTRICTOR 1.15 mm (3 rings) 5 1 5206 FRAME 6 1 5600 ELBOW 1/4” BSP x 8mm 7 1 6029 CLIP, HOSE WIRE 11.9mm 8 1 5414/90 TUBE 8mm x12mm OD 9 1 5776A TAP 2 3 1 4 5 6 11 12 13 7 8 9 10 16 Name of manufacturer or supplier: Micron Sprayers Ltd. Full postal address: Bromyard Industrial Estate, BROMYARD, Herefordshire Country of origin: England Post code: HR7 4HS Description of Product: Battery powered, hand-held agricultural spraying machine. Name and model number of machine: HANDYDOME Place of Issue: Bromyard, England Name of authorised representative: G. S. Povey Position of authorised Representative: Joint Managing Director DECLARATION OF CONFORMITY DECLARATION: I declare that as the authorised Representative, the above information in relation to the supply/manufacture of this product is in conformity with the requirements of the Machinery Directive 2006/42/EC and complies with the relevant essential health and safety requirements. Signature of authorised Representative: 17 NOTES 18 NOTES 19 NOTES 20

