magnetic remote transformer installation guide

MAGNETIC REMOTE TRANSFORMER INSTALLATION GUIDE
150w, 300w, 600w, 12V Remote Multitap Transformers.
1 Securely mount transformer to desired location using the mounting tabs located on the top and bottom of the transformer.
2 Turn the line voltage power off at the electrical breaker panel.
3 Remove the front cover of the remote transformer by loosening the two side Philips screws.
4 Remove the desired knockouts on the front or side of the transformer.
5 Install conduit and 120VAC wires from the transformer to the desired line voltage circuit.
6 Connect the black transformer wire to the line voltage HOT using wire nuts.
Do not use crimp style wire nuts.
7 Connect the white transformer wire to the line voltage NEUTRAL using wire nuts.
Do not use crimp style wire nuts.
8 Install conduit and low voltage wires from the transformer to the remote power feed junction box.
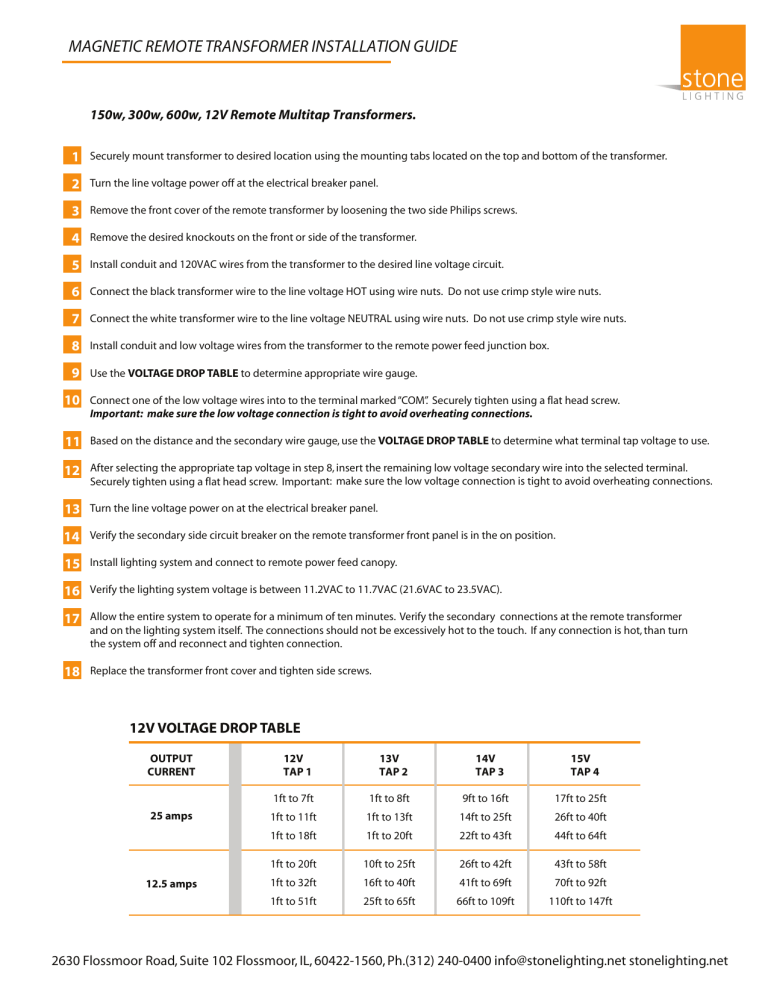
9 Use the VOLTAGE DROP TABLE to determine appropriate wire gauge.
10 Connect one of the low voltage wires into to the terminal marked “COM”. Securely tighten using a flat head screw.
Important: make sure the low voltage connection is tight to avoid overheating connections.
11 Based on the distance and the secondary wire gauge, use the VOLTAGE DROP TABLE to determine what terminal tap voltage to use.
12 After selecting the appropriate tap voltage in step 8, insert the remaining low voltage secondary wire into the selected terminal.
Securely tighten using a flat head screw. Important: make sure the low voltage connection is tight to avoid overheating connections.
13 Turn the line voltage power on at the electrical breaker panel.
14 Verify the secondary side circuit breaker on the remote transformer front panel is in the on position.
15 Install lighting system and connect to remote power feed canopy.
16 Verify the lighting system voltage is between 1 1.2
VAC to 11.
7 VAC (21.6VAC to 23.5VAC).
17 Allow the entire system to operate for a minimum of ten minutes. Verify the secondary connections at the remote transformer and on the lighting system itself. The connections should not be excessively hot to the touch. If any connection is hot, than turn the system off and reconnect and tighten connection.
18 Replace the transformer front cover and tighten side screws.
12V VOLTAGE DROP TABLE
OUTPUT
CURRENT
25 amps
12.5 amps
12V
TAP 1
1ft to 7ft
1ft to 11ft
1ft to 18ft
1ft to 20ft
1ft to 32ft
1ft to 51ft
1 3 V
TAP 2
1ft to 8ft
1ft to 13ft
1ft to 20ft
10ft to 25ft
16ft to 40ft
25ft to 65ft
1 4 V
TAP 3
9ft to 16ft
14ft to 25ft
22ft to 43ft
26ft to 42ft
41ft to 69ft
66ft to 109ft
1 5 V
TAP 4
17ft to 25ft
26ft to 40ft
44ft to 64ft
43ft to 58ft
70ft to 92ft
110ft to 147ft
2630 Flossmoor Road, Suite 102 Flossmoor, IL, 60422-1560, Ph.(312) 240-0400 info@stonelighting.net stonelighting.net
LOW-VOLTAGE WIRE SIZE TABLE
Use to determine the correct THHN wire size for a recommended 3 percent drop in voltage at the specified wattage.
The length shown is the length of wire from the transformer to the power feed.
12 Volt
150 Watt
5 ft.
#12 GA
6-15 ft.
#8 GA
16-20 ft.
#6 GA
21-40 ft.
#4 GA
41-60 ft.
#2 GA
61-90 ft.
#1 GA
LOW-VOLTAGE WIRE SIZE TABLE
Use to determine the correct THHN wire size for a recommended 3 percent drop in voltage at the specified wattage.
The length shown is the length of wire from the transformer to the power feed.
24 Volt
300 Watt
5 ft.
#14 GA
6-15 ft.
#12 GA
16-20 ft.
#10 GA
21-40 ft.
#6 GA
41-60 ft.
#6 GA
61-90 ft.
#4 GA
Remote Transformer Selection
Remote mounting the transformer provides a clean minimalist look that will not detract from the beauty of the space. Also, remote mounting the transformer is the only way to guarantee a noise free installation. The transformer should be installed in an accessible remote location such as a closet. Once the transformer is installed, electrical wire is used to connect the transformer to a power feed canopy or power bolts. Using the correct gauge wire to connect the transformer to the track is essential for providing the desired voltage at the fixture. The wire gauge used to supply power to the track should be sized according to the distance between the transformer and the track.
Voltage Drop Chart 5-15 feet
D = Distance
% = Light Output
AWG
No Dimmer
No Dimmer
No Dimmer
No Dimmer
With Dimmer
With Dimmer
Tap #1
Tap #1
Tap #2
Tap #2
Tap #2
Tap #2
# 10
# 8
# 10
# 8
# 10
# 8
D
Volts
5’
12.0
12.1
12.5
12.6
12.0
12.1
%
Light
Output
100%
103%
116%
120%
100%
103%
D
Volts
10’
11.7
11.9
12.3
12.5
11.7
11.9
%
Light
Output
92%
98%
108%
115%
92%
98%
D
Volts
15’
11.5
11.8
12.0
12.3
11.5
11.8
%
Light
Output
85%
94%
100%
110%
85%
94%
2630 Flossmoor Road, Suite 102 Flossmoor, IL, 60422-1560, Ph.(312) 240-0400 info@stonelighting.net stonelighting.net
Remote Transformer Selection
Voltage Drop Chart 20-30 feet
D = Distance
% = Light Output
AWG
No Dimmer
No Dimmer
No Dimmer
No Dimmer
With Dimmer
With Dimmer
Tap #1
Tap #1
Tap #2
Tap #2
Tap #2
Tap #2
# 10
# 8
# 10
# 8
# 10
# 8
D
Volts
20’
11.2
11.6
11.7
12.2
11.2
11.6
%
Light
Output
78%
89%
92%
105%
78%
89%
D
Volts
25’
11.0
11.5
11.5
12.0
11.0
11.5
%
Light
Output
72%
85%
85%
100%
72%
85%
D
Volts
30’
10.7
11.3
11.2
11.8
10.7
11.3
%
Light
Output
66%
81%
79%
95%
66%
81%
Voltage Drop Chart 35-45 feet
D = Distance
% = Light Output
AWG
No Dimmer
No Dimmer
No Dimmer
No Dimmer
With Dimmer
With Dimmer
Tap #1
Tap #1
Tap #2
Tap #2
Tap #2
Tap #2
# 10
# 8
# 10
# 8
# 10
# 8
11.0
11.7
10.4
11.2
D
Volts
35’
10.4
11.2
%
Light
Output
60%
77%
72%
91%
60%
77%
D
Volts
40’
10.2
11.0
10.7
11.5
10.2
11.0
%
Light
Output
55%
73%
66%
86%
55%
73%
D
Volts
45’
9.9
10.8
10.4
11.4
9.9
10.8
%
Light
Output
50%
69%
61%
82%
50%
69%
Voltage Drop Chart 50-60 feet
D = Distance
% = Light Output
AWG
No Dimmer
No Dimmer
No Dimmer
No Dimmer
With Dimmer
With Dimmer
Tap #1
Tap #1
Tap #2
Tap #2
Tap #2
Tap #2
# 10
# 8
# 10
# 8
# 10
# 8
D
Volts
50’
9.7
10.7
10.2
11.2
9.7
10.7
%
Light
Output
46%
66%
55%
78%
46%
66%
D
Volts
55’
9.4
10.5
9.9
11.1
9.4
10.5
%
Light
Output
41%
62%
50%
74%
41%
62%
D
Volts
60’
9.1
10.4
9.7
10.9
9.1
10.4
%
Light
Output
37%
59%
46%
71%
37%
59%
2630 Flossmoor Road, Suite 102 Flossmoor, IL, 60422-1560, Ph.(312) 240-0400 info@stonelighting.net stonelighting.net
