Composting System for Small Horse Farms PDF
advertisement
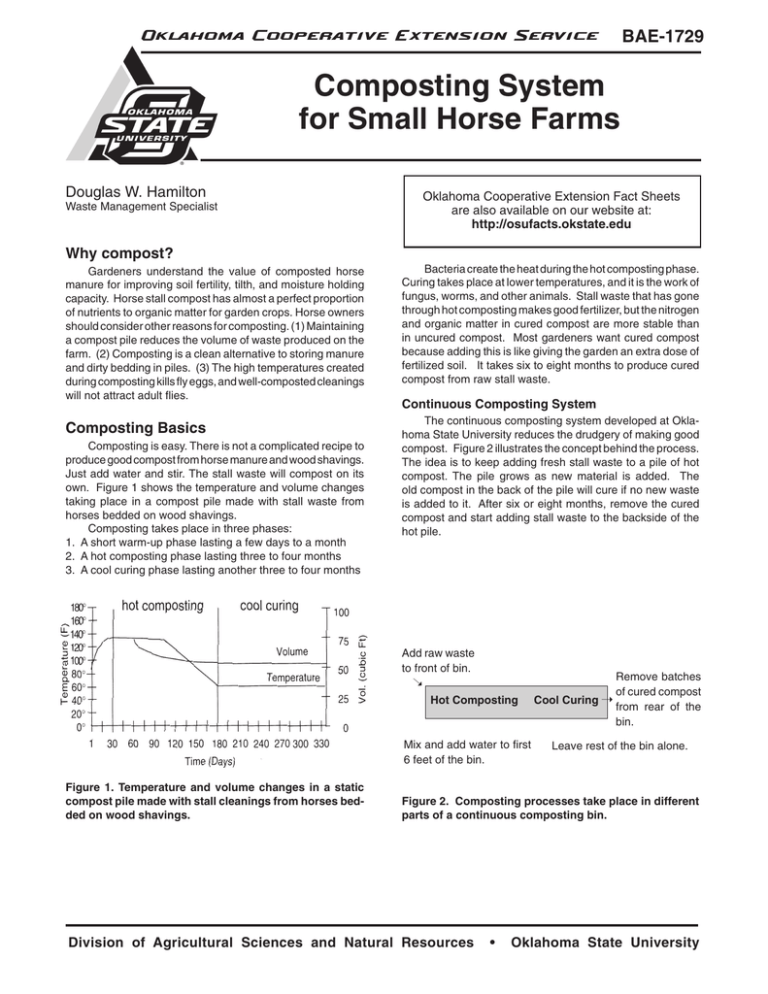
Oklahoma Cooperative Extension Service BAE-1729 Composting System for Small Horse Farms Douglas W. Hamilton Oklahoma Cooperative Extension Fact Sheets are also available on our website at: http://osufacts.okstate.edu Waste Management Specialist Why compost? Gardeners understand the value of composted horse manure for improving soil fertility, tilth, and moisture holding capacity. Horse stall compost has almost a perfect proportion of nutrients to organic matter for garden crops. Horse owners should consider other reasons for composting. (1) Maintaining a compost pile reduces the volume of waste produced on the farm. (2) Composting is a clean alternative to storing manure and dirty bedding in piles. (3) The high temperatures created during composting kills fly eggs, and well-composted cleanings will not attract adult flies. Bacteria create the heat during the hot composting phase. Curing takes place at lower temperatures, and it is the work of fungus, worms, and other animals. Stall waste that has gone through hot composting makes good fertilizer, but the nitrogen and organic matter in cured compost are more stable than in uncured compost. Most gardeners want cured compost because adding this is like giving the garden an extra dose of fertilized soil. It takes six to eight months to produce cured compost from raw stall waste. Composting Basics The continuous composting system developed at Oklahoma State University reduces the drudgery of making good compost. Figure 2 illustrates the concept behind the process. The idea is to keep adding fresh stall waste to a pile of hot compost. The pile grows as new material is added. The old compost in the back of the pile will cure if no new waste is added to it. After six or eight months, remove the cured compost and start adding stall waste to the backside of the hot pile. Composting is easy. There is not a complicated recipe to produce good compost from horse manure and wood shavings. Just add water and stir. The stall waste will compost on its own. Figure 1 shows the temperature and volume changes taking place in a compost pile made with stall waste from horses bedded on wood shavings. Composting takes place in three phases: 1. A short warm-up phase lasting a few days to a month 2. A hot composting phase lasting three to four months 3. A cool curing phase lasting another three to four months Continuous Composting System Add raw waste to front of bin. ➝ Hot Composting Mix and add water to first 6 feet of the bin. Figure 1. Temperature and volume changes in a static compost pile made with stall cleanings from horses bedded on wood shavings. Remove batches of cured compost Cool Curing ➝ from rear of the bin. Leave rest of the bin alone. Figure 2. Composting processes take place in different parts of a continuous composting bin. Division of Agricultural Sciences and Natural Resources • Oklahoma State University Figure 3. How to build a 18' Continuous Composting bin (Good for 1 to 3 Stalls) Materials Needed: • Eight, 6’ T-posts. • 50’ roll of 4’ tall fencing, openings 3” X 4” or smaller. • Fencing wire. Construction Steps: 1. Drive T-posts so that they form three, 6’ X 6’ areas. Decide which end needs an opening. 2. Divide the 50’ roll of fencing into two, 25’ pieces. Securely fasten one end of a fencing piece to T-post number 1. Keeping the fencing taut, wire the piece to the inside of posts 2, 3, and 4. Wrap the remaining fencing around post 4, and bend the wire fingers so that the gate attaches to the fencing at post 3. 3. Securely fasten the other piece of fencing to T-post 8. Wire fencing to the inside of posts 7, 6, and 5. Turn the remaining fencing towards post 1, pull it tight, and securely wire to post 1. Make sure there is no slack in the fencing between posts 1 and 5. Compost will be piled against this section. 1729-2 Figure 4. Using a Continuous Composting Bin 1. Place loads of stall cleanings and/or strippings against the enclosed end of the bin. Mix and add water. 2. Each time material is added, take a pitchfork and pull out the first six feet of the pile. Dump new loads of stall waste on the compost. 3. Add water, mix, and throw the moist mixture back up against the pile. Add just enough water that the pile appears wet, but does not ooze liquid. 4. Eventually, the end of the bin will be reached. Close the opening and even out the pile, completely filling the bin. 5. Restart the process by opening the fencing that held up the pile in step 1. Remove cured compost until the hot portion of the pile is reached. Continue filling the bin from the new opening. 1729-3 Table 1. Size and number of bins needed based on number of horses in stalls. Length Number and Number Number of Bins Number Length of of Stalls of Bins (ft) of Posts Fencing rolls 1 to 3 3 to 5 6 7 or 8 9 10 or 11 1 1 2 2 3 3 18 30 18 30 18 30 8 12 16 24 24 36 1 X 50’ 1 X 75’ 2 X 50’ 2 X 75’ 3 X 50’ 3 X 75’ Operating a Continuous Composting Bin Operating a continuous compost bin is simple. The procedure is given in Figure 4. Add stall waste to the front of the pile and mix with old compost, wetting the mixture with a garden hose. There is no need to mix more than the first six feet of the pile. Compost cures in the back as the pile grows forward. After six or eight months, dig out cured compost to a hot core, and start adding fresh material in the opposite direction. Producing Quality Compost Building a Continuous Composting Bin Instructions for building a continuous composting bin for one to three horses in stalls are given in Figure 3. Consult Table 1 for construction recommendations for bin sizes that can handle waste taken from more than three stalls. The bins listed in Table 1 are designed to fill in approximately eight months. Where the table lists two or three bins, all the bins should be used at the same time so all bins fill evenly. Adding an extra bin to those listed in Table 1 provides storage room for times when cured compost cannot be removed. Composting is a simple process, but there are a number of things in to remember to produce quality compost: 1. Thoroughly mix raw waste with hot compost. 2. Maintain 50 percent moisture content in the first six feet of the bin. (Squeezing moist compost should yield just a few drops of liquid.) 3. Stack enough material in the bin to insulate the hot compost. The pile should be at least 6 feet wide and 3 feet high. 4. If the pile is too wide or too high, the flow of oxygen to the micro-organisms composting the mixture may be cut off. Make sure the bin is less than 10 feet wide and 5 feet high. 5. Arrange bins so they can be reached from both ends. 6. Choose the right number and size of bins for the number of stalls according to Table 1. Oklahoma State University, in compliance with Title VI and VII of the Civil Rights Act of 1964, Executive Order 11246 as amended, Title IX of the Education Amendments of 1972, Americans with Disabilities Act of 1990, and other federal laws and regulations, does not discriminate on the basis of race, color, national origin, gender, age, religion, disability, or status as a veteran in any of its policies, practices, or procedures. This includes but is not limited to admissions, employment, financial aid, and educational services. Issued in furtherance of Cooperative Extension work, acts of May 8 and June 30, 1914, in cooperation with the U.S. Department of Agriculture, Robert E. Whitson, Director of Cooperative Extension Service, Oklahoma State University, Stillwater, Oklahoma. This publication is printed and issued by Oklahoma State University as authorized by the Vice President, Dean, and Director of the Division of Agricultural Sciences and Natural Resources and has been prepared and distributed at a cost of 20 cents per copy. 1203 1729-4
