EE43/EE100 — LAB #3 Equivalent Circuits Guide
advertisement

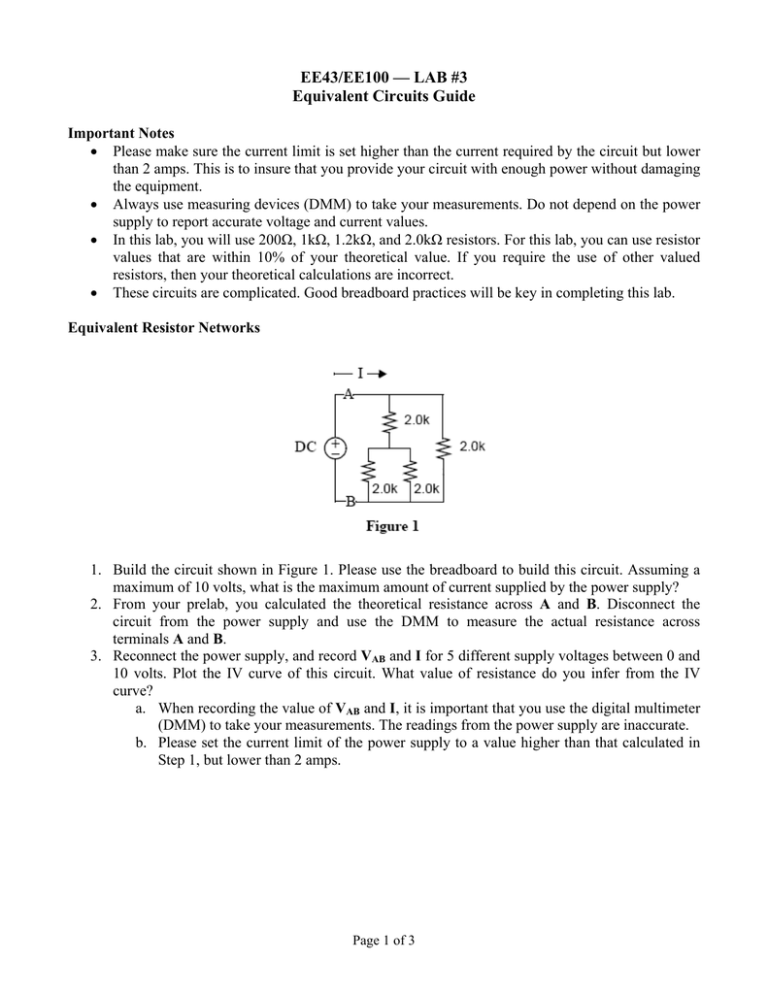
EE43/EE100 — LAB #3 Equivalent Circuits Guide Important Notes • Please make sure the current limit is set higher than the current required by the circuit but lower than 2 amps. This is to insure that you provide your circuit with enough power without damaging the equipment. • Always use measuring devices (DMM) to take your measurements. Do not depend on the power supply to report accurate voltage and current values. • In this lab, you will use 200Ω, 1kΩ, 1.2kΩ, and 2.0kΩ resistors. For this lab, you can use resistor values that are within 10% of your theoretical value. If you require the use of other valued resistors, then your theoretical calculations are incorrect. • These circuits are complicated. Good breadboard practices will be key in completing this lab. Equivalent Resistor Networks 1. Build the circuit shown in Figure 1. Please use the breadboard to build this circuit. Assuming a maximum of 10 volts, what is the maximum amount of current supplied by the power supply? 2. From your prelab, you calculated the theoretical resistance across A and B. Disconnect the circuit from the power supply and use the DMM to measure the actual resistance across terminals A and B. 3. Reconnect the power supply, and record VAB and I for 5 different supply voltages between 0 and 10 volts. Plot the IV curve of this circuit. What value of resistance do you infer from the IV curve? a. When recording the value of VAB and I, it is important that you use the digital multimeter (DMM) to take your measurements. The readings from the power supply are inaccurate. b. Please set the current limit of the power supply to a value higher than that calculated in Step 1, but lower than 2 amps. Page 1 of 3 4. Build the circuit shown in Figure 2. Use the value of Req calculated in the prelab exercises and measured in Step 2. 5. Using the power supply, record VAB and I for 5 different supply voltages between 0 and 10 volts. Plot the IV curve of this circuit. What value of resistance do you infer from the IV curve? Thévenin’s and Norton’s Equivalence 6. Build the circuit shown in Figure 3, leaving out the resistor labeled RL for now. Measure the voltage across terminals C and D. This is your open circuit voltage (VTH) and should be the same as calculated in your prelab. 7. Now measure the current flowing through terminals C and D. Remember, when measuring current using DMM, there is 0-resistance across the probes. So, you are essentially measuring the short circuit current (ISC), which should be the same as calculated in your prelab. 8. Disconnect the power supply and short terminals A and B. You have removed (zeroed) the voltage source. Measure the resistance across terminals C and D. This is your Thévenin resistance (RTH), and should be the same as calculated in the prelab. 9. Now, open the circuit between terminals A and B, and reconnect the power supply, thus restoring the circuit to the one shown in Figure 3. For three different values of RL = 200Ω, 1.2kΩ, and 2.0kΩ, install the resistor and measure the voltage across and the current through RL. Page 2 of 3 10. Build the circuit shown in Figure 4 with the appropriate values of VTH and RTH (calculated in your prelab, and measured in Steps 6 and 8). 11. For the three values of RL, measure the voltage across and current through RL. Building a Current Source: 12. Build the circuit shown in Figure 5 with the appropriate values of ISC and RTH (calculated in your prelab, and measured in Steps 7 and 8). a. Disconnect everything from the DC power supply. b. Set the power supply to output +25 V with a current limit that is close to ISC (short circuit current). ISC should not exceed 100 mA. c. Connect the DMM set up to measure current in parallel with the power supply and adjust the power supply until ISC is displayed on the DMM. d. Disconnect DMM and use the power supply at this setting as a current source for the Norton’s equivalent circuit. 13. For the three values of RL, measure the voltage across and current through RL. Wheatstone Bridge 14. Build the circuit shown in Figure 6. Measure the current ig. (The resistors are only 5% tolerance, so there will be an imbalance.) If you swap the two 2.0kΩ resistors, what is the current ig? 15. Deliberately unbalance the bridge by touching your index finger and thumb from your same hand across one of the 20kΩ resistors. Demonstrate to your TA, and explain orally what is going on. (Keep your other hand in your pocket.) 16. From the measured ig with fingers across this resistor, estimate your thumb-to-index finger resistance. What resistance do you measure using the DMM? Page 3 of 3

