Confocal Application Notes
advertisement
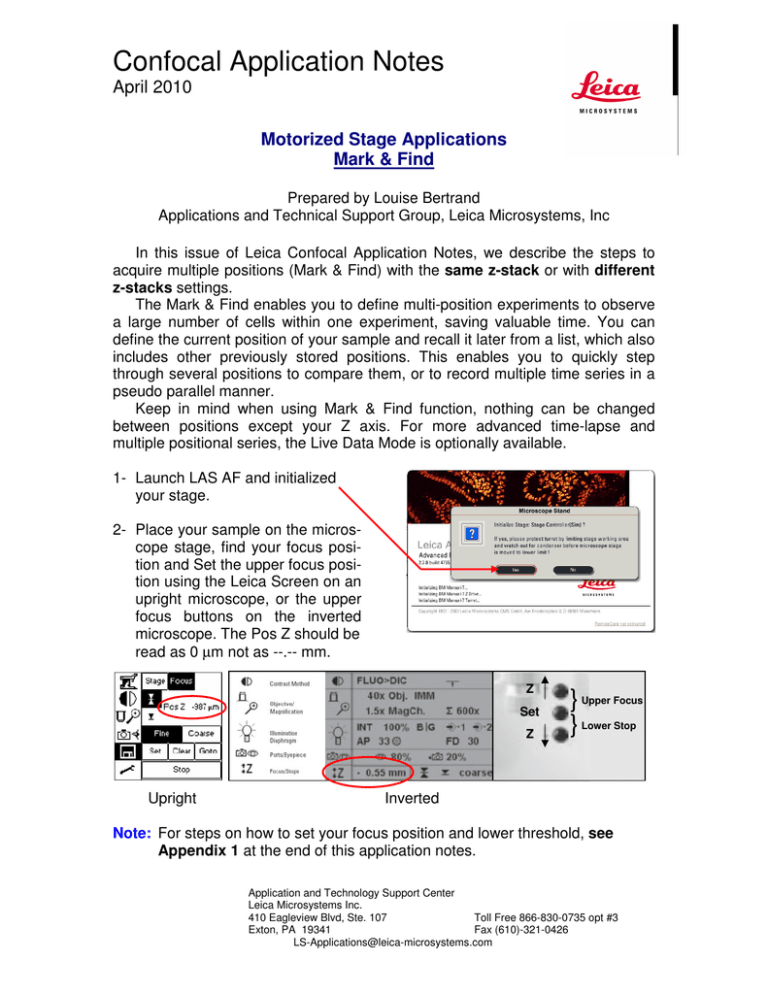
Confocal Application Notes April 2010 Motorized Stage Applications Mark & Find Prepared by Louise Bertrand Applications and Technical Support Group, Leica Microsystems, Inc In this issue of Leica Confocal Application Notes, we describe the steps to acquire multiple positions (Mark & Find) with the same z-stack or with different z-stacks settings. The Mark & Find enables you to define multi-position experiments to observe a large number of cells within one experiment, saving valuable time. You can define the current position of your sample and recall it later from a list, which also includes other previously stored positions. This enables you to quickly step through several positions to compare them, or to record multiple time series in a pseudo parallel manner. Keep in mind when using Mark & Find function, nothing can be changed between positions except your Z axis. For more advanced time-lapse and multiple positional series, the Live Data Mode is optionally available. 1- Launch LAS AF and initialized your stage. 2- Place your sample on the microscope stage, find your focus position and Set the upper focus position using the Leica Screen on an upright microscope, or the upper focus buttons on the inverted microscope. The Pos Z should be read as 0 µm not as --.-- mm. Z Set Z Upright } Upper Focus } Lower Stop Inverted Note: For steps on how to set your focus position and lower threshold, see Appendix 1 at the end of this application notes. Application and Technology Support Center Leica Microsystems Inc. 410 Eagleview Blvd, Ste. 107 Toll Free 866-830-0735 opt #3 Exton, PA 19341 Fax (610)-321-0426 LS-Applications@leica-microsystems.com Confocal Application Notes April 2010 3- Go to your Configuration tab, click on Stage and verify that ‘Restore Z-Wide’ box is checked and Stack Reference Point Begin/End selected under Mark & Find window. 4- Back to the Acquire tab, set your acquisition parameters: activate your lasers, set the spectral range of the PMTs and adjust Gain and Offset. Note: You cannot change your Gain and Offset between positions. Choose an average voltage that will be good for all your positions. Intensity compensation is not available with Mark & Find. 5- Stop your ‘Live’ mode and go to your z-Stack window. Bring your z-Position value to zero ‘0’ µm by writing it in the z-Position box. z-Position box Application and Technology Support Center Leica Microsystems Inc. 410 Eagleview Blvd, Ste. 107 Toll Free 866-830-0735 opt #3 Exton, PA 19341 Fax (610)-321-0426 LS-Applications@leica-microsystems.com Confocal Application Notes April 2010 6- Hit ‘Live’ and using your SmartMove or STP6000 z-drive, move your sample to the Begin (top) position. Look on the image monitor to be sure you are at the beginning of your sample - where you want to start acquiring your z-stack. Read out the µm Pos Z value from your microscope Leica screen and write it down (For example: +2µm) for reference. z-drive (focus) y-drive y-drive x-drive x-drive SmartMove z-drive (focus) STP6000 7- Always using the SmartMove or STP6000 z-drive, move your sample to the End position (Bottom) and again, note the µm Pos Z value indicated on your Leica screen (For example: -42µm). Add these two values together to obtain your sample thickness. Divide the total thickness by two, which will give you the sample middle (+2 + -42 = +44 µm / 2 = 22µm) With the z-drive, bring your sample to the calculated µm Pos Z value (middle) (in our example, -20µm) and set this position as your focus position on the microscope. You should then read a value of 0µm on the Leica screen. Stop the ‘Live’ mode. 8- Verify that your z-position in the z-stack window is still set to 0 µm and that you are getting the same image as previously with the microscope. Now, your z-position is the same as your z-drive (z-wide). A) Same Stack parameters / settings for All (For Different z-Stack, go to step B 1) – LAS AF v2.2.0 and v2.2.1 1- Knowing the thickness of your sample, write the half thickness value in both the Begin (+) and End (-). Those values should include your sample thickness and some variation due to sample preparation. Application and Technology Support Center Leica Microsystems Inc. 410 Eagleview Blvd, Ste. 107 Toll Free 866-830-0735 opt #3 Exton, PA 19341 Fax (610)-321-0426 LS-Applications@leica-microsystems.com Confocal Application Notes April 2010 2- Using the z-position knob on your control panel, verify that the sample is included in the predetermined Begin and End and return your z-Position to 0 µm. Stop the ‘Live’ mode Do not touch the z-position knob again (control panel) 3- Activate your Mark & Find function by clicking on it 4- Go to your Mark and Find window and hit the ‘Mark Position’ button. The drop down list will display your Position 1. Be sure the ‘Same stack for all’ box is checked. The currently define z-stack will be acquired with the same settings at each position. Show all Pos Mark Pos Clear Pos Clear All Note: If all positions have the same absolute z-plane position and range you can hit the ‘Mark Position’ button for each position and go to step 15. 5- Hit ‘Live’ again and using your SmartMove or STP6000 x-y knobs, go to your second position. Using the SmartMove or STP6000 z-drive knob, find the Begin position (top) of the cell, look on your Leica screen and note the value in µm. Always with your z-drive, move your sample to the End position (bottom) and again, note the value indicated on your Leica screen. Add these two values and divide the Application and Technology Support Center Leica Microsystems Inc. 410 Eagleview Blvd, Ste. 107 Toll Free 866-830-0735 opt #3 Exton, PA 19341 Fax (610)-321-0426 LS-Applications@leica-microsystems.com Confocal Application Notes Vol. 5 April 2010 total by two. Then add or subtract it to one of the measured value to get the middle (center) position for your sample. With the z-drive, bring your sample to the calculated value (center), stop the ‘Live’ mode and Mark the position (Position 2). 6- Repeat step 13 for all other positions. 7- Once all the positions are marked, hit ‘Start’*. *Note: If you want to acquire time-lapse using these positions, switch your mode from xyz to xyzt and set your time interval parameters. Then hit ‘Start’. B) Different z-Stack parameters / settings – LAS AF v2.2.1 only 1- Go ‘Live’ and using your z-position knob on the control panel, define your Begin and End. Stop the ‘Live’ mode. The z-position value in the Z-stack window should still be 0 µm. Change your z-step size if you don’t want to use System optimized. z-Position box 2- Activate your Mark & Find function by clicking on it. Application and Technology Support Center Leica Microsystems Inc. 410 Eagleview Blvd, Ste. 107 Toll Free 866-830-0735 Exton, PA 19341 Fax (610)-321-0426 LS-Applications@leica-microsystems.com Confocal Application Notes Vol. 5 April 2010 3- Go to your Mark and Find window and hit the ‘Mark Position’ button. The drop down list will display your Position 1. Uncheck the box ‘Same stack for all’. Mark Pos Clear Pos Clear All 4- Hit ‘Live’ and using the Smartmove X-Y knobs, go to your second position. Using the z-position knob, adjust your Begin and End and Mark this position (Position 2). Note: If you mark your position before setting your z-stack Begin and End, just hit the ‘Redefine Stack Pos’ (Position 2). If you move your position from the original mark you hit, click ‘Redefine Position’. Redefine Stack Pos 5- Repeat steps 19 for all other positions. . 6- Once all the positions are marked, hit ‘Start’*. *Note: If you want to acquire time-lapse using these positions, switch your mode from xyz to xyzt and set your time interval parameters. Then hit ‘Start’. Application and Technology Support Center Leica Microsystems Inc. 410 Eagleview Blvd, Ste. 107 Toll Free 866-830-0735 Exton, PA 19341 Fax (610)-321-0426 LS-Applications@leica-microsystems.com Confocal Application Notes Vol. 5 April 2010 Appendix 1: Setting the focus position and lower threshold On Leica DM6000 1- Select the ‘Stage and Focus’ settings (1). 2 1 2- Select ‘Focus’ (2) from the menu bar, the current z-position (Pos Z) is displayed with respect to the set focus position. 3- Bring your sample in focus using the z-drive on the SmartMove or STP6000 or the focus knob on the microscope. 4- Once your sample is in focus, select the focal plane icon (3) and delete the actual focus position by touching ‘Clear’ on the Leica screen. Pos Z will display --.-- mm. 3 4 5- Touch the ‘Set’ icon to set your focus position. Pos Z = 0 mm 6- Bring your stage down, using the focus knob or the SmartMove z-drive or STP6000 z-drive; select the lower threshold icon (4), delete the actual lower threshold by touching ‘Clear’ on the Leica screen and touch the ‘Set’ icon to set your lower threshold. Application and Technology Support Center Leica Microsystems Inc. 410 Eagleview Blvd, Ste. 107 Toll Free 866-830-0735 Exton, PA 19341 Fax (610)-321-0426 LS-Applications@leica-microsystems.com Confocal Application Notes Vol. 5 April 2010 On Leica DMI6000 1- Using your SmartMove, or the STP6000 or the focus knob, bring your sample in focus. 2- Once your sample is in focus, delete the actual focus position by pressing the Upper Focus buttons together (Z↑ + SET). Pos Z will display --.-- mm. Z SET Z Navigation Panel Leica Screen - Menu Bar } Upper Focus } Lower Stop E-focus control buttons 3- Press again the Upper Focus buttons together (Z↑ + SET), to set your focus position. Pos Z = 0 mm. 4- Bring your objectives down using the focus knob or the SmartMove z-drive or STP6000 z-drive or by pressing the Z↓ button. 5- Once the objective are at the lower level, press the Lower Stop buttons together (Z↓ + SET), to clear the actual lower position. 6- Press again the Lower Stop buttons together (Z↓ + SET), to set your lower stop or position or threshold. Pos Z = -xx µm. 7- Verify that your Focus Position and Lower Threshold (Stop) are set. Application and Technology Support Center Leica Microsystems Inc. 410 Eagleview Blvd, Ste. 107 Toll Free 866-830-0735 Exton, PA 19341 Fax (610)-321-0426 LS-Applications@leica-microsystems.com
