Implementing a Backup Catalog…on a Student Budget

Implementing a Backup Catalog…on a Student Budget
Setting Up a CatBackup Machine
Intended Audience: Novice
You have some SQL experience, some Perl, are comfortable with everyday Unix commands, can use a Unix-based text editor.
Intended Installation:
Academic institution.
Hardware and O.S.
Obtain a suitable PC. It doesn’t have to be very big or very fast (if you have a larger collection, build times will benefit from a faster machine). Our first machine ran at 450Mhz. The rack machine we presently use is a
900Mhz Pentium III. It has three drives in a RAID configuration, resulting in about a 33gig “drive”, similar in size to the first machine. We’ve used RedHat 7.2 and 7.3 in the past, and are now using 8.0 on our production machine.
RedHat still has RedHat Linux (currently version 9) as we know it available through April 2004. Go to http://www.redhat.com/download/products.html
to download (free). After that, I imagine that it will be available from the many mirror sites for some time to come. If you want to buy it, you’ll probably want to buy it now. Fedora is what’s replacing it; RedHat says it’s for “developers and early high-tech enthusiasts using
Linux in non-critical computing environments”. I think that’s their way of saying that they’re not going to officially support it. Go to http://www.redhat.com/solutions/migration/rhl/ for details on Fedora. To download Fedora, go to http://fedora.redhat.com/download/
. If you’re feeling adventurous, you could try one of the many other Linux distributions.
The instructions here address RedHat Linux 8, but should probably be the same, if not similar, for the other versions or distributions.
If you want to download, you’ll need to have a fast connection. You could do it over a phone modem , but it would take a very long time (days) if it worked at all. You’ll be downloading around two gigs of data in three pieces. Select “burn disk image” when you put the .iso files on your blank CDs.
If you’re new to the system administrations aspect, I recommend you look at the RedHat installation guide and if you feel uncomfortable about doing some of that, having a knowledgeable person assist you might be a good idea. Security consideration: you may want to consult with someone knowledgeable on this to make sure that you will have an at least reasonably secure configuration.
Install Linux on your machine (start with disk 1). The install process (wizard) walks you through the steps.
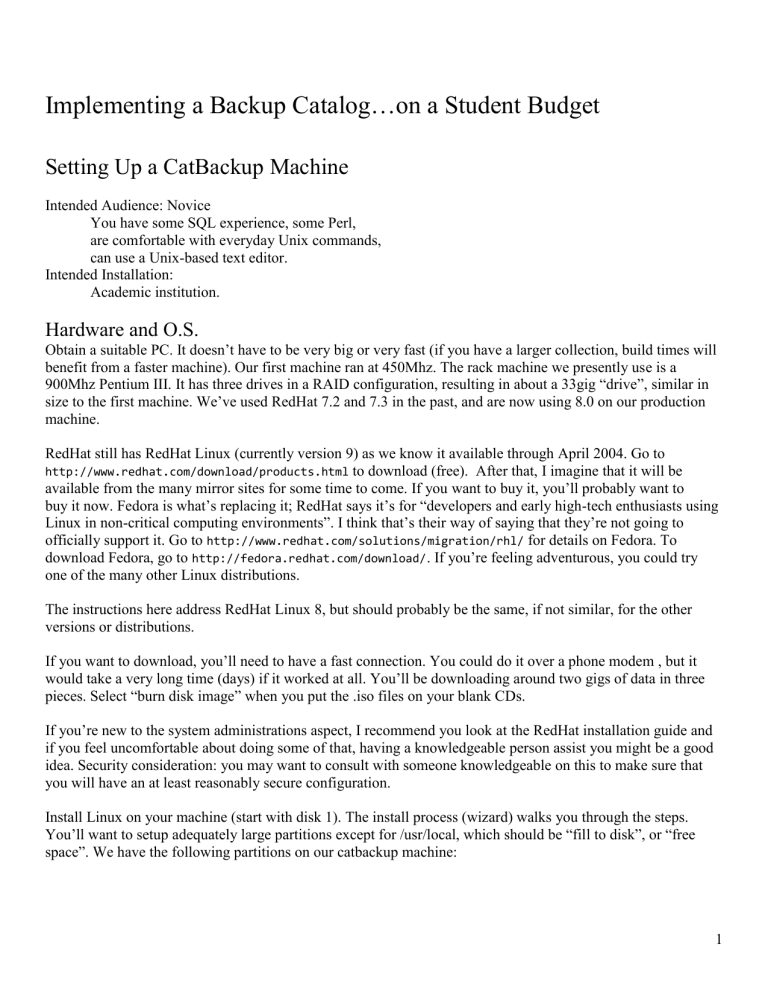
You’ll want to setup adequately large partitions except for /usr/local, which should be “fill to disk”, or “free space”. We have the following partitions on our catbackup machine:
1
/
/boot
/home
/opt
/dev/shm
/tmp
/usr
1024
96
1024
1024
256
1024
3072
/var
/usr/local
1024 free or remaining space
The amounts in the right column are approximate allocations. You can choose Disk Druid or fdisk to do this.
Software
Your installation probably includes Perl and Apache; you may want to install newer (more secure?) versions. I had Perl 5.6.1, and Apache 1.3.23 (test bed machine not accessible outside the university, so that’s ok; production machine has newer versions installed).
You’ll need to make some changes to the httpd.conf
file for Apache; do this as root. This file is often found in
/etc/httpd/conf
. If it’s not there:
find / –name httpd.conf –print
This should show you where to find it.
Changes needed for httpd.conf:
(ServerAdmin section)
ServerAdmin some_suitable_account@your.IP.address.here
(ServerName section)
ServerName your.IP.address
(various places)
Options FollowSymLinks ExecCGI
(occurs more than once, leave defaults as is. you may need to add ExecCGI)
(search for this line)
(ScriptAlias section)
ScriptAlias /cgi-bin/ "/var/www/cgi-bin/"
(Aliases section, add the following)
Alias /images/ “/var/www/images/”
(DocumentRoot section)
DocumentRoot /var/www/html
2
Your IP address refers to your catbackup machine. Some of these settings may already be as desired. If you will have multiple databases on your catbackup machine, you’ll have to create virtual URLs for each database/catalog. You should find templates for this in the file. I used name-based virtual hosting. (Some of the above lines will be in each virtual host definition section, and will be different for each virtual host. You still should do the above.)
For the remainder of the software, you’ll want the newest stable versions. In each case, I got the xxx.tar.gz files.
Postgres
Download Postgres from the Postgres site, http://www.postgres.org
.
Install it:
(These instructions are for version 7.3.4 and the commands may be the same for your version)
gunzip file.tar.gz
tar –xvf file.tar
cd to the postgresql-v.v.v directory , (source distribution), which will be a subdirectory “down” one level from the one in which you unzipped and untar’d the original file (the v’s represent the version number).
Enter the following commands:
./configure
gmake
su (to root, if you’re not already)
gmake install
useradd SOBackup
mkdir /usr/local/pgsql/data
chown SOBackup /usr/local/pgsql/data
su – SOBackup
/usr/local/pgsql/bin/initdb –D /usr/local/pgsql/data
/usr/local/pgsql/bin/postmaster –D /usr/local/pgsql/data >logfile 2>&1 &
/usr/local/pgsql/bin/createdb test
/usr/local/pgsql/bin/psql test
\q
These last two commands create a test database and log you into it; \q logs you out of the database. While you’re logged in, issue the
\l (slash ell) command to get a listing of databases. You should see a database called
SOBackup. If you don’t, log out and use the createdb command above to create it.
Test things out to make sure all is ok.
Making sure Postgres starts on system bootup:
Login as root
cd /etc/rc.d/init.d
cp xxx/contrib/start-scripts/linux postgresql where xxx is the complete path spec for your source distribution directory referenced above.
3
You’ll have to edit this postgresql file… PGUSER should be SOBackup
chmod 755 postgresql
To verify that Postgres starts up, reboot and then: ps –ef | grep postgres
As root, give the SOBackup account a password: passwd SOBackup
Supporting Software:
Get the tar’d and gzip’d modules, following this procedure: go to the URL for each piece of software click on the distribution for the module you’re getting click the download button on the following page.
Get DBD (for Postgres) and DBI from the CPAN site. http://search.cpan.org/author/TIMB/ for the DBI module, and (1.34 9/03) http://search.cpan.org/author/DWHEELER/ for the DBD-pg module (1.22 9/03)
Get the Unicode modules from CPAN also. http://search.cpan.org/author/MSCHWARTZ/ for Unicode-Map--- (0.112 9/03) http://search.cpan.org/author/GAAS/ for Unicode-Map8--- and Unicode-String--- (2.07 9/03) http://search.cpan.org/author/DANKOGAI/ for Jcode (0.83 9/03) http://search.cpan.org/author/SNOWHARE/ for Unicode-MapUTF8--- (1.09 9/03)
The numbers in parentheses at the ends of the lines indicate the most current version available as of that date.
DBI and DBD enable the catbackup software to talk to the Postgres database(s). The other modules are used for the Unicode character translation (you may not need them, depending on your Voyager version and Perl version).
These modules must be installed in the specified order:
DBI
DBD-pg
Jcode
Unicode-String
Unicode-Map8
Unicode-Map
Unicode-MapUTF8
The procedure is the same for each and you should be root. gunzip and untar the module, then cd to its directory just created.
Look at the README file; make sure your version of Perl is new enough.
Issue the following commands, and scan the output from each to make sure that things are ok:
perl Makefile.PL
make
make test
make install
4
Creating the Home Environment
Log in as user SOBackup, and in that home directory, create the following directories:
pwd (should show /home/SOBackup, if not cd to it)
mkdir Build
mkdir control
cd Build
mkdir logs
Protect the SOBackup directories to facilitate web access:
cd ..
chmod 755 control
cd /home
chmod 755 SOBackup
Log in as root and make the following directories you’re creating belong to user SOBackup:
cd to /usr/local
mkdir SOB
chown SOBackup SOB
chgrp SOBackup SOB
cd SOB
mkdir indata
chown SOBackup indata
chgrp SOBackup indata
mkdir temp
chown SOBackup temp
chgrp SOBackup temp
mkdir words
chown SOBackup words
chgrp SOBackup words
Log in as SOBackup:
cd /home/SOBackup (if you’re not already there)
ln –s /usr/local/SOB/indata indata
ln –s /usr/local/SOB/temp temp
ln –s /usr/local/SOB/words words
These last three lines create soft links to these new directories. Above, you created directories in /usr/local .
Creating these links to the actual directories makes it look as if these directories are in /home/SOBackup . These directories will contain a number of huge files that would not fit in the /home partition. Recall that when
/usr/local was created, it got all the remaining space on the hard drive. This is where all the incomng and inprocess data is located. Recall from the Postgres setup that its data also resides in the /usr/local partition.
(If you will be using multiple databases, you’ll want to keep things separate. I created subdirectories under words and indata ; temp is ok as is.)
In order to facilitate SOBackup’s use of Postgres, you’ll need to add its binaries’ location to your path.
Edit .
bash_profile (unless you set up a different shell) in /home/SOBackup .
5
You’ll find a line in there that looks something like the following, but may contain more data:
PATH=$PATH:$HOME/bin
Using this example, you should end up with the following:
PATH=$PATH:$HOME/bin:/usr/local/pgsql/bin
Note that the colon “:” separates the individual entries in the line.
Getting Catbackup Specific Files
There is a number of files that are unique to the catbackup implementation. These are available from http://homepages.wmich.edu/~zimmer Go to the section for EUGM 2004. Click on catbackup.tar.gz
to download it. gunzip and untar it (see earlier instructions). This process will create, off of your current directory, a directory called generic . You should print out the readme.txt
file there and follow its instructions on customization. Further subdirectories contain the catbackup files, organized by category.
Files for the Build Process
Login as SOBackup
cd /home/SOBackup/Build
Put the build files in here:
buildX.script
buildX
buildnew.pl
dobuild
marc2unicode.pl
creserve.pl
split.pl
Xcallbibload.sql
dict.pl
Xindexes.sql
dept.map where X represents the database. This is useful when more than one database is being used on your catalog backup machine. If you have only one database, you can leave the X part off. The rest of the installation refers to a single database installation. The order of the files shown above is also the order of execution.
Marc2unicode is presently required with Perl 5.8.0. Once you upgrade to a Voyager version that works with
Unicode, this step probably will not be needed, and your build process would take appreciably less time. buildX.script is the “cron” script to call buildx. buildX merely provides a convenient way to call buildnew.pl, supplying it with X.
6
buildnew.p
l handles the marching of the database versions through several generations, and creates the current version of the database. dobuild is the backbone of the build process, and logs all activity.
The incoming data file is gunzip’d. marc2unicode.pl
does the MARC to Unicode translation on the data file. creserve.pl
processes the course reserve and opac suppression information in there. Some housekeeping/clean up is done. split.pl
takes this preprocessed data and prepares it for use on the catbackup machine.
Xcallbibload.sql
creates callnumber and bib tables and indexes. This runs when split.pl
is done, but some overlap in processing is possible. You may need to adjust the value of the “wait” variable in the dobuild script to avoid this. dict.pl creates a dictionary of searchable words.
Xindexes.sql
builds the other tables and indexes that make up a backup catalog database.
Then “pointers” to the generations of the database are updated.
Lastly, the oldest version of the database is deleted. dept.map contains data used for the course reserve handling.
There are two fields, the first is a department abbreviation (6 characters), and the second is the full department name (remaining characters). This file is used in split.pl
. You will have to populate this file with data for your institution.
Note on creserve.p
l: this program, along with the dept.map
file, ensures that items suppressed in OPAC, but on course reserve, do show up in the backup catalog.
Apply the following protections:
chmod 755 *.pl *.sql *.script dobuild
chmod 664 dept.map wmuDB
HTML File
This goes in /var/www/html .
It’s what the user sees when first interacting with your catbackup implementation. The user enters parameters and starts a search here. This file should be called index.html
, or you can call it something else, or put it elsewhere, and make index.htm
l a symlink to that other file (see use of the ln command above). You will have to customize it for your installation, particularly the “
Form action…
” line, which needs a URL that references your catbackup machine.
Protect this file:
chmod 755 index.html
.
For multiple databases, you’ll need separate HTML files for each database. I put them in their own directories under /var/www .
Images
Login as root.
cd /var/www/html
mkdir images
7
cd images
Put these files there:
search4.gif
searchagainbutton.gif
searchagainexplain.gif
refinesearchbutton.gif
refinesearchexplain.gif
go2topbutton.gif
xxxsmall_logo.gif
xxxinstitution_logo.gif
The xxxsmall_logo.gif is an optional file supplied by you. It would contain a small copy of an image associated with this catalog (the one you’re backing up on this machine). You’ll probably want a different one for each catalog if you have more than one. The xxxinstitution_logo.gif file is also optional. It typically would be an image of your institution logo.
cgi-bin
Install XsearchMe.cgi and, as root, apply the needed protection:
cd /var/www/cgi-bin
chmod 755 XSearchMe.cgi
.
Edit it, searching for http , then change the url in those lines to point to your machine. For multiple databases, you’ll have multiple
XSearchMe.cgi
files here, otherwise drop the X identifier.
HOW TO FEED YOUR CATBACKUP MACHINE
On Your Voyager Machine
There are several files needed for the extract process: extractX.script
gets scheduled to run in cron. It calls doextract . doextract does just what its name implies.You’ll need to put the readonly username and password for your database in the script. getX.sql
queries the Voyager database to get the data for this backup extract, and sorts and gzips the results.
X.transfer
handles the secureftp file transfer. trigger.X is copied to the transfer directory. when the cron process on catbackup finds it, the build process starts up.
/m1/scratch is used as a data staging area for the extract process.
8
Scripts for cron
On your Voyager machine, run extractX.script
from cron. On your catbackup machine, buildX.script
should be scheduled in cron. It should run as SOBackup.
How to Use cron
A “cron job” is a task scheduled to run via Unix’s cron process. It takes its instructions from a crontab file. crontab –l lists the contents of your crontab file, crontab –e invokes vi (sorry!) on the file so that you can edit it. The contents of the crontab file follow a specific format:
[minute] [hour] [day of month] [month] [day of week] task-to-run
0-59 0-23 1-31 1-12 0-6
(starting with Sunday at 0)
Here’s the crontab entry to run the build for one of our catbackup databases:
0 3 * * 1,2,4,5 /home/SOBackup/Build/buildwmu.script >/tmp/wmubuild.log 2>&1 buildwmu.script
will run at 3 AM on Monday, Tuesday, Thursday and Friday of each week. It can run on any day of the month, so we specify “*” for any day, and it will run every month, thus the “*”. The
>/tmp… redirects program output interactively seen on the screen (stdout) to the specified path and file. If we experience problems, we can go look at /tmp/wmubuild.log
to check for error messages, etc. You should schedule your build runs via cron as user SOBackup.
USE
When the appropriate scripts have been correctly set up with cron, you’ll have a fresh backup image on your catbackup machine whenever the scripts run. In our case, we run the extract and build process on Monday,
Tuesday, Thursday, and Friday. We omit Wednesday because we have a full backup of our Voyager machine running that night. The build process is finished by around 7 a.m..
Searches of the backup catalog are logged. I created logcat.pl
to provide usage reports, useful for those times when we rely on the backup catalog as the catalog. The search process creates monthly log files. You tell logcat.pl which logfile to use and which days to look at. The report, as supplied, is set up for our situation with two institutions on two databases in one Voyager implementation. You’ll need to edit logcat.pl
for your use.
Searching for “wmu” and “kvcc” will show you which areas to change.
PERFORMANCE
Our Voyager box is a Sun UltraSPARCII with 4 processors, 4 gigs RAM, and over 80 gigs drive space at the time of this writing. The backup machine specs are listed earlier in this document.
We have somewhere over a million and quarter bib records. The extract takes about two and a half hours. The build process takes about three and three quarter hours. Searches are very fast. Your mileage will vary.
9
CAVEATS:
I may have forgotten some details. You’ll have to be resourceful (like I was when I put this together and modified the basic process, a lot). If something does not work, check permissions on related files and directories. Looking at the web server log file may also be helpful. In the setup detailed above, that is
/etc/httpd/logs/error_log . I will not provide support. I have a job. I might answer simple quick questions.
You implement this software and anything associated with it at YOUR risk.
COMMENTS ON COST:
Price of PC – as much as several thousand, or possibly free if you have an available machine
Price of Software – free
Cost of Labor – free (built into overhead)
Benefit of Implementation – priceless, when you need it! (and it might not cost you anything!)
10


