INSTALLATION PROCEDURES
advertisement
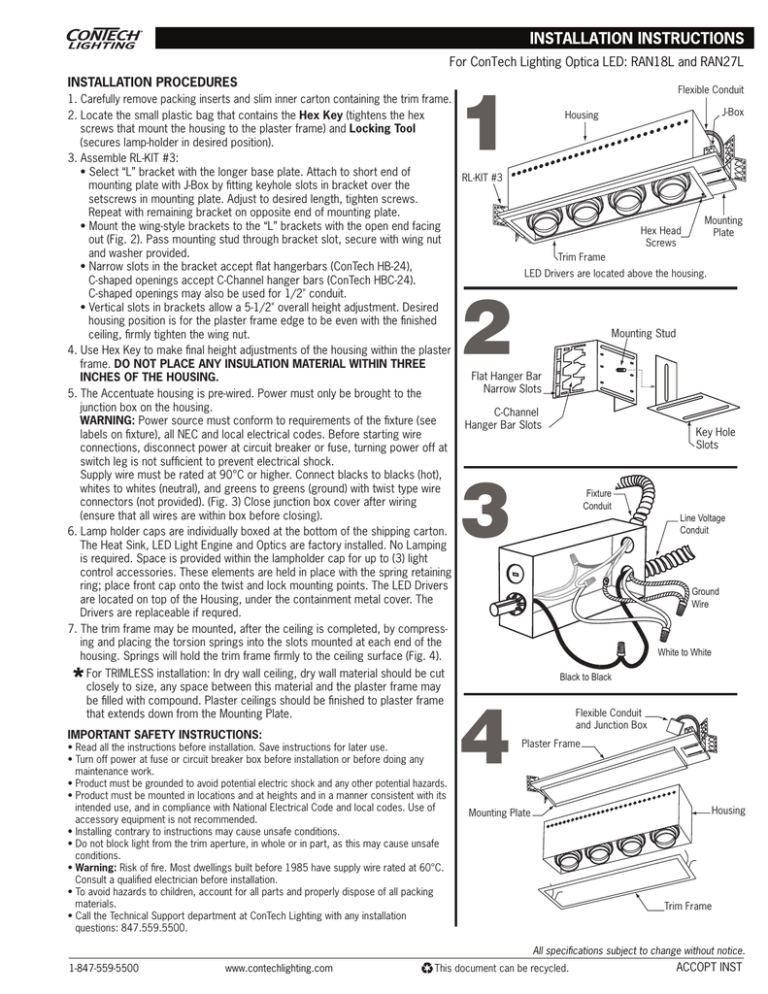
For ConTech Lighting Optica LED: RAN18L and RAN27L 1 INSTALLATION PROCEDURES Flexible Conduit 1. Carefully remove packing inserts and slim inner carton containing the trim frame. J-Box Housing 2. Locate the small plastic bag that contains the Hex Key (tightens the hex screws that mount the housing to the plaster frame) and Locking Tool (secures lamp-holder in desired position). 3. Assemble RL-KIT #3: • Select “L” bracket with the longer base plate. Attach to short end of RL-KIT #3 mounting plate with J-Box by fitting keyhole slots in bracket over the setscrews in mounting plate. Adjust to desired length, tighten screws. Repeat with remaining bracket on opposite end of mounting plate. Mounting • Mount the wing-style brackets to the “L” brackets with the open end facing Hex Head Plate out (Fig. 2). Pass mounting stud through bracket slot, secure with wing nut Screws and washer provided. Trim Frame • Narrow slots in the bracket accept flat hangerbars (ConTech HB-24), LED Drivers are located above the housing. C-shaped openings accept C-Channel hanger bars (ConTech HBC-24). C-shaped openings may also be used for 1/2" conduit. • Vertical slots in brackets allow a 5-1/2" overall height adjustment. Desired housing position is for the plaster frame edge to be even with the finished Mounting Stud ceiling, firmly tighten the wing nut. 4. Use Hex Key to make final height adjustments of the housing within the plaster frame. DO NOT PLACE ANY INSULATION MATERIAL WITHIN THREE Flat Hanger Bar INCHES OF THE HOUSING. Narrow Slots 5. The Accentuate housing is pre-wired. Power must only be brought to the junction box on the housing. C-Channel WARNING: Power source must conform to requirements of the fixture (see Hanger Bar Slots Key Hole labels on fixture), all NEC and local electrical codes. Before starting wire Slots connections, disconnect power at circuit breaker or fuse, turning power off at switch leg is not sufficient to prevent electrical shock. Supply wire must be rated at 90°C or higher. Connect blacks to blacks (hot), whites to whites (neutral), and greens to greens (ground) with twist type wire Fixture connectors (not provided). (Fig. 3) Close junction box cover after wiring Conduit (ensure that all wires are within box before closing). Line Voltage Conduit 6. Lamp holder caps are individually boxed at the bottom of the shipping carton. The Heat Sink, LED Light Engine and Optics are factory installed. No Lamping is required. Space is provided within the lampholder cap for up to (3) light control accessories. These elements are held in place with the spring retaining ring; place front cap onto the twist and lock mounting points. The LED Drivers Ground are located on top of the Housing, under the containment metal cover. The Wire Drivers are replaceable if requred. 7. The trim frame may be mounted, after the ceiling is completed, by compressing and placing the torsion springs into the slots mounted at each end of the White to White housing. Springs will hold the trim frame firmly to the ceiling surface (Fig. 4). 2 3 For TRIMLESS installation: In dry wall ceiling, dry wall material should be cut closely to size, any space between this material and the plaster frame may be filled with compound. Plaster ceilings should be finished to plaster frame that extends down from the Mounting Plate. IMPORTANT SAFETY INSTRUCTIONS: • Read all the instructions before installation. Save instructions for later use. • Turn off power at fuse or circuit breaker box before installation or before doing any maintenance work. • Product must be grounded to avoid potential electric shock and any other potential hazards. • Product must be mounted in locations and at heights and in a manner consistent with its intended use, and in compliance with National Electrical Code and local codes. Use of accessory equipment is not recommended. • Installing contrary to instructions may cause unsafe conditions. • Do not block light from the trim aperture, in whole or in part, as this may cause unsafe conditions. • Warning: Risk of fire. Most dwellings built before 1985 have supply wire rated at 60°C. Consult a qualified electrician before installation. • To avoid hazards to children, account for all parts and properly dispose of all packing materials. • Call the Technical Support department at ConTech Lighting with any installation questions: 847.559.5500. Black to Black 4 Flexible Conduit and Junction Box Plaster Frame Housing Mounting Plate Trim Frame All specifications subject to change without notice. 1-847-559-5500 www.contechlighting.com This document can be recycled. ACCOPT INST
