For ConTech Lighting Magellan Low Voltage Flexible Track System

For ConTech Lighting Magellan Low Voltage Flexible Track System
Con-Tech Lighting’s Magellan Low Voltage Flexible Track system has a 25 AMP capacity and is rated for use at 12V (300W capacity) or 24V (600W capacity). Track sections may be cut in the field, and polarity is not an issue with this low voltage system. Utilize a wide variety of fixtures, track lengths, accessories and transformers to customize your lighting plans.
Magellan Low Voltage Flexible Track is versatile. It can be powered with remote or surface mounted electronic or magnetic transformers. All electronic transformers have auto-reset electronic short circuit, thermal cutoff and overload protection. Wattage overload protection resets itself automatically when the wattage correction is made.
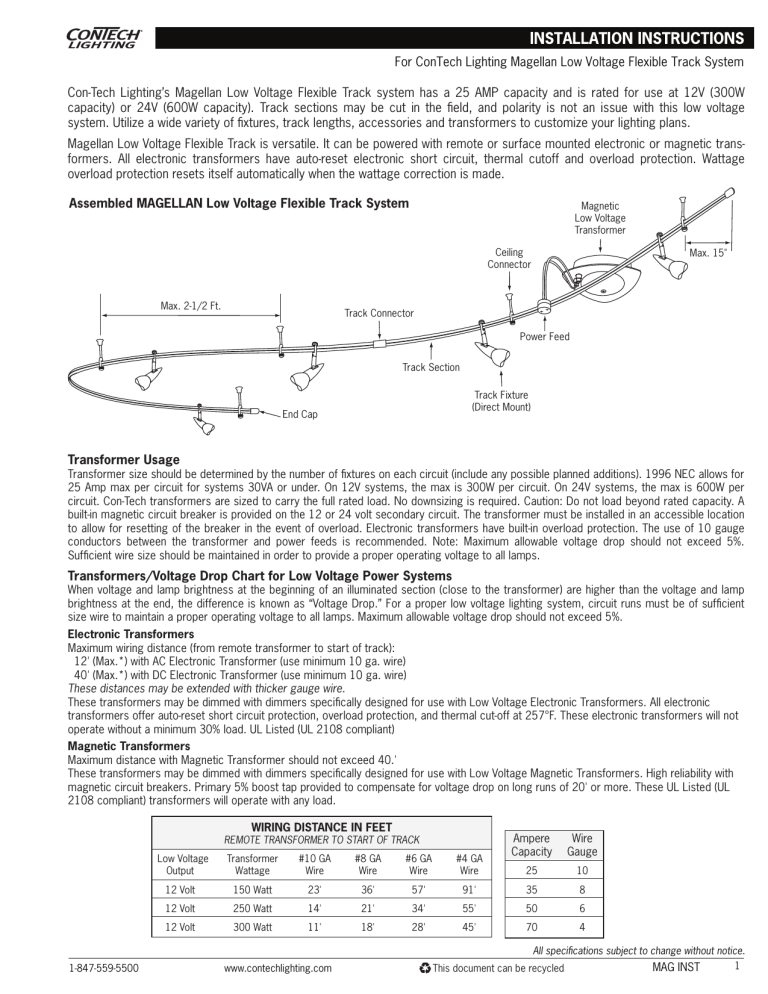
Assembled MAGELLAN Low Voltage Flexible Track System
Magnetic
Low Voltage
Transformer
Ceiling
Connector
Max. 15"
Max. 2-1/2 Ft.
End Cap
Track Connector
Power Feed
Track Section
Track Fixture
(Direct Mount)
Transformer Usage
Transformer size should be determined by the number of fixtures on each circuit (include any possible planned additions). 1996 NEC allows for
25 Amp max per circuit for systems 30VA or under. On 12V systems, the max is 300W per circuit. On 24V systems, the max is 600W per circuit. Con-Tech transformers are sized to carry the full rated load. No downsizing is required. Caution: Do not load beyond rated capacity. A built-in magnetic circuit breaker is provided on the 12 or 24 volt secondary circuit. The transformer must be installed in an accessible location to allow for resetting of the breaker in the event of overload. Electronic transformers have built-in overload protection. The use of 10 gauge conductors between the transformer and power feeds is recommended. Note: Maximum allowable voltage drop should not exceed 5%.
Sufficient wire size should be maintained in order to provide a proper operating voltage to all lamps.
Transformers/Voltage Drop Chart for Low Voltage Power Systems
When voltage and lamp brightness at the beginning of an illuminated section (close to the transformer) are higher than the voltage and lamp brightness at the end, the difference is known as “Voltage Drop.” For a proper low voltage lighting system, circuit runs must be of sufficient size wire to maintain a proper operating voltage to all lamps. Maximum allowable voltage drop should not exceed 5%.
Electronic Transformers
Maximum wiring distance (from remote transformer to start of track):
12' (Max.*) with AC Electronic Transformer (use minimum 10 ga. wire)
40' (Max.*) with DC Electronic Transformer (use minimum 10 ga. wire)
These distances may be extended with thicker gauge wire.
These transformers may be dimmed with dimmers specifically designed for use with Low Voltage Electronic Transformers. All electronic transformers offer auto-reset short circuit protection, overload protection, and thermal cut-off at 257°F. These electronic transformers will not operate without a minimum 30% load. UL Listed (UL 2108 compliant)
Magnetic Transformers
Maximum distance with Magnetic Transformer should not exceed 40.'
These transformers may be dimmed with dimmers specifically designed for use with Low Voltage Magnetic Transformers. High reliability with magnetic circuit breakers. Primary 5% boost tap provided to compensate for voltage drop on long runs of 20' or more. These UL Listed (UL
2108 compliant) transformers will operate with any load.
1-847-559-5500
WIRING DISTANCE IN FEET
REMOTE TRANSFORMER TO START OF TRACK
Low Voltage Transformer #10 GA #8 GA #6 GA #4 GA
Output Wattage Wire Wire Wire Wire
12 Volt 150 Watt 23' 36' 57' 91'
12 Volt
12 Volt
250 Watt
300 Watt
14'
11'
21'
18'
34'
28'
55'
45' www.contechlighting.com
Ampere Wire
Capacity Gauge
25
35
50
70
6
4
10
8
All specifications subject to change without notice.
This document can be recycled MAG INST 1
For ConTech Lighting Magellan Low Voltage Flexible Track System
Ceiling and Wall Connectors
Connectors include a 15/16" flange with a two-piece plastic insulator washer (external)/insert (internal), allen wrench, concrete anchor 8-32 brass nut and wood screw. (Figure 1) The maximum distance allowed between ceiling connectors is 26". For sloped ceiling applications, a sloped ceiling adaptor is available.
On longer ceiling drops, use cable ceiling connectors. The cable has crimped metal sleeves on both ends that are held in place by side 1.5mm
Allen screws in the threaded brass fittings. To adjust cable length, cut with side-cutting pliers from only one end, turn the end over for 1/4" and insert the folded over cable into the center hole of the threaded brass fitting.
Lock the cable down with the 1.5mm Allen screw. Thread the brass fitting into the ceiling flange so that no brass threads are showing.
Solid Surface Installation
The surface flange can be mounted to various surfaces (ceiling or wall).
For wood surfaces, use 1/8" drill bit for the wood screw included. In concrete surfaces, use a 7/32" drill bit for the included concrete anchor.
Drywall Installation
For installation into a drywall surface, use a 1/8" toggle bolt anchor (not included) which fits through the plastic insulator of the ceiling flange. A
1/2" hole should be drilled into the drywall to properly insert the 1/8" anchor toggle wings. Toggle bolt anchors are available by others.
T-Bar Mounting
Use Con-Tech’s LA-1 15/16" Grid Stuf Type T-Bar Mounting Clip with #8-32 x 5/8" stud (Figure 2). Insert the stud through the ceiling flange and insulator. Attach the nut to the #8-32 stud and lock down using a straight blade screwdriver. Upon completion, attach the assembly to the proper location of the T-Bar ceiling. Care should be taken to add sufficient support wires to the suspended ceiling to carry the additional weight of the
Magellan Flexible Track System.
Mounting of Track Support Stems
After mounting the flange in either a solid surface or a T-Bar ceiling, the support stem can now be attached (Figure 3). Screw in the vertical stem into the support flange, so that no threads are showing and tighten securely. Loosen the 1.5mm Allen screw in the track connector and rotate the lower portion of the stem assembly to align with the track section.
Remove the stem cap and insert the track into the slot of the support stem. Attach the stem cap loosely over the track and onto the stem support. Adjust the track position as desired, then tighten all stem caps and 1.5mm Allen screws securely. Max. 10 lbs. loading for stem.
Concrete Wall Anchor
Insulator Washer
Track Support Flange
Wood Screw
T-Bar Ceiling
T-Bar Mounting Clip
Insulator Washer
Track Support Flange
Barrel Nut
Track Support Flange
Support Stem
1.5mm Allen Screw
Stem Cap
1-847-559-5500 www.contechlighting.com
All specifications subject to change without notice.
This document can be recycled MAG INST 2
For ConTech Lighting Magellan Low Voltage Flexible Track System
Layout and Track Installation Procedure
Rail Shaping
Magellan layouts may be made using straight or curved track sections, joined by conductive or non-conductive connectors (Figure 4). Curved track sections may also be used to create arc, serpentine, round, or any other configurations in the horizontal plane only. A Standard Curving
Machine (CRS320) is available to curve the track to your desired radius in gradual measures. Over tightening or quick radical curves can remove the anodization from the track. Con-Tech Lighting can curve the 4' rails at the factory to your specified radius for an additional charge.
Track Sizing/Cutting
Mark the track where it should be cut (if required). Cut the track with a fine tooth (32T) hacksaw blade. Smooth off any burrs with a fine file or rasp.
Conductive connectors require that the track should have 3/4" the anodization removed at the track ends, on all sides (Figure 5).
Mounting/Connecting Track
Layout the Magellan design on the floor and connect the tracks together.
Align the mounting points on the ceiling using a plumb line or laser device.
Install all the support stems and power connections on the ceiling. Starting at the power connections, begin with a single Magellan track piece and attach it to its designated support(s) and/or power stem(s). Tighten all
Allen screws and suspension tabs.
Install the connectors that the adjoining track will be attached to. The
Conductive and Non-conductive Connectors have a 3mm Allen screw that must be tightened after placing the two tracks in the connector (Figure 6).
Conductive connectors require that the track should have 3/4" the anodization removed at the track ends, on all sides. If using the Angular
Connector, tighten the (8) 2mm Allen screws and the (2) Philips screws on top and bottom to lock the angle (60° to 300°) after the two pieces of track are in the connector. The “T” Connector has (12) 2mm Allen screws, the “X" Connector has (16) 2mm Allen screws that need to be tightened after track pieces have been inserted. To lock proper angles, tighten the
Philips screw on the connector.
Bring the second track into position and attach it to the first track with the proper connector and/or power source. Secure the second track to the ceiling support(s) and tighten all Allen and Philips screws. Repeat this procedure until all of the track has been installed.
When finished, secure each end of the track run by installing the included
Track End Caps to each uncapped track end piece.
Once all the Magellan track has been installed, ensure that all connections and Allen screws are tightly secured. Never attempt to raise an assembled layout or multiple pieces of track to the ceiling as a single piece. Damage to the system may occur. Be sure that
POWER IS OFF when tightening during routine maintenance.
Min. Radius:
12-1/2"
Circular bending capacity of track: 5 CYCLES
5
6
Max. distance between supports:
2-1/2 ft.
Remove 3/4" of anodization for conductive connections.
Max. Angle: 25°
Angular bending capacity of track: 1 TIME
Track Connector
Track End Cap
All specifications subject to change without notice.
This document can be recycled MAG INST 3 1-847-559-5500 www.contechlighting.com
Power Stem Installation Procedure
Power Stems are available in fixed and adjustable lengths with canopy
(Figure 7); transformer sold separately. An Allen wrench is included for tightly securing all Allen screws. Feed Rating: 12-24V, 25A.
For ConTech Lighting Magellan Low Voltage Flexible Track System
7
Power Stem Mounting at the Junction Box
On the power stem assemblies, bring the 12 or 24 volt current to the 4" round junction box. Attach the mounting bar to the junction box with (2)
#8-32 screws. The mounting bar has (2) Philips screws for holding the canopy to the junction box. Connect the black lead wire from the power stem to the low voltage secondary wiring from the remote transformer.
Slide the canopy over the mounting bar side screws and twist until in the proper place. Tighten the (2) Philips screws for the canopy. Adjust the length of the power stem (if necessary) and lock into place with (2) 1.5mm Allen screws (Figure 8).
Fixed Power
Stem Canapy
Adjustable Power
Stem Canopy
Changing Power Feed Wire Length for Surface Transformers
On the Power Feed Assembly, first attach the two wire leads to the surface transformer. Make sure there is enough wire to make the correct placement on the track. Additional lengths of feed wire can be ordered from Con-Tech
Lighting. Remove the existing wiring from the Power Feed Assembly by loosening the (2) 2mm Allen screws on the side of the hub. Take the correct length of the feed wire and insert the wire into the hub feed points. Tighten the (2) 2mm Allen screws.
8 Low Voltage
Feed From
Remote
Transformer
Mounting the Track to the Power Stem
Loosen the (2) Philips screws on the bottom of the power stem. Slide the track through the power stem to its proper position. Tighten (2) Philips screws on the bottom of the power stem. Then tighten the (2) 2mm Allen screws on the top and bottom of the power stem hub assembly (Figure 9).
(2) 1.5mm Allen Screws;
(1) on each side of adjustable stem
9
A
C
B
D
1-847-559-5500 www.contechlighting.com
All specifications subject to change without notice.
This document can be recycled MAG INST 4
Surface Mount Transformer Installation Procedure
Surface Mount Transformers are to be used with Power Feeds. The transformers are a 300W Magnetic or a 300W Electronic model. Both housings cover a standard octagonal ceiling box.
For ConTech Lighting Magellan Low Voltage Flexible Track System
10
G
Junction Box
(4" Round)
H
N
Surface Mount Canopy with Built-In 300W Magnetic Transformer
Part number CRS318. This transformer can be installed anywhere along the system. Dis-assemble the transformer before mounting to a recessed 4" round junction box. Attach the universal mounting plate to the junction box with (2) #8-32 screws from the box. Feed the three-conductor wire sleeve through the center hole. Connect the wires properly. Attach the transformer housing to the universal mounting plate with (2) Philips screws. (Figure 10)
Universal
Mounting Plate
Circuit
Breaker
The transformer housing has two keyhole slots for the Philips screws. The screws should be attached to the universal mounting plate. Install the transformer cover plate with the center slotted screw. The two wires from the Power Feed can now be inserted into the bottom terminals. Ensure the screws are well tightened on the terminals. (Figure 11)
Surface Mount Canopy with Built-In 300W Electronic Transformer
Part number SA54T. Attach the universal mounting bar to the 4" round junction box with (2) #8-32 screws from the box. Connect the 120V primary leads (black/white) from the transformer to the supply wires along with the ground wire. Slide the Power Feed conductors through the rubber grommet and transformer. Connect the Power Feed conductors to the blue secondary
(12V) conductors from the transformer. Make sure the transformer heat sinks are properly positioned around the wires and above the electronic transformer. Slide the canopy assembly to the ceiling and align the mounting bar screws with the canopy side holes. Tighten the screws to the mounting bar. (Figure 12)
Connecting Flexible Track to Power Feed
Loosen the top Philips screws on the Power Feed and slide the Magellan track through the power feed to its proper position. Tighten the (2) Philips screws on the top of the power feed. Then tighten the (2) 2mm Allen screws on the top and bottom of the power feed hub assembly. (Figure 13)
11
12
Junction Box
(4" Round)
G
H N
1-847-559-5500 www.contechlighting.com
13
A B
All specifications subject to change without notice.
This document can be recycled MAG INST 5
For ConTech Lighting Magellan Low Voltage Flexible Track System
Fixture Installation Procedure
After the fixture is assembled, attach to the Magellan track using the suspension tab. Tighten the cap in order to make good electrical contacts.
The two points in the suspension tab needs to pierce the anodized finish of the track. Low voltage systems carry high amperage; high amperage through loose connections can cause arcing and high temperatures that could damage the entire system. Aim the fixture according to application.
(Figure 14)
14
IMPORTANT SAFETY INSTRUCTIONS:
• Read all the instructions before installation. Save instructions for later use.
• Turn off power at fuse or circuit breaker box before installation or before doing any maintenance work.
• Product must be grounded to avoid potential electric shock and any other potential hazards.
• Product must be mounted in locations and at heights and in a manner consistent with its intended use, and in compliance with National Electrical Code and local codes. Use of accessory equipment is not recommended.
• Installing contrary to instructions may cause unsafe conditions.
• Ensure all allen screws are properly tightened (top and bottom).
• Caution: to reduce risk of fire and electrical shock, use only fixtures and fittings intended for use with the Con-Tech Magellan Low Voltage Flexible Track System.
• Do not use any wire smaller than #10 gauge copper for the secondary feed. The track is rated for 25A capacity (300W at 12V or 600W at 24V).
• Intended to be connected only to 12 or 24 volt secondary wiring from a UL listed transformer supply. Please do not exceed the nominal supply voltage.
• Do not block light from the trim aperture, in whole or in part, as this may cause unsafe conditions.
• Warning: Risk of fire. Most dwellings built before 1985 have supply wire rated at 60°C. Consult a qualified electrician before installation.
• To avoid hazards to children, account for all parts and properly dispose of all packing materials.
• Call the Technical Support department at Con-Tech Lighting with any installation questions: 847.559.5500.
1-847-559-5500 www.contechlighting.com
All specifications subject to change without notice.
This document can be recycled MAG INST 6


