WATERBARS ~diverting water off paths and trails~
WATERBARS
~diverting water off paths and trails~
Portland Water District
Purpose: A waterbar intercepts water traveling down footpaths, trails and other areas and diverts it into stable vegetated areas.
Installation: Install waterbars on moderately steep paths with concentrated flows. Select a location where the waterbar outlet can drain to a stable, vegetated area. Install multiple waterbars as needed and space closer together on steeper slopes as directed in
Table 1.
Any rot-resistant type of wood, such as cedar, spruce, fir or hemlock logs can be used. For logs, the diameter should be at least 8” at the small end. 6” to 8” diameter, pressure treated or cedar timbers can also be used. The length should extend past the edge of the path on both sides. Install waterbars as follows:
1.
Dig the trench – First, dig a trench for the wood that is a 30° angle across the path. Be sure the trench and the waterbar extends off both sides of the path. The trench should be deep enough so the top of the log will be almost flush with the trail on its downhill side once in place. Soil and rock excavated from the trench should be heaped on the trail below the water bar to be used later as backfill.
2.
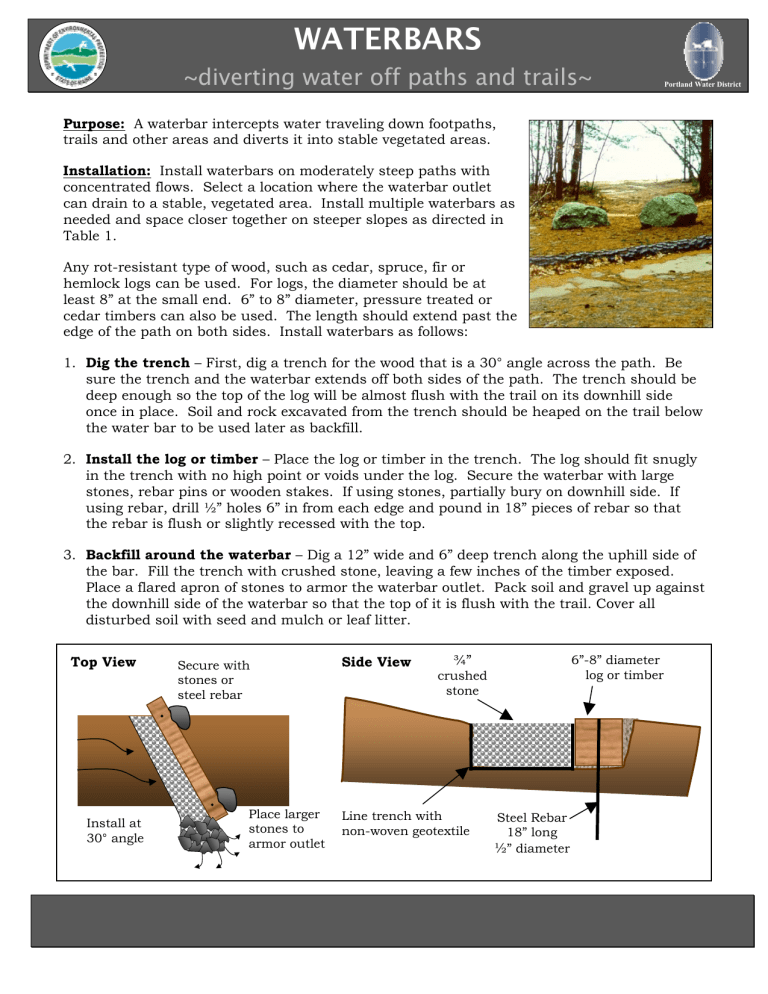
Install the log or timber – Place the log or timber in the trench. The log should fit snugly in the trench with no high point or voids under the log. Secure the waterbar with large stones, rebar pins or wooden stakes. If using stones, partially bury on downhill side. If using rebar, drill ½” holes 6” in from each edge and pound in 18” pieces of rebar so that the rebar is flush or slightly recessed with the top.
3.
Backfill around the waterbar – Dig a 12” wide and 6” deep trench along the uphill side of the bar. Fill the trench with crushed stone, leaving a few inches of the timber exposed.
Place a flared apron of stones to armor the waterbar outlet. Pack soil and gravel up against the downhill side of the waterbar so that the top of it is flush with the trail. Cover all disturbed soil with seed and mulch or leaf litter.
Top View
Secure with stones or steel rebar
Side View ¾” crushed stone
6”-8” diameter log or timber
Place larger stones to armor outlet
Line trench with non-woven geotextile
Steel Rebar
18” long
½ ” diameter
Install at
30° angle
Materials: Fallen rot-resistant timbers can often be found on site. Pressure treated timbers, cedar
Table 1. Waterbar Spacing landscape timbers and steel rebar can be purchased from lumber and hardware stores. Some stores will cut rebar to the specified length for a small fee. Otherwise,
%
Grade
Spacing Between
Waterbars (feet) rebar can be cut with a hack saw.
Contact your local Soil and Water Conservation District for suppliers of non-woven geotextile fabric. Other geotextiles, including landscaping weed barrier, can be
2
5
10
15
25+
250
130
80
50
40 substituted for smaller projects.
Maintenance: Waterbars should be checked periodically and after storm events to ensure that material is not eroding behind the structure or at the outlet. Any needed repairs should be made as soon as possible. Periodically remove accumulated leaves and debris from behind the waterbar.
Before After
Other Types of Waterbars: There are several other types of waterbars that are better suited for diverting water off driveways and gravel roads. For more information, see fact sheets on open-top culverts and rubber razors.
Part of the Conservation Practices for Homeowners Factsheet Series, available at:
Maine DEP (800.452.1942); http://www.maine.gov/dep/blwq/docwatershed/materials.htm
Portland Water District (207.774.5961); http://www.pwd.org/news/publications.php
