B 3. TEMPERATURE MONITORING:
advertisement
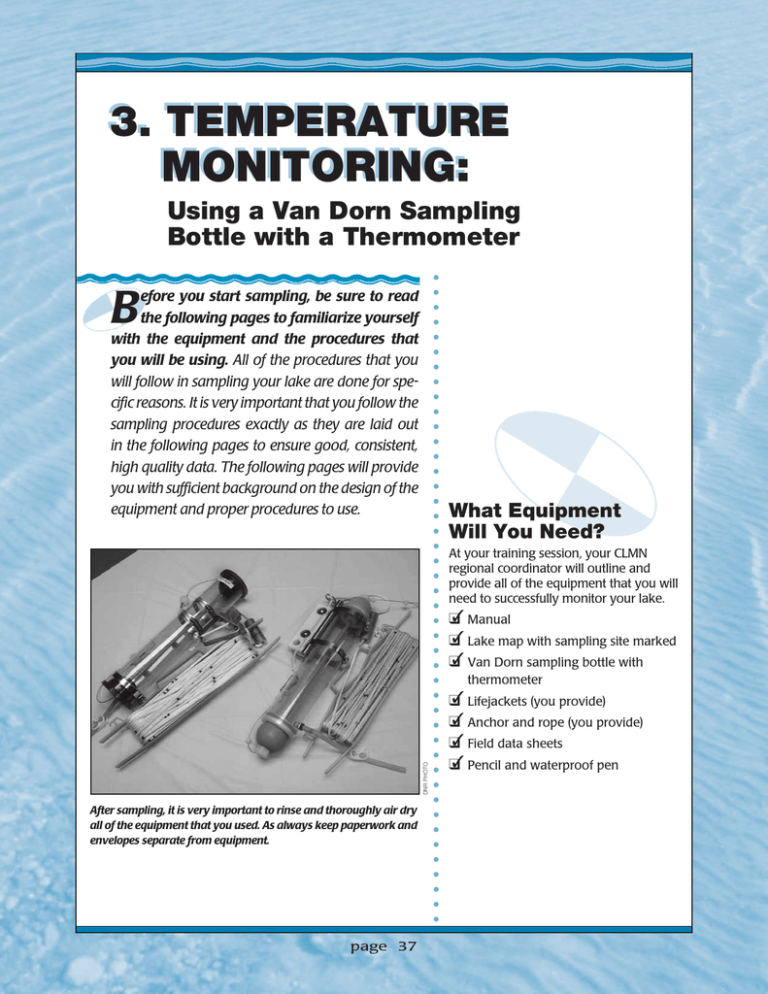
3. TEMPERATURE MONITORING: Using a Van Dorn Sampling Bottle with a Thermometer B efore you start sampling, be sure to read the following pages to familiarize yourself with the equipment and the procedures that you will be using. All of the procedures that you will follow in sampling your lake are done for specific reasons. It is very important that you follow the sampling procedures exactly as they are laid out in the following pages to ensure good, consistent, high quality data. The following pages will provide you with sufficient background on the design of the equipment and proper procedures to use. What Equipment Will You Need? At your training session, your CLMN regional coordinator will outline and provide all of the equipment that you will need to successfully monitor your lake. 3Manual q 3Lake map with sampling site marked q 3Van Dorn sampling bottle with q DNR PHOTO thermometer After sampling, it is very important to rinse and thoroughly air dry all of the equipment that you used. As always keep paperwork and envelopes separate from equipment. page 37 3Lifejackets (you provide) q 3Anchor and rope (you provide) q 3Field data sheets q 3Pencil and waterproof pen q C I T I Z E N L A K E M O N I T O R I N G T R A I N I N G M A N U A L How Do You Prepare to Sample? The Day You Sample On the day you plan to sample, complete the top portion of your field data sheet by filling in the Waterbody # (or WBIC) and Station # (or Storet #). If you do not know these numbers, contact your CLMN regional coordinator. Before you launch your boat, make sure you have an anchor, sufficient gas, and personal flotation devices in your boat. Measure the rope on your Van Dorn sampling bottle before the season starts to make sure it is accurate. Check your Van Dorn sampling bottle before each sample period to make sure it is working. If it is not working properly return it to your CLMN coordinator for repair or replacement. Sampling Overview Temperature Readings Some limnologists believe that lake temperature profile data are very important to document the effects of climate change. Keep this in mind, as the accuracy of the data you collect is critical. Temperature readings are easy to take. Your regional coordinator will give you the depths at which the temperature should be recorded for your particular lake. When using this method you will use a regular thermometer in the Van Dorn sampling bottle to record the temperature of the water. CAROL WATKINS, UW-EXTENSION, ENVIRONMENTAL RESOURCES CENTER W I S C O N S I N page 38 ON LAKE PROCEDURES How to Collect Water Samples There are several types of sampling bottles being used by the CLMN: horizontal tug-release sampler, horizontal messenger-release sampler, and the vertical messenger releaser sampler. The following instructions are for the vertical messenger release sampler. Please contact your regional coordinator if you need instruction on using other models or if your sampler fails to work properly. Please be sure to anchor your boat before collecting your water sample(s). If the boat is drifting, the release mechanism may not work properly. STEP 1. Prepare the sam- pler by pulling the sealing balls out of the ends of the tube and hooking the lines over the release pins. Loop the cable from the top cap under the release mechanism support arm and hook onto pin. Hook the bottom cable onto the other pin. Be very careful to keep the top sealing cap away from the release mechanism so that it does not interfere with the messenger when it is released. Make sure the clamp is closed on the release valve. STEP 2. Hold the sampler line in one hand and the brass messenger securely in your other hand. STEP 3. Holding the rope waist-high, lower the sampler DNR PHOTOS to the desired depth using the marks on the rope for reference. The rope is marked in one foot increments. The red mark appears every five feet. A double black mark shows 10 feet, 20 feet, 30 feet, etc. page 39 W I S C O N S I N C I T I Z E N L A K E M O N I T O R I N G T R A I N I N G M A N U A L STEP 4. Once the sampler is at the appropriate depth, hold the line straight up and down with one hand. With your other hand, drop the brass messenger into the water. You should feel a “thump” when the messenger reaches the sampler. STEP 5. Bring the now closed sampler to the surface. Allow time for thermometer to stabilize. Read thermometer. Empty the sampler and repeat steps 1-5 for each depth. STEP 6. After STEP 7. If using the Van Dorn sampling bottle to collect your water sample, release the clamp to release a small amount of water through the drain tube. Fill the water collection bottle with water from the Van Dorn. page 40 DNR PHOTOS sampling it is very important to thoroughly rinse and air dry all of the equipment that you used. Rinse your Van Dorn sampling bottle with distilled water. Place pencils or popsicle sticks in either end so the sampler will dry out. Also, open up or remove the hose clamp so the hose can dry out. Don’t forget to remove pencils/popsicle sticks when sampler is dry. If you don’t remove pencils/popsicle sticks, the rubber tubing will stretch causing the Van Dorn sampling bottle to leak.
