Adobe InDesign, Part One
advertisement
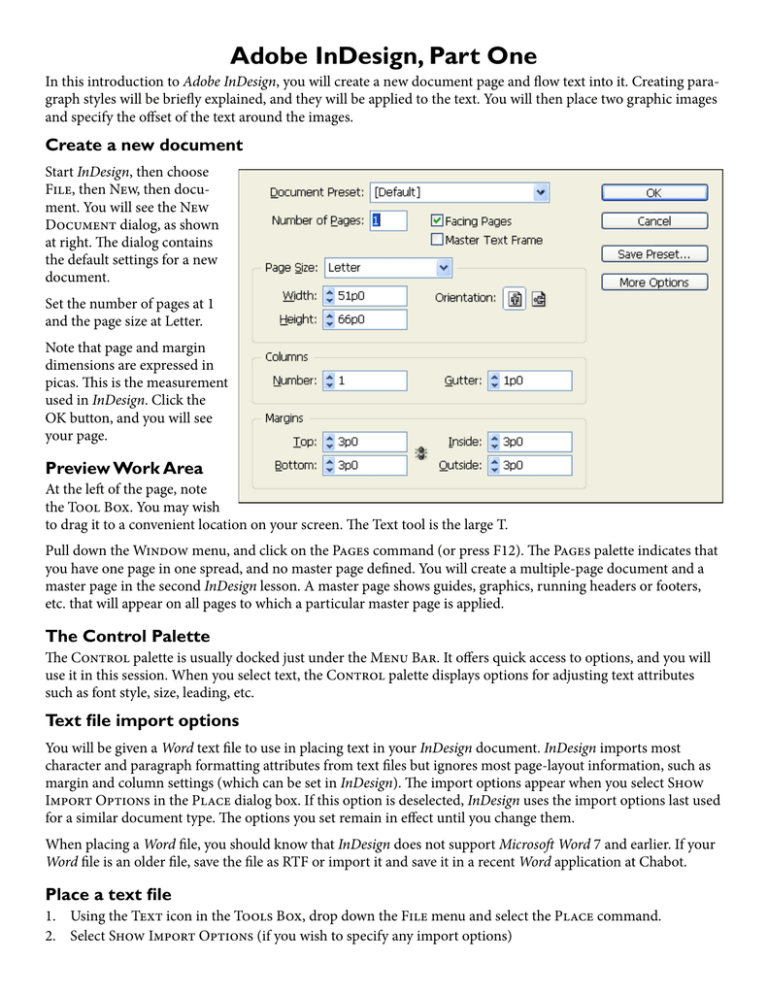
Adobe InDesign, Part One In this introduction to Adobe InDesign, you will create a new document page and flow text into it. Creating paragraph styles will be briefly explained, and they will be applied to the text. You will then place two graphic images and specify the offset of the text around the images. Create a new document Start InDesign, then choose File, then New, then document. You will see the New Document dialog, as shown at right. The dialog contains the default settings for a new document. Set the number of pages at 1 and the page size at Letter. Note that page and margin dimensions are expressed in picas. This is the measurement used in InDesign. Click the OK button, and you will see your page. Preview Work Area At the left of the page, note the Tool Box. You may wish to drag it to a convenient location on your screen. The Text tool is the large T. Pull down the Window menu, and click on the Pages command (or press F12). The Pages palette indicates that you have one page in one spread, and no master page defined. You will create a multiple-page document and a master page in the second InDesign lesson. A master page shows guides, graphics, running headers or footers, etc. that will appear on all pages to which a particular master page is applied. The Control Palette The Control palette is usually docked just under the Menu Bar. It offers quick access to options, and you will use it in this session. When you select text, the Control palette displays options for adjusting text attributes such as font style, size, leading, etc. Text file import options You will be given a Word text file to use in placing text in your InDesign document. InDesign imports most character and paragraph formatting attributes from text files but ignores most page-layout information, such as margin and column settings (which can be set in InDesign). The import options appear when you select Show Import Options in the Place dialog box. If this option is deselected, InDesign uses the import options last used for a similar document type. The options you set remain in effect until you change them. When placing a Word file, you should know that InDesign does not support Microsoft Word 7 and earlier. If your Word file is an older file, save the file as RTF or import it and save it in a recent Word application at Chabot. Place a text file 1. Using the Text icon in the Tools Box, drop down the File menu and select the Place command. 2. Select Show Import Options (if you wish to specify any import options) 3. Then double-click the file you want to import. See at the right an illustration of the bottom portion of the Place dialog. 4. Your cursor is now “loaded.” 5. Once you have a loaded type cursor, the size of your text frame is determined by the document’s column and margin settings. Simply click at the top of the column or page, and your text will flow within the text frame. If there is more text to come, you will click on the red overset text icon at the lower right of the text frame to “reload” your cursor. Then move to where you want the rest of the text to go and click at the top of the new column or new page to flow another text frame. Things to consider when flowing text If you have checked Replace Selected Item in the Place dialog box, and you have a text frame selected with your Selection Tool, the text file you are importing will replace any text selected in your document. If you have made this error, press Ctrl-Z (or Cmd-Z) immediately to restore your selected text and give you a loaded text cursor. You can cancel a loaded text cursor by choosing any tool from the Tool palette or press any tool letter shortcut. Types of Text Flow and Associated Text Flow Icons Manual text flow adds text one frame at a time. Manual text flow is used mostly for short bodies of text. This is the default text flow. See the manual text flow icon pictured at right here. Autoflow (Shift) text flow flows all the text, adding pages and frames as necessary. Autoflow functions best when working with single-column documents containing one main story. When you press the Shift key, this icon will change to an Autoflow type. See it pictured at right here. Semi-Autoflow (Alt/Option) works like manual text flow, except that the cursor is reloaded at the end of each frame, saving the trouble of having to click on the red plus symbol. You then continue the text flow by clicking or dragging to create a new text frame or clicking in an existing text frame. When you press Alt (WIN) or Option (Mac) your text flow icon will become the semi-autoflow type. See it pictured at right here. Fixed Page Autoflow (Shift-Alt/Shift-Option) flows as much text as will fit without adding pages. When you press Shift-Alt (WIN) or Shift-Option (Mac) your text flow icon will become the fixed page autoflow type. It is pictured at right. Create and attach paragraph styles to the text You will create some paragraph styles using the text you have placed in InDesign. In the next lesson, you will learn much more about creating text styles. Before you can use formatted text to create a style, you will need to learn how to format text. Format the first paragraph of text as a main heading 1. With your Text tool, select the entire first paragraph, the main heading. 2. Using the Control Palette, click the Down Arrow at the right of the Text Box (upper left) and select the typeface, Arial. 3. Using the box just beneath, click the Down Arrow at the right of the box and select Bold. 4. Pull down the Type menu and choose Character. 5. The Character Palette displays. 6. You see in the Character Palette the typeface (Arial) and the Bold attribute that you used the Control Palette to set. Use this palette to change the character point size and specify the leading. The current setting of 12 points is not large enough for the main heading. Click the Up Arrow in the top box on the left to change it to 18 or 20 points. You can see the changes in the text as you make these changes, and you can decide what point size you want the heading to be by the way the text looks on the page. 7. In the opposite box on the palette, set the leading for the characters. This sets the vertical space between the lines of text. This is not the same as setting a space after a paragraph. 8. Click the Paragraph Palette tab. 9. See a picture of the Paragraph Palette at right. 10. Your main heading is still selected. If you want it to be centered, click the second icon in the top row which illustrates centered text. 11. If you want the main heading to be separated from the body of the text by some extra space, then click the Up Arrow in the third from the top box in the right column that shows an icon with some space beneath the lines of text. As you click the Up Arrow, see the text move. Stop when you like the look of the space beneath the main heading. Create a Main Head Style and a Subhead 1 Style Follow these steps: 1. Now that your main heading is formatted, and with it selected, display the Paragraph Styles palette. 2. See the Paragraph Styles palette at the right. This is a picture of a Paragraph Styles palette that has a number of styles already created. 3. Choose New Style from the Paragraph Styles palette menu. That menu will appear when you click the very small right-pointing arrow in a small circle in the upper left of the palette. 4. The New Paragraph Style dialog box appears. 5. Type a name for the style in the Style Name field. 6. Notice that you can specify the next style for the next paragraph in this dialog box. However since you do not know at this time which style will always follow the main head, do not fill this in. 7. Click the OK button. 8. Select the next paragraph, and follow steps as above to create the Subhead 1 style. Create a Body Text Style 1. Select a paragraph of body text and format it, following the above steps in selecting the typeface (use Times New Roman), the point size, and the space after each body text paragraph). 2. A suggestion is to set in the Character palette, left-aligned text with 11-point type with leading of 13 or 14 points. 3. In the Paragraph palette, you should set space after each paragraph at 6 or 7 points. If you follow the same procedure as above, you can visualize the effect of the settings for your body text. 4. When you are finished formatting your body text, then create a body text style, as explained above. However, in the New Paragraph Style dialog, in addition to naming your style, specify the style following should be the same style. When attaching a paragraph style, simply click anywhere in the paragraph and select the desired style from the Paragraph Styles palette. Place a Graphic. You have been given two graphic files to place in your publication. You will link them to your document, using the Selection tool (top left in Tool box). Linking a graphic The default is to link the graphic to the publication. When you link a graphic, InDesign does not include the graphic file in your publication but establishes a link between the publication and the imported file and creates a low-resolution screen preview of the graphic. InDesign checks the status of your graphics when you open a document or when you switch from another application back into InDesign. As soon as it notices that a linked file is modified or missing, it displays an icon in the Links palette. At the right is a picture of the Links palette. If you have modified the graphic since you linked it in your document, you will need to update your link. If your linked graphic is no longer in the same place as it was when linked, you will need to re link the graphic. When you select a graphic, you see the location of the graphic, as illustrated in the picture at right. If, for example, you prepare an InDesign publication file and send it for printing, you will need to include all graphic files that have been linked. These files when provided for the printer may become unlinked and need re linking. Embedding the Graphic If you want to store the graphic inside the publication, select the name of the graphic in the Links palette and choose Embed from the Links palette menu. At right is a picture of a portion of the Links palette menu with the Embed File command highlighted. When you embed a graphic, InDesign displays an embedded graphic icon next to the graphic’s filename. The link to the external file is broken, and the size of your publication file increases by the size of the graphic file. If you are planning on sending your file for printing, you should talk with the printer about how you should handle your linked or embedded graphic files. Wrap text around graphic Select the graphic, then pull down the Window menu and select the Text Wrap palette. See, in the Text Wrap palette illustrated at right, the top row icons that depict how the text wraps around the graphic. In the top row, the second icon from the left is selected. It is the Wrap Around Bounding Box. This is the one to use if your graphic has a rectangular bounding box. Below the icon row, see the four boxes. The top left allows you to specify the text offset at the top, the bottom left is used to specify the text offset at the bottom. The top right is used to specify the text offset at the left of the graphic, and the one below that is used to specify the text offset from the right side of the bounding box of the graphic. Note about picas and points 6 picas = 1 inch 12 points = 1 pica 72 points = 1 inch 1 pica and 6 points are expressed as 1p6. It could also be expressed as 0p18 or 18 pt. This system of measurement allows the user of InDesign to make very precise text settings. However, if you prefer to use inches to express the dimensions of picture frames, for example, in inches, simply type the measurement (5 in) with in following the number, InDesign will do the conversion for you.

