Engineers at a manufacturing plant wish to monitor the outside... machined on a CNC turning center. The target value is... ±
advertisement
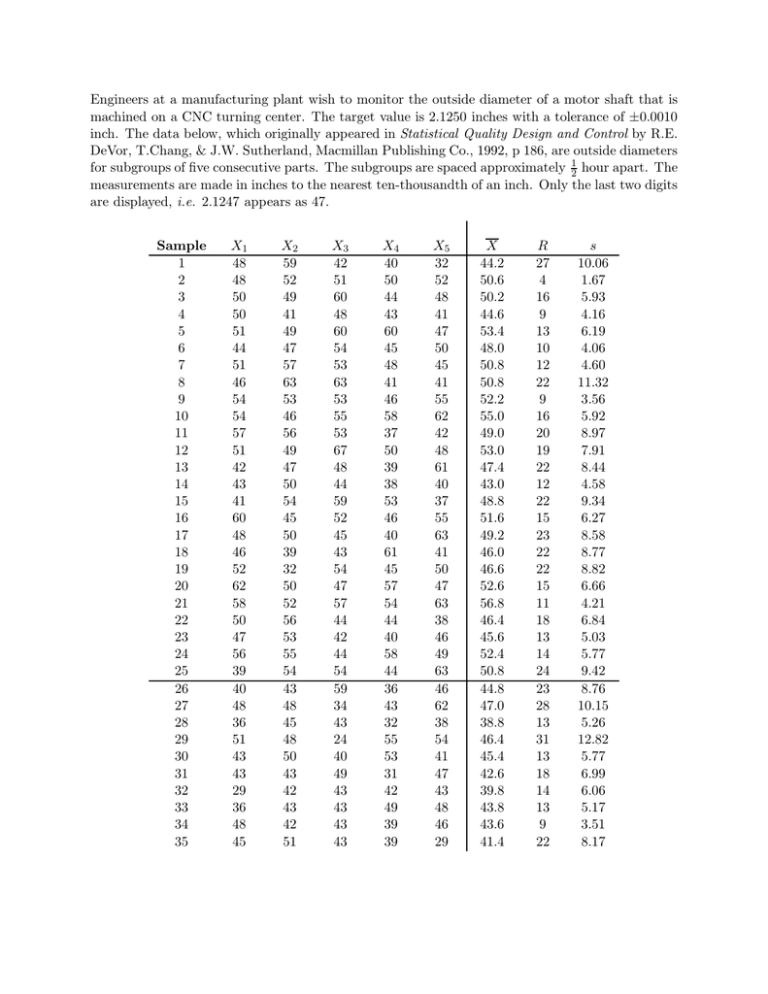
Engineers at a manufacturing plant wish to monitor the outside diameter of a motor shaft that is machined on a CNC turning center. The target value is 2.1250 inches with a tolerance of ±0.0010 inch. The data below, which originally appeared in Statistical Quality Design and Control by R.E. DeVor, T.Chang, & J.W. Sutherland, Macmillan Publishing Co., 1992, p 186, are outside diameters for subgroups of five consecutive parts. The subgroups are spaced approximately 12 hour apart. The measurements are made in inches to the nearest ten-thousandth of an inch. Only the last two digits are displayed, i.e. 2.1247 appears as 47. Sample 1 2 3 4 5 6 7 8 9 10 11 12 13 14 15 16 17 18 19 20 21 22 23 24 25 26 27 28 29 30 31 32 33 34 35 X1 48 48 50 50 51 44 51 46 54 54 57 51 42 43 41 60 48 46 52 62 58 50 47 56 39 40 48 36 51 43 43 29 36 48 45 X2 59 52 49 41 49 47 57 63 53 46 56 49 47 50 54 45 50 39 32 50 52 56 53 55 54 43 48 45 48 50 43 42 43 42 51 X3 42 51 60 48 60 54 53 63 53 55 53 67 48 44 59 52 45 43 54 47 57 44 42 44 54 59 34 43 24 40 49 43 43 43 43 X4 40 50 44 43 60 45 48 41 46 58 37 50 39 38 53 46 40 61 45 57 54 44 40 58 44 36 43 32 55 53 31 42 49 39 39 X5 32 52 48 41 47 50 45 41 55 62 42 48 61 40 37 55 63 41 50 47 63 38 46 49 63 46 62 38 54 41 47 43 48 46 29 X 44.2 50.6 50.2 44.6 53.4 48.0 50.8 50.8 52.2 55.0 49.0 53.0 47.4 43.0 48.8 51.6 49.2 46.0 46.6 52.6 56.8 46.4 45.6 52.4 50.8 44.8 47.0 38.8 46.4 45.4 42.6 39.8 43.8 43.6 41.4 R 27 4 16 9 13 10 12 22 9 16 20 19 22 12 22 15 23 22 22 15 11 18 13 14 24 23 28 13 31 13 18 14 13 9 22 s 10.06 1.67 5.93 4.16 6.19 4.06 4.60 11.32 3.56 5.92 8.97 7.91 8.44 4.58 9.34 6.27 8.58 8.77 8.82 6.66 4.21 6.84 5.03 5.77 9.42 8.76 10.15 5.26 12.82 5.77 6.99 6.06 5.17 3.51 8.17
