Document 10549202
advertisement
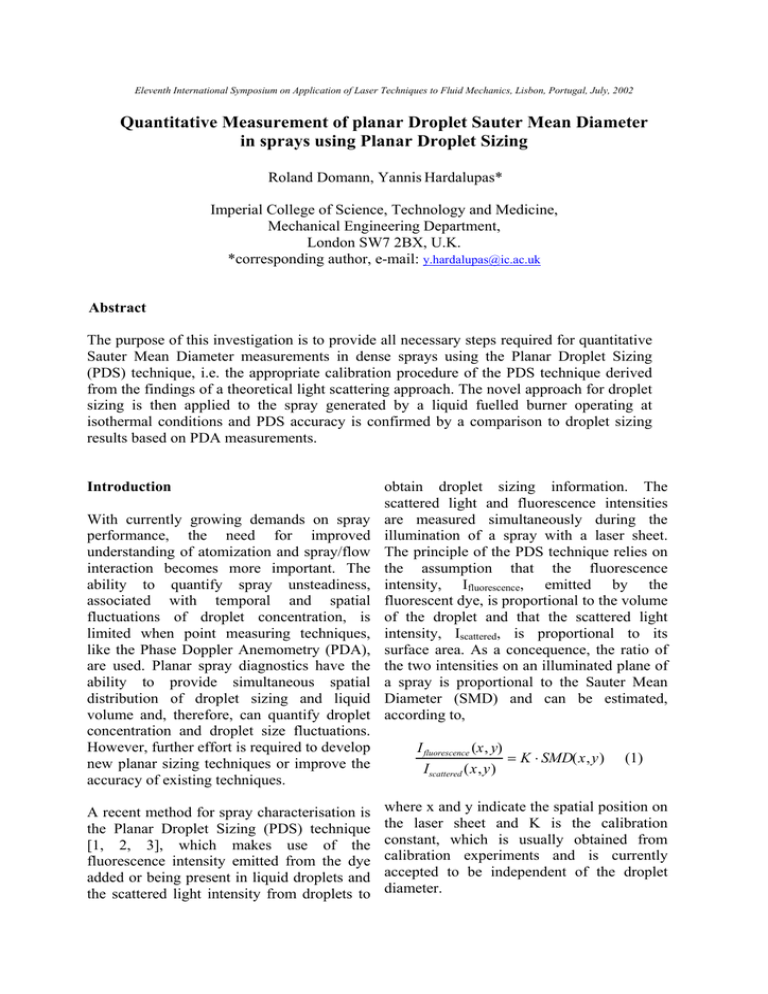
Eleventh International Symposium on Application of Laser Techniques to Fluid Mechanics, Lisbon, Portugal, July, 2002 Quantitative Measurement of planar Droplet Sauter Mean Diameter in sprays using Planar Droplet Sizing Roland Domann, Yannis Hardalupas* Imperial College of Science, Technology and Medicine, Mechanical Engineering Department, London SW7 2BX, U.K. *corresponding author, e-mail: y.hardalupas@ic.ac.uk Abstract The purpose of this investigation is to provide all necessary steps required for quantitative Sauter Mean Diameter measurements in dense sprays using the Planar Droplet Sizing (PDS) technique, i.e. the appropriate calibration procedure of the PDS technique derived from the findings of a theoretical light scattering approach. The novel approach for droplet sizing is then applied to the spray generated by a liquid fuelled burner operating at isothermal conditions and PDS accuracy is confirmed by a comparison to droplet sizing results based on PDA measurements. Introduction With currently growing demands on spray performance, the need for improved understanding of atomization and spray/flow interaction becomes more important. The ability to quantify spray unsteadiness, associated with temporal and spatial fluctuations of droplet concentration, is limited when point measuring techniques, like the Phase Doppler Anemometry (PDA), are used. Planar spray diagnostics have the ability to provide simultaneous spatial distribution of droplet sizing and liquid volume and, therefore, can quantify droplet concentration and droplet size fluctuations. However, further effort is required to develop new planar sizing techniques or improve the accuracy of existing techniques. A recent method for spray characterisation is the Planar Droplet Sizing (PDS) technique [1, 2, 3], which makes use of the fluorescence intensity emitted from the dye added or being present in liquid droplets and the scattered light intensity from droplets to obtain droplet sizing information. The scattered light and fluorescence intensities are measured simultaneously during the illumination of a spray with a laser sheet. The principle of the PDS technique relies on the assumption that the fluorescence intensity, Ifluorescence, emitted by the fluorescent dye, is proportional to the volume of the droplet and that the scattered light intensity, Iscattered, is proportional to its surface area. As a concequence, the ratio of the two intensities on an illuminated plane of a spray is proportional to the Sauter Mean Diameter (SMD) and can be estimated, according to, I fluorescence (x, y) Iscattered (x,y) = K ⋅ SMD(x,y) (1) where x and y indicate the spatial position on the laser sheet and K is the calibration constant, which is usually obtained from calibration experiments and is currently accepted to be independent of the droplet diameter. The Planar Droplet Sizing technique has been evaluated theoretically and experimentally by calculating and measuring droplet internal fluorescence intensity distribution and fluorescence and scattered light intensities in the far field for different droplet diameters [4, 5, 6]. These studies quantified the effects of dye concentration in the liquid, optical parameters and liquid refractive index and provided guidelines for the selection of the above parameters for improved sizing measurements with the PDS technique. The current work extends the experimental and theoretical analysis to evaluate the sizing accuracy of the PDS technique. The findings of the theoretical analysis establish the sizing uncertainty and suggest a novel approach to improve the accuracy of planar Sauter Mean Diameter measurement in sprays. The novel approach will be demonstrated by measurements in a spray, which are compared to droplet sizing results from Phase Doppler Anemometer (PDA). Theoretical evaluation of droplet sizing accuracy The theoretical approach makes use of the geometrical optics approximation [7] to calculate the scattered light and the fluorescence light emitted by a droplet, following the approach reported in [4, 5, 6], which has been successfully compared with Mie theory in [8]. The intensity of the light scattered by a sphere located in a single laser beam was calculated with the geometrical optics approach with proper account of the phases between surface reflection, refraction, 1st and 2nd internal reflection. The fluorescence intensity emitted due to absorption over a specific pathlength b within a liquid of dye concentration c is denoted by Eq. 2, where the quantum efficiency φ is multiplied with the term describing the absorbed light over a pathlength b [9]. This term comprises the intensity i0 at the beginning of the absorbing path and the molar extinction coefficient ε , which is fixed to a value of 8800 m2/mol corresponding to if ( x,τ ) = φ i0 (1 − e ε b c ) (2) the dye - Rhodamine 6G - used in the experimental work. In order to use this approach to calculate fluorescence intensity emitted by a droplet, it is necessary to determine the light absorbed over the distances within the sphere covered by refracted, 1st and 2nd internally reflected rays associated with all the possible rays of incident light interacting with a droplet. Using this approach, an approximation of the real averaged intensities captured on the array of pixels of the CCD camera is obtained. The proportionality of scattered light and fluorescence intensities vs. droplet diameter can then be evaluated by profiles such as shown in Fig. 1.2. Provided that the fluorescence and Mie-scattering intensity profiles and the dependence of the corresponding D3 and D2 proportionality on different experimental parameters are known, the impact of different calibration parameters on the SMD accuracy of a virtual measurement can be investigated. This was achieved following the approach illustrated in Fig. 1.1-7, which consists of two steps. First, the error introduced to the measured SMD by determining the calibration constant K of equ. (1) by fitting the intensity profiles to follow I=a·Db function is analysed. An investigation on the impact of Mie-scattering intensity fluctuations with droplet diameter and deviations from a constant value of the proportionality K for small droplet diameters on the accuracy of virtual SMD measurements follows. The geometrical optics approach [7] was extended to calculate the overall scattered and fluorescence intensities from all the droplets present in various droplet size distributions with known Sauter Mean Diameter, which were generated assuming a Rosin-Rammler distribution function (Fig. 1.1). The function parameters varied in order Figure 1: Schematic description of the droplet sizing accuracy analysis. to obtain wide variation of droplet size spread and Sauter Mean Diameters. The resulting scattered and fluorescence intensities were used to estimate the corresponding intensity ratios. Eq. (1) was then applied to calculate the required value of the calibration constant K (Fig. 1.4), so that the calculated intensity ratios could be converted to the value of the Sauter Mean Diameter of the assumed droplet size distribution (Fig. 1.5). In this way, the current assumption of independence of the calibration value of K from droplet diameter could be evaluated. Application of Planar Droplet Sizing The Planar Droplet Sizing technique and the phase Doppler technique were applied to size droplets in a spray produced by a atomiser, which injected liquid on the centreline of an industrial burner, as shown in the schematic of Fig. 2. The air-assisted pressure swirl atomiser produces a hollow cone spray of 60 degrees cone angle. This atomiser is part of a gun-type burner, of 98 mm outer diameter, with a mounted baffle plate that introduces a swirling component to the co-flowing air stream. The fluorescence and scattered light measurements were taken under the following experimental conditions. Water was injected at a pressure of 0.7 MPa, corresponding to a flow rate of 9.46 l/h, the air flow rate was set to 110 Nm3 h-1. The combination of nozzle and baffle plate generates a central recirculation zone, which in the combusting case is used to stabilize the flame. For laser induced fluorescence measurements, Rhodamine dye was added to the atomised water at an a concentration of 0.0089 g/l that was appropriate to ensured liquid volume proportionality of the fluorescence intensity signal. In order to obtain planar scattered light and fluorescent light signals, a cross-section of the spray is illuminated by a laser sheet of less than 1 mm thickness formed with the beam of a dual cavity Nd:Yag laser (SP PIV-400) at 532 nm wavelength, providing an energy of 400 mJ per pulse. The intensity signals were captured by two CCD cameras (TSI PIVCAM 10-30) of 1000 x 1016 pixel arrays that were placed perpendicular to the laser sheet to avoid optical distortions of the images. While both cameras were fitted with lenses of 60 mm focal length (f/\#=4), an optical filter (Omega Optical XF3019605) with a total bandwith of 50 nm centered on 615 nm was placed into the optical path of the camera set to capture the fluorescence signal removing the scattered light and allowing only the fluorescence signal at around 590 nm to pass. Since the fluorescence signal is some orders of magnitude weaker than the scattered light, a high speed gated image intensifier unit (Hamamatsu C6653) was fitted on the fluorescence capturing camera. The isothermal flow field corresponding to our experimental conditions was determined by Zimmer et al [11] using Phase Doppler measurements. Results and Discussion (a) Infuence of Diameter Exponents bs, bf On the basis of a set of 620 different droplet size distributions, such as shown in Fig. 1.1, the error introduced in the SMD measurement by calibrating the constant K from a fit of the fluorescence and scattered light profiles to functions of the form I=a · Db is investigated, and the values of bs, bf providing a minimum error are determined. The SMD error that can be expected if the parameters as, af, bs, bf are allowed to float freely in the fitting routine was investigated first. The sizing error was defined according to Fig. 1 as the difference between SMDreal and SMDfit, with the real SMD directly obtained for each of the reference distributions of Fig. 1.1, representing the value which should ideally be obtained in the virtual measurement. SMDfit is the value resulting from the virtual measurement, including the effects of K calibration, and is, therefore, dependent on the as, af, bs, bf parameters. Consequently, the differences between SMDreal and SMDfit obtained from this analysis shows the dependence of SMD accuracy on the diameter exponents assuming the PDS system measures the intensities described by the fitted profiles, i.e. no fluctuations on the intensity profiles. The profiles of SMD error presented in Fig. 3 Figure 3: .Profiles of SMD error, showing impact of variations in the diameter exponents over scattering angle on the sizing accuracy error with SMD that can be seen for a single profile. (b) Infuence of Calibration Coefficient K Knowing the ideal diameter exponents that provide the correct SMD value for any size distribution and assuming a constant value of K and no fluctuations in the Mie-scattering intensity, the impact that a deviation of K from the value obtained by calibration on the accuracy of the SMD measurement can be analysed. The error on K was defined according to Fig. 4 as the difference between Kfit=af / as, the constant value obtained from fitting the profiles to functions a·Db using the ideal diameter exponents, and Kreal (q0), which is calculated individually for each distribution using the real emitted according to Fig. 4, resulting from integration of the Is(D), If(D) profiles over the droplet size distribution. On the basis of the real integrated intensity values and the known SMDreal for each size distribution, which should result from an ideal PDS measurement, the required Kreal(q0) for the individual distributions is determined. were calculated for a fluorescent dye concentration of 0.001 g/l and Mie-scattering profiles at 60o, 80o, 90o scattering angles corresponding to the profiles of a water droplet and weak absorption. For a fixed fluorescence exponent of bf=2.996, the profiles show a clear dependence of the accuracy on the Mie-scattering exponent. The SMD error becomes larger with increasing deviation from the ideal value bf=2, assumed for PDS processing, leading to errors up to 13% for bf=1.972 exponent. This result shows that the accuracy of the measured SMD is very sensitive to the calibration process that determines the diameter exponents, a slight deviation of 1.5% in the Mie-scattering exponent being magnified to a maximum 13% SMD error. Given the definition of the SMD as the ratio Figure 4: (a) Values of calculated calibration constant of droplet volume to surface area, this K of equ. (1) with superimposed constant K value sensitivity can be explained by the fact that obtained from experimental calibration with in case of a deviation in any of the two monodisperse droplets. exponents the measured parameter is no Figure 4 presents the calculated value of the longer the SMD. Accordingly, the impact of calibration constant Kreal (q0) as a function of an exponent inaccuracy increases with the Sauter Mean Diameter of the assumed droplet diameter, resulting in the increase of droplet size distribution and shows that its value depends on the droplet diameter, which is not in agreement with current assumptions in the literature. The literature has always assumed that the value of K is independent of droplet diameter and is evaluated by a calibration experiment, preferably using monodisperse droplets. Figure 4 also indicates the value of Kfit obtained from such calibration, which is constant and larger than the calculated values and the deviation between the calculated and experimental values of K increases with decrease of droplet diameter. The constant value Kfit corresponds to the value obtained from calculations for a 200 µm droplet diameter and the calculations indicate that for large Figure 5: Example of size distributions used for the analysis. droplet diameters the value of K becomes independent of droplet diameter. value of K for all droplet diameters. One component is a systematic deviation of the value of K from the constant value Kfit, which increases for small values of SMD, and is identified by the red line on figure 4. The second component is associated with deviations from the systematic value of K. These two components determine the sizing error of current PDS measurements. Figure 5 indicates the errors of the measured SMD, when a constant value of K is assumed, as a percentage deviation from the real value of SMD for each droplet size distribution. The origin of these two deviations from a constant value of K is as follows. For small droplet diameters, the scattered light intensity does not remain proportional to the droplet surface area (i.e. diameter squared) leading to the systematic deviation of the K value for small diameters. The deviations of the K value from the systematic value are due to fluctuations of the scattered light intensity around a mean value for small droplet sizes (see [12]). The results show that the large deviations of the K value away from the systematic value are associated with narrow droplet size distributions (nearly monodisperse droplets) with small droplet diameters, as indicated by the large errors in SMD values for narrow distributions of small droplet diameters in figure 5. However, a large contribution of this error is due to the systematic component. Since the droplet size distributions in sprays are spread over a wide range of diameters, the results indicate that the influence of the fluctuations on the K value does not exceed a deviation of around 10% and the main contribution to sizing errors is due to the systematic component. The black dots in Figure 4 indicate the calculated value of Kreal (q0) for different size distributions. The continuous (red) line represents a polynomial fit on the calculated values and the stars with the associated letters (a, b, c…) indicate the calculated Kreal value for the corresponding droplet size (c) Correction of Sytematic K Deviation distribution plotted in figure 5. After determining the origin of the two Fig. 4 identifies two components in the components of error sources on the sizing resulting values of K, which contribute to accuracy of PDS, a new approach for sizing errors in the current approach of the improvement of sizing measurements was PDS technique, which assumes a constant identified. Fig. 6 shows the suggested approach, which includes an iterative correction method that accounts for the systematic deviation of the calibration constant K for small droplet sizes. The proposed method estimates the first value of SMD from the value of Kfit, established from a calibration experiment, which is assumed constant for all droplet diameters. The first estimate of SMD is corrected using the curve associated with the systematic deviation of the value of K, which was established from the calculations of figure 4. An iterative procedure is followed, as indicated in figure 6, which leads to a new value of SMD and this process is repeated till the SMD value has converged. This value of SMD represents the corrected size measurement, which reduces the SMD errors to below 10% for all droplet size distributions. Figure 6: Iterative K correction method developed to account for deviations from the measured calibration constant. (d) Quantitative Planar Droplet Sizing Following appropriate choice of dye concentration, angular position of the cameras and droplet density within the spray, calibration of the entire system using the fluorescence and scattered light signals from droplets of a known size is necessary in order to obtain quantitative measurements of liquid volume, droplet surface area and Sauter Mean Diameter (SMD). The proportionality constant Kfit of our experimental setup was determined using droplets of monodisperse size D=120 µm droplets, produced by a vibrating orifice type droplet generator with a 50 µm pinhole, operating at liquid flow rate of 50 ml/h and excitation frequency of 15 kHz. The new sizing approach was subsequently applied to PDS measurements in a polydisperse spray generated by a pressure swirl atomizer, injecting the droplets in the air flow of an industrial burner. Phase Doppler Anemometer (PDA) measurements were used as an independent evaluation of the improvements of the new sizing procedure. Results of quantitative Planar Droplet Sizing are presented in the plots of Fig.7 on the basis of the mean intensity ratio of 800 instantaneous images, showing good agreement with the superimposed SMD profiles of PDA measurements and emphasizing the importance of K correction. All profiles measured by corrected PDS show SMD increase, a maximum peak and a subsequent decrease of SMD with increasing radial distance x=0 to 50mm. This maximum becomes flatter and moves radially outwards with increasing axial distance z from the nozzle. The corresponding SMD profiles obtained from PDA measurements show a similar droplet size increase with increasing radial distance with comparable slope as the PDS, however, with further radial distance the measured SMD does not decrease at larger axial distances z>50mm from the nozzle. In addition, the uncorrected PDS profiles show large differences to the PDA measurements over the entire range of axial distances. It should be noted that there is a large difference in the total sampling time used for PDS and PDA measurements, which has a significant impact on the SMD measurements in the low volume flux region at the outer edges of the spray cone. On the basis of a laser pulse duration of 10 ns and 800 images, the sampling time of the presented PDS results is ~4 ms, much lower than the 3 minutes time limit that was set for the PDA measurements. In regions with low volume flux the limited sampling time of the PDS system is not long enough to provide the correct SMD, since larger droplets that, in our case, appear only occasionally are not likely to be considered, leading to an underestimation of the SMD values at the The profiles in Fig.7(a) show the results from PDA and PDS measurements at z=29mm from the nozzle exit. Good quantitative agreement is found on the slope of increasing SMD in radial direction and, in this case, also for the value of the SMD maximum measured at x=18mm due to advanced atomization. At radial positions 20<x<37mm the values measured with PDA are higher than the PDS results, which can again be explained by the combination of short sampling time in the PDS measurements and low volume flux in these regions of the spray. This region spreads in radial direction due to the droplet size dispersion effects at z=29mm, corresponding to the lower edge of recirculation zone. For the same reason, the subsequent region of good agreement where the recirculation zone has still a considerable influence is small starting at x>38. At an axial distance z=41mm, the recirculation zone is not expected to affect the local size distribution anymore, which is confirmed by the profiles shown in Fig. 7(b). Again, quantitative agreement is found on the slope of increasing SMD in the 0<x<22mm region, however, a difference of 10 mm is found in the radial position of the SMD maximum determined with each technique. In this case, the results from PDS underestimate the SMD in the entire region x>20 due to the low volume flux and the flat size distributions at this positions in the spray, which make it necessary to measure Figure 7: Quantitative PDS profiles compared to PDA for a longer time to obtain the correct results, showing good agreement and importance of K contributions of large sizes. Compared to correction. Fig. 7(a), the influence of the recirculation edges of the spray. zone is small and cannot produce a region void of large droplets. This is confirmed by This discrepancy is not caused by an inherent the PDA profile, which shows a slight problem with the PDS technique, since a decline of the SMD, but provides high values better agreement with PDA results could be even at the outer radial positions. easily achieved by a longer time sampling time, meaning a larger number of PDS Conclusions images. A detailed comparison of the single profiles at 29 and 41 mm from the nozzle The results presented in this article confirm obtained from PDA and PDS measurements that accurate, quantitative information can be follows. obtained from Planar Droplet Sizing if careful image pre-processing is applied, the concentration’, Appl. Opt., 40, 3586-3597 correct dye concentration is chosen and the (2001) calibration is adapted according to the 5. Domann R., Hardalupas Y., ‘A study of characteristics of the scattered and parameters that influence the accuracy of the fluorescence light dependence on droplet Planar Droplet Sizing technique’, Part. Part. diameter. Considering these parameters, the Syst. Char., 18, 3-11 (2001) measured SMD in a spray from a pressure 6. Domann R., Hardalupas Y., ‘Evaluation of swirl atomiser using a new data processing the Planar Droplet Sizing (PDS) technique’, scheme of the PDS images was compared 8th ICLASS, Pasadena, USA (2000) with PDA measurements with good 7. Van de Hulst, H.C., Light Scattering by agreement over a wide droplet size range. Small Particles, Dover Publications, (1957). 8. Domann R., Hardalupas Y. and Jones A.R. ‘A study of the influence of absorption on the spatial distribution of fluorescence intensity within large droplets using Mie theory, geometrical optics and imaging experiments’. Meas. Sci. and Techn., 13, pp. 280-291, (2002). Guilbault, G.G., Practical Fluorescence Theory, Methods and Techniques, Marcel Dekker, (1973). 10. Y. Ikeda, N. Kawahara, T. Nakajima, "Flux measurements of O2, CO2 and NO in an oil furnance", Meas. Sci. Technol. 8, 826-832 (1994). 11. Zimmer L., Ikeda Y., Domann R. and Hardalupas Y. (2002). ‘Simultaneous LIF and Mie scattering measurements for branchlike spray cluster in industrial oil burner’. AIAA 02-0349. Accepted for presentation at the 40th Aerospace Sciences Meeting & Exhibit, Jan. 14-17, Reno, Nevada, USA. 12. Domann R. “Characterisation of spray unsteadiness”, PhD thesis, University of London, (2002). Acknowledgements The authors would like to acknowledge support from EPSRC (grant GR/L87712) and thank Prof. Y. Ikeda and Dr. Zimmer from Kobe University in Japan, where the spray measurements were obtained. 9. References. 1. Yeh C.-N., Kosaka H., Kamimoto T., ‘A fluorescence / scattering imaging technique for instantaneous 2-D measurements of particle size distribution in a transient spray’, Proc. 3rd Congr. on Opt. Part. Sizing, Yokohama, Japan, 355 -361 (1993) 2. Sankar S.V., Mahler K.E., Robart D.M., ‘Rapid characterization of fuel atomizers using an optical patternator’, J. Eng. Gas Turb. Power, 121, 409 - 414 (1999) 3. P. LeGal, N. Farrugia, D. A. Greenhalgh, "Laser sheet dropsizing of dense sprays", Optics and Laser Techn. 31, 75-83 (1999). 4. Domann R., Hardalupas Y., ‘Spatial distribution of fluorescence intensity within large droplets and its dependence on dye Figure 2: Experimental setup used for spray unsteadiness investigation by PDS measurements, consisting of atomiser, laser illumination system and CCD cameras.
